New_category: Technical Information

Technical Information

  • How Does a Piezo Switch Work?

    How Does a Piezo Switch Work?

    [vc_row][vc_column][vc_column_text css=””]

    How Does a Piezo Switch Work?

    [/vc_column_text][/vc_column][/vc_row][vc_row][vc_column][vc_column_text css=””]Piezo switches have become a popular alternative to traditional plastic, as well as membrane, switches in recent years. Defined by their piezoelectric mechanics, they are durable, long-lasting and available in custom designs. While piezo switches can open and close a circuit — just like all other electrical switches — they are unique in several ways. For a better understanding of piezo switches and how they work, keep reading.[/vc_column_text][/vc_column][/vc_row][vc_row content_placement=”middle”][vc_column width=”1/2″][vc_column_text css=””]

    An Introduction to Piezo Switches

    Also known as a piezoelectric switch, a piezo switch is a relatively new type of electrical switch that’s characterized by its piezoelectric method of operation. You can find them in keypads, human machine interfaces (HMIs) and other circuit-based input devices. Piezo switches feature one or more buttons that, when pressed, will open or close a corresponding circuit.[/vc_column_text][/vc_column][vc_column width=”1/2″][vc_single_image image=”11181″ img_size=”full” alignment=”right” css=””][/vc_column][/vc_row][vc_row content_placement=”middle”][vc_column width=”1/2″][vc_single_image image=”7296″ img_size=”full” alignment=”center” css=””][/vc_column][vc_column width=”1/2″][vc_column_text css=””]

    The Mechanics of a Piezo Switch

    Although there are many types of piezo switches, they all use the same method of operation. For a switch to be considered piezo, it must use a piezoelectric element. The piezoelectric element is responsible for generating a voltage that opens or closes a corresponding circuit. When you press a button, the piezoelectric element will generate a voltage. This voltage will then open or close the corresponding circuit.

    Piezoelectric elements are components that generate a voltage in response to mechanical stress. Pressing a button will create mechanical stress. This mechanical stress will essentially squeeze the piezoelectric element so that it creates electricity, which in turn opens or closes the corresponding circuit.[/vc_column_text][/vc_column][/vc_row][vc_row content_placement=”middle”][vc_column width=”1/2″][vc_column_text css=””]

    Piezo Switch Benefits

    Piezo switches offer several benefits. Since they don’t have moving parts, they typically last longer than other types of switches. Some piezo switches, in fact, can last for over 50 million actuations.

    Another benefit of piezo switches is protection from moisture and contaminants. Most switches are susceptible to damage when exposed to water, liquids or other contaminants. When moisture or contaminants enters a switch’s circuity, it can cause permanent damage that renders the switch inoperable. Fortunately, this isn’t a concern with piezo switches. They feature a completely sealed design that protects against the intrusion of moisture and contaminants.

    Because they are sealed, piezo switches are easy to clean. You can clean the buttons on a pizeo switch without fear of damaging its underlying circuits or other components.

    Piezo switches are also customizable. You aren’t restricted to choosing a piezo switch in a standard design. Rather, you can customize the design to achieve the perfect piezo switch for your business’s needs.[/vc_column_text][/vc_column][vc_column width=”1/2″][vc_single_image image=”12834″ img_size=”full” alignment=”center” css=””][/vc_column][/vc_row][vc_row][vc_column][vc_row_inner][vc_column_inner width=”1/3″][vc_single_image image=”9971″ img_size=”large” alignment=”center”][vc_column_text css=””]

    30mm Piezo Switch

    [/vc_column_text][/vc_column_inner][vc_column_inner width=”1/3″][vc_single_image image=”9960″ img_size=”large” alignment=”center”][vc_column_text css=””]

    19mm Piezo Switch

    [/vc_column_text][/vc_column_inner][vc_column_inner width=”1/3″][vc_single_image image=”9972″ img_size=”large” alignment=”center”][vc_column_text css=””]

    22mm Piezo Swtich

    [/vc_column_text][/vc_column_inner][/vc_row_inner][/vc_column][/vc_row][vc_row][vc_column][vc_column_text css=””]

    Applications of Langir Piezo Switches

    [/vc_column_text][/vc_column][/vc_row][vc_row][vc_column][vc_single_image image=”13373″ img_size=”full” css=””][/vc_column][/vc_row][vc_row][vc_column][vc_zigzag]

    Get Custom Quote
    We’ll get back to you within 12 hours.
    Drag & Drop Files, Choose Files to Upload You can upload up to 3 files.
    [/vc_column][/vc_row][vc_row][vc_column][vc_zigzag][/vc_column][/vc_row]

  • Light Pipe Technology & Applications

    Light Pipe Technology & Applications

    [vc_row][vc_column][vc_column_text]

    Light Pipe Technology & Applications

    [/vc_column_text][vc_gallery interval=”3″ images=”9297,9296,9265,9258″ img_size=”1200×400″][vc_column_text]Light pipes might seem straightforward, but they fulfill a critical role in electronic equipment design; their use can simplify PCB layout, ease the job of the human factors engineer, and allow for a more compact design.

    This article will discuss the function of light pipes, the technology behind them, the underlying physics, and the choices and options available to the equipment designer.[/vc_column_text][/vc_column][/vc_row][vc_row][vc_column width=”1/4″][vc_row_inner][vc_column_inner el_class=”side_content pinned” css=”.vc_custom_1681437177262{background-color: #ffffff !important;}”][vc_column_text]

    Table of contents

    [/vc_column_text][vc_column_text]

    [/vc_column_text][/vc_column_inner][/vc_row_inner][/vc_column][vc_column width=”3/4″][vc_column_text]

    What is a light pipe?

    [/vc_column_text][vc_column_text]A light pipe is a solid transparent plastic rod or an optical fiber used for transmitting light from a board-mounted LED to another location where it can conveniently be viewed, such as an indicator panel of an electronic module.

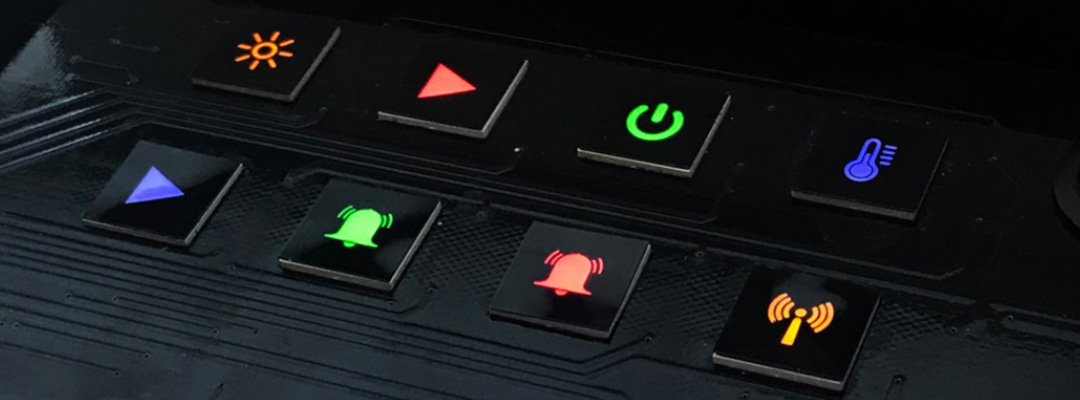
    They offer several benefits, including clean status indication and simpler human factors engineering. The non-conductive light path requires no solder or crimped terminations and eliminates the potential of electrical shorts due to pinched wires; no solder or crimp terminations are needed.

    Light pipes are critical components in many modern electronics applications. Adding a light pipe is a cost-effective solution to help eliminate many of the steps otherwise required to transport light from one place to another.[/vc_column_text][vc_column_text]

    How are they used?

    [/vc_column_text][vc_column_text]Light pipes have applications in various industries.[/vc_column_text][vc_column_text]Depending on the equipment and the design of the user interface of a device, a product can require more than one — and up to many — indicators. For designs that require multiple indicators, light pipes are an ideal solution due to their low cost, excellent visual communication and design flexibility.[/vc_column_text][vc_row_inner][vc_column_inner width=”1/3″][vc_single_image image=”9139″ img_size=”400×270″ alignment=”center”][vc_column_text]

    Healthcare

    In healthcare, LED Indication and Illumination solutions enable crucial Human Machine Interface (HMI) designs in a range of medical technology applications.

    Medical applications for light pipes include:

    • Connected life technologies
    • Medical disposable devices
    • Medical smart devices
    • Medical human machine interface

    [/vc_column_text][/vc_column_inner][vc_column_inner width=”1/3″][vc_single_image image=”9137″ img_size=”400×270″ alignment=”center”][vc_column_text]

    Industrial automation & control

    Light pipes help ensure safety, reliability, and compliance in harsh environments such as those found in industrial operations. Integrated indication and illumination technologies improve manufacturing floor monitoring to safeguard assets from hazardous conditions.

    Industrial applications include

    • Industrial machinery controls
    • Digital factories
    • Industry 4.0
    • Intelligent buildings

    [/vc_column_text][/vc_column_inner][vc_column_inner width=”1/3″][vc_single_image image=”9138″ img_size=”400×270″ alignment=”center”][vc_column_text]

    EV, autonomous & automotive, transportation

    Light pipes support the LED Indication and Illumination requirements of this rapidly expanding market that encompasses electric vehicles and their charging infrastructure, as well as non-automotive transportation.

    Transportation applications include:

    • Electric vehicles
    • Autonomous vehicles
    • Connected transportation
    • Hybrid & electric mobility

    [/vc_column_text][/vc_column_inner][vc_column_inner width=”1/3″][/vc_column_inner][vc_column_inner width=”1/3″][vc_single_image image=”9136″ img_size=”400×270″ alignment=”center”][vc_column_text]

    Renewable energy

    Light pipes enable reliable operation in the harshest of conditions. Water, extreme temperatures, and vibration demand that product designs conform to strict regulatory ISO guidelines.

    Light pipes are used in multiple areas:

    • Wind power
    • Solar power
    • Greenhouse operations
    • Agriculture

    [/vc_column_text][/vc_column_inner][vc_column_inner width=”1/3″][vc_single_image image=”9135″ img_size=”400×270″ alignment=”center”][vc_column_text]

    Communications

    As part of the expanding infrastructure driving worldwide connectivity, light pipes direct light throughout complex systems: from servers and edge computing, to data centers and 5G system infrastructure.

    Sample applications in communications include:

    • Data centers
    • Cloud computing
    • Storage
    • 5G/IoT

    [/vc_column_text][/vc_column_inner][/vc_row_inner][vc_column_text]

    How they work

    [/vc_column_text][vc_column_text]A light pipe is placed very closely to an LED light source on one end of a PCB board. Its optical-grade materials help carry the rays of light to the desired destination, typically at the user interface of a device. Light pipes transmit roughly 80 to 90 percent of the light from the LED source, depending on design and spacing. The closer the light pipes are to the LED(s), the more efficiently they can transfer light. Of course, the light pipe(s) used will need to be rated for the same amount of heat that is produced by the LED or light source, so that must be a design consideration as well that can dictate the minimum allowable distance between the light pipe and the light source.[/vc_column_text][vc_single_image image=”9586″ img_size=”1200×350″ alignment=”center”][vc_row_inner][vc_column_inner][vc_column_text]

    Refractive Index: Medium Matters

    [/vc_column_text][vc_column_text]Light doesn’t always behave the same way, which makes light pipe design that much more complex. Why?

    Let’s go back to physics class and learn about refraction.

    Refraction is defined as the change in direction of a wave from one medium to another or from a gradual change in the medium itself.

    So, in addition to all the other variables that go into light pipe design (size, shape, brightness, distance to LED, viewing angle, and material used, to name a few), designers must also consider the Refractive Index.

    The Refractive Index is used to determine how fast light travels through a medium.

    Calculated as n = c/v, c is the speed of the light and v is the velocity of the light in that specific medium.

    This number represents how much of the light is bent or refracted when it hits the medium. It also calculates how much light is reflected when reaching the medium.

    In a vacuum, light breaks at a rate of 1.0. But no one designs light pipes to be used in this type of vacuum, so additional consideration must be given to optimize performance.

    Plus, any number above 1.0 shows the decreased speed at which it travels compared to in a vacuum.[/vc_column_text][/vc_column_inner][vc_column_inner][vc_column_text]

    Refractive Indices:

    [/vc_column_text][/vc_column_inner][vc_column_inner width=”1/3″][vc_single_image image=”9589″ img_size=”full” alignment=”center”][vc_column_text]Air, the rate is 1.003[/vc_column_text][/vc_column_inner][vc_column_inner width=”1/3″][vc_single_image image=”9590″ img_size=”full” alignment=”center”][vc_column_text]Water, the rate is 1.33[/vc_column_text][/vc_column_inner][vc_column_inner width=”1/3″][vc_single_image image=”9591″ img_size=”full” alignment=”center”][vc_column_text]Acrylic, which is what most light pipes are made of — it’s ~1.49.[/vc_column_text][/vc_column_inner][vc_column_inner][vc_column_text]Refractive Index isn’t the only number that needs to come into play when it comes to how a surface affects light.

    There’s also total internal reflection (TIR), which is the angle at which light is reflected when none of it shines through to a surface exit, instead it is reflected from one surface to another where it is visible.[/vc_column_text][vc_single_image image=”9593″ img_size=”full” alignment=”center”][vc_column_text]

    Source: https://www.physicsclassroom.com/class/refrn/Lesson-3/Total-Internal-Reflection

    [/vc_column_text][vc_column_text]TIR is a phenomenon that occurs when the angle of incidence is greater than a certain limiting angle, referred to as the critical angle.[/vc_column_text][vc_single_image image=”9170″ img_size=”full” alignment=”center”][vc_column_text]

    Why does TIR matter in light pipe design?

    [/vc_column_text][vc_column_text]Often, light pipes are used to guide light around corners. To help ensure that the light bounces at the critical angle and travels to the endpoint with maximum effectiveness, understanding the critical angle of various materials is essential.[/vc_column_text][vc_single_image image=”9594″ img_size=”full” alignment=”center”][vc_column_text]For clear polycarbonate, the critical angle is 39, and for acrylic, it’s 42.
    Understanding how the light reacts in different scenarios will lead to better, more optimized light pipe performance.
    For example, when using a right-angle light pipe, here’s how TIR would affect the specifications:[/vc_column_text][vc_single_image image=”9595″ img_size=”full” alignment=”center”][vc_column_text]When designing light pipes, most people assume light behaves like electric current and ignore TIR.

    Because light has unique properties, designing a light pipe like the right-angle illustration shown above will result in significant light loss at the TIR. To avoid light loss, incorporate the critical angle to create a geometry to guide the light around the critical angle without having the light escape. This concept also applies to light pipes with round corners (or any geometry your design includes).[/vc_column_text][/vc_column_inner][/vc_row_inner][vc_column_text]

    Light pipe categories

    [/vc_column_text][vc_column_text]Two types of light pipes are commonly used: rigid and flexible pipes.[/vc_column_text][vc_single_image image=”9258″ img_size=”1200×350″ alignment=”center”][vc_column_text]

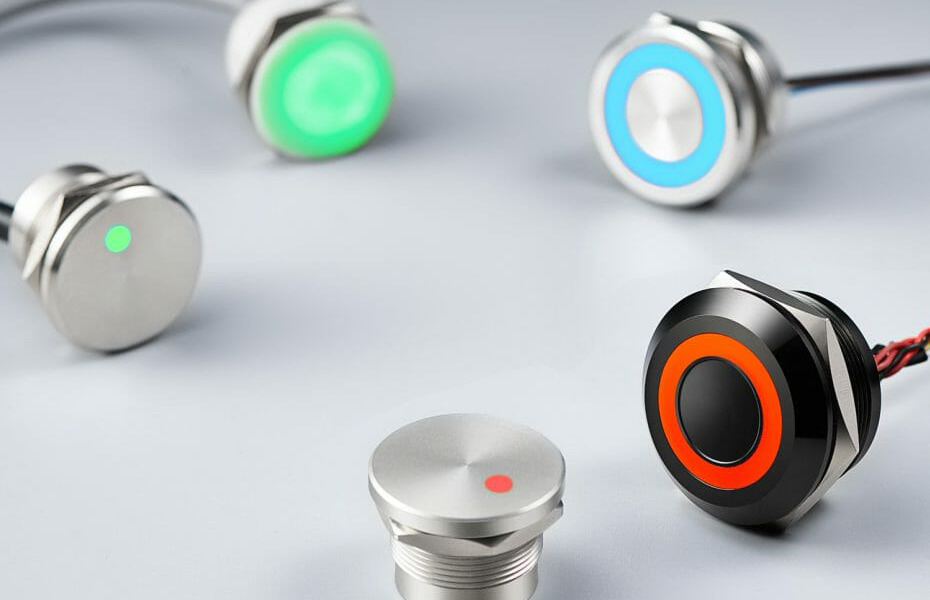
    What is a rigid light pipe?

    [/vc_column_text][vc_row_inner][vc_column_inner width=”1/4″][vc_single_image image=”9583″ img_size=”full” alignment=”center”][/vc_column_inner][vc_column_inner width=”3/4″][vc_column_text]A rigid light pipe is designed to carry light shorter distances in moderate to high vibration conditions and in damp or dusty environments. Rigid light pipes are available in many configurations including vertical, right angle and multi-levels and are designed for distances up to 3 inches. A rigid light pipe is constructed from polycarbonate.[/vc_column_text][vc_column_text]Rigid light pipes are available in numerous configurations, including straight, right angle, single-unit, or multiple-unit, stacked or vertical arrangements Rigid light pipes with an IP67-rated heavy-duty threaded retention provide maximum protection against liquid and dust incursion. Complete solutions are available that include the light pipe, the LED, and a surface-mount adapter.

    Overall, rigid light pipes are an economical way to move light from an LED to the indication area on the front panel when direct access is available.[/vc_column_text][/vc_column_inner][/vc_row_inner][vc_column_text]

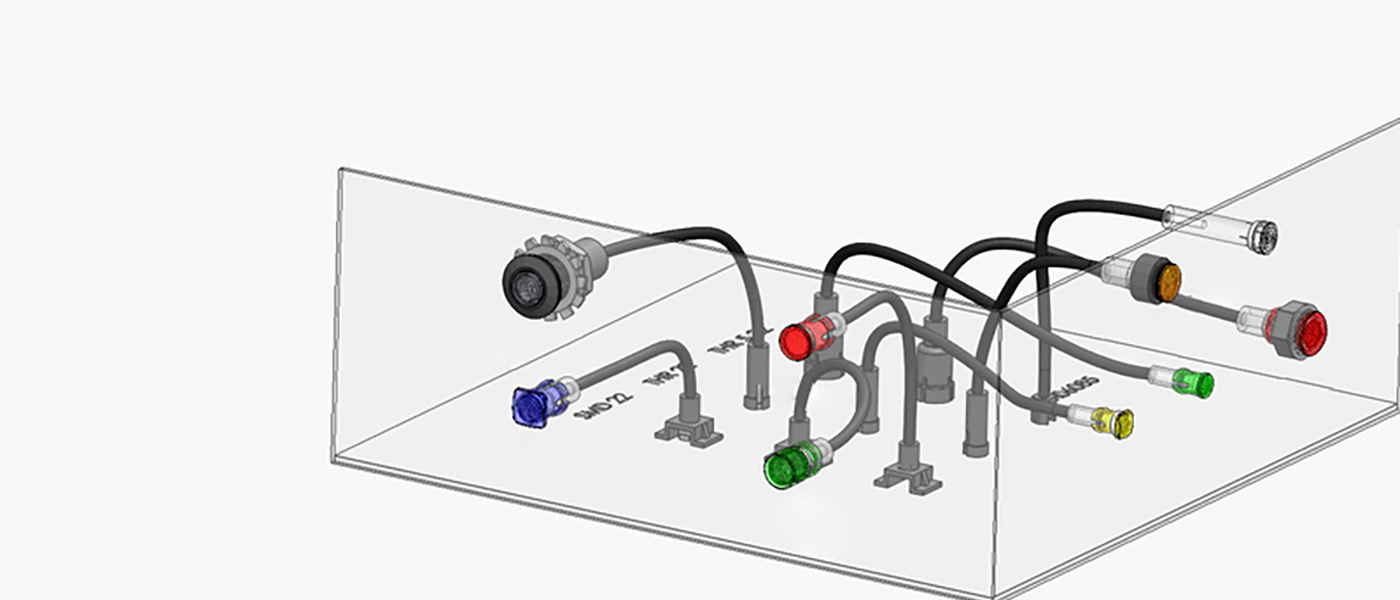
    What is a flexible light pipe?

    [/vc_column_text][vc_single_image image=”9297″ img_size=”1200×350″ alignment=”center”][vc_column_text]A flexible light pipe is preferred when light must be moved over longer distances or around obstacles between the LED and a front panel or other display location. A flexible light pipe assembly consists of an adapter, which provides less to no light bleed, and a flexible optical fiber with a lens cap. Flexible light pipes are immune to electromagnetic interference (EMI) and do not conduct or transfer electrostatic discharge (ESD) pulses.[/vc_column_text][vc_column_text]Flexible light pipes are more complex and cost more than rigid light pipes; they solve accessibility challenges for engineers by giving them the flexibility to bypass components on the printed circuit board (PCB) that prevent a straight-line access to the indication area on the front panel.

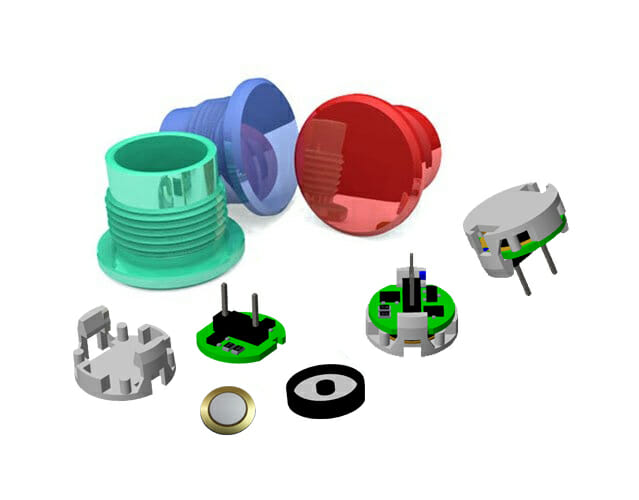
    Figure 5 shows the various parts of a flexible light pipe design. The components consist of the LED at point A; a SMD-22 adapter that ensures no light bleeds into an adjacent pipe; a plastic optical fiber (POF); and a lens cap at point B that is bonded to the POF.

    Flexible light pipes make it easy to add additional indicators or replace a damaged assembly because the lens cap at point B can be up to 330 feet from the LED light source at point A. The light pipe and lens need far less room near the panel face than the LED and its circuitry. If a human-factors engineer finds another indicator is necessary and space is an issue, a large redesign can be avoided by adding another indicator with a flexible adapter routed from another LED that may be in a completely different location from the first LED. The coupling of design time and design space radically improve cost concerns in a variety of industries and applications. Five different POF jacket colors improve installation and visual identification in the field by technicians, as well as clarify references in user manuals.[/vc_column_text][vc_column_text]

    Comparison between rigid and flexible types

    [/vc_column_text][vc_column_text]Rigid and flexible light pipes offer you two distinct options. Each one has advantages and disadvantages. Here are some guidelines to help you make the right choice.[/vc_column_text][vc_row_inner css=”.vc_custom_1679561971805{background-color: #c9c9c9 !important;}”][vc_column_inner width=”1/2″][vc_column_text]Consider a Rigid light pipe if these parameters apply to your project:

    • Light only needs to travel a short distance
    • Low cost is a top priority
    • The printed circuit board is located close to the front panel with simple access available

    [/vc_column_text][/vc_column_inner][vc_column_inner width=”1/2″][vc_column_text]Look towards using a Flexible light pipe if:

    • The light must travel a long distance
    • The design of the equipment does not allow for a direct path from the LED to the display lens
    • There is a possibility that additional indicators may need to be added later
    • The human factors design is not yet finalized
    • The LED output must travel through a high-EMI environment before reaching the lens cap

    [/vc_column_text][/vc_column_inner][/vc_row_inner][vc_column_text]

    Design considerations for using light pipes

    [/vc_column_text][vc_column_text]The design engineer must pay close attention to the pairing of the light pipe and the LED to minimize light loss and ensure best performance. The LED must be effectively matched to the entrance of the light pipe to allow for proper light capture with minimal light loss.

    [/vc_column_text][vc_column_text]Of course, light pipe position can impact the light properties. To minimize light loss, a general rule is to use an LED with a narrow viewing angle of 160 degrees or less and position the light pipe and LED no more than 0.05” apart. There’s a little more to it than that to get the best product for your design. That’s where light simulations come in. Contact our team to run a simulation and determine the ideal light pipe for your design. And, don’t forget the constraints you may have based on the type of light pipe you use: Rigid light pipe design constraints Can’t bend Length limits: Press fit: 1.20” Custom: 1.5” Standard: up to 2” with shorter versions available Flexible light pipe design constraints Bends up to 30 degrees[/vc_column_text][vc_row_inner][vc_column_inner][vc_single_image image=”9602″ img_size=”full” alignment=”center”][vc_column_text]

    Light pipe position

    [/vc_column_text][/vc_column_inner][/vc_row_inner][vc_column_text]

    The importance of reducing light bleed

    [/vc_column_text][vc_column_text]Light bleed occurs when light from the LED can be visible around the LED and light pipe area. Light bleed causes false-readings, muted and blended colors, crosstalk between adjacent light pipes, and unwanted glow in the enclosure. When a rigid light pipe is located over the LED, it allows for a certain amount of light bleed at the base of the light pipe. A flexible light pipe is designed to provide less light bleed with a coated optical fiber and a light resistant black adapter.

    The maximum flexibility occurs when the designer can choose between designing with individual components (LED and light pipe) or using a complete solution that includes both elements. [/vc_column_text][vc_column_text]Light pipes are designed to carry light from Point A to Point B as effectively as possible.

    Point A: Where the input or light source is located. In most cases, it’s the surface-mount (SMD) LED.

    Point B: The exit surface, or where the end-user sees the light at the interface or indicator panel of the device.

    Light loss, or light bleed, occurs when some of the light traveling from Point A to Point B escapes or shines elsewhere, so less light is available to shine at the exit point.[/vc_column_text][vc_row_inner][vc_column_inner width=”1/2″][vc_single_image image=”9598″ img_size=”full” alignment=”center”][vc_column_text]

    Light Loss

    [/vc_column_text][/vc_column_inner][vc_column_inner width=”1/2″][vc_single_image image=”9597″ img_size=”full” alignment=”center”][vc_column_text]

    More Light

    [/vc_column_text][/vc_column_inner][/vc_row_inner][vc_column_text]To minimize the amount of light loss, designers can use an LED with a narrow viewing angle instead of one with a wide viewing angle to help close the distance between the light pipe and LED where light could escape. The wider the gap between the light pipe and the LED, the more room for light to escape before it enters the light pipe and travels to the exit point.[/vc_column_text][vc_single_image image=”9599″ img_size=”full” alignment=”center”][vc_column_text]Note: there will always be some level of light that gets lost traveling from where the LED is located and the exit point where the end-user sees the light.[/vc_column_text][vc_column_text]

    Key specifications and options

    [/vc_column_text][vc_column_text]No matter which type of light pipe is chosen, there are multiple options available to optimize the design.[/vc_column_text][vc_column_text]

    Understand your LED options

    [/vc_column_text][vc_column_text]A surface mount (SMD) LED is mounted on the surface of the PCB and does not require holes. Through-hole LEDs are mounted by inserting leads through the PCB and soldering to provide a stronger connection between layers, which also can withstand some environmental stress conditions. An SMD LED tends to be smaller and brighter than the through-hole equivalent. Both through-hole and SMD LEDs are available in a wide range of sizes, colors, luminosities and lower power wattage.

    LED color. SMD LEDs and through-hole are available in a wide range of single colors. SMD LEDs have additional options, including white or single, bi-color and tri-color, in an array of color configurations. Light pipe adapters are available for use with both types of LEDs. In addition, the designer can choose an adapter with a built-in LED or one intended for use with a separate LED.

    LED size. Surface mount LED are based on industry standard sizes and through-hole LEDs are sized in millimeters (1.8mm, 3mm, 5mm). For example, an 0402 package (SM0402) is based on approximate dimensions (length × width) at roughly 0.4mm long by 0.2mm wide.

    LED intensity. The light output (brightness intensity) of SMD LEDs and through-hole is commonly measured in millicandelas (mcd) or lumens (lm). The higher the mcd or lm rating, the brighter the light intensity.[/vc_column_text][vc_column_text]

    All about lenses

    [/vc_column_text][vc_column_text]The lens is mounted or molded on the end of the light pipe; it provides a convenient visual indicator and also protects the light pipe from mechanical disturbance. Some lens parameters are:[/vc_column_text][vc_column_text]Lens profile. A Fresnel lens is designed to focus light and provides reduced shadowing and glare, and a wide viewing angle. A simple flat lens profile or dome lens is also used for increased viewing angle.

    Lens color. Diffused, smoked, and color (blue, black, green, gray, red, yellow) lens options are available, depending on model.

    Lens size and shape. A variety of lens sizes is available, including diameters of 2mm, 3mm, 4mm and 5mm. Round, oval, and rectangular shapes are available.[/vc_column_text][vc_column_text]

    Sealing Gasket and IP rating

    [/vc_column_text][vc_column_text]Applications in many industries must operate in harsh environments where it is critical that the lens cap appropriately sealed against the elements with the appropriate IP rating. The IP rating of a lens cap indicates the level of protection it provides against the incursion of solids, including dust, and liquids, including moisture or water. An IP rating is expressed in the form “IPXY”, where X and Y are numeric values.[/vc_column_text][vc_column_text]The first digit in an IP rating indicates the level of ingress protection against solid objects: from IP0x (no protection) to IP6x (complete protection against dust). The second digit refers to protection from liquids: from IPx0 (no protection) to IPx9 (protection against water jets).[/vc_column_text][vc_column_text]

    Light pipe related components

    [/vc_column_text][vc_column_text]A light pipe design includes more than the LED, pipe, and lens. Additional components are needed to make up a complete system, and there are several options for each one.[/vc_column_text][vc_column_text]

    Mounting type

    [/vc_column_text][vc_column_text]There are various mounting options for light pipes depending on your application and manufacturing requirements.
    If flexible and rigid were the only options, your options might be limited. Light pipes are designed to accommodate a wide range of mounting types.
    In addition to the rigid vs. flexible decision, there are several other considerations when choosing a light pipe for your design. Your power source and overall design footprint can dictate which mounting type you should use with your light pipe. [/vc_column_text][vc_row_inner][vc_column_inner][vc_column_text]
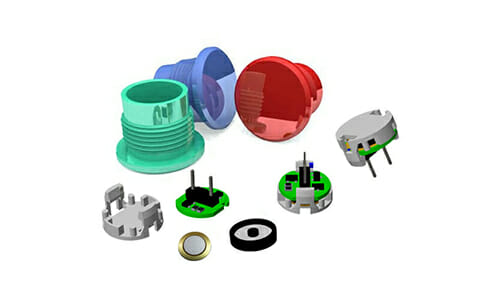
    Adapters

    [/vc_column_text][vc_column_text]It is important to pair the LED with an appropriate adapter to minimize light bleed. Bivar offers adapters that are designed to fit over existing LEDs, plus integrated solutions with a built-in SMD or through-hole LED.[/vc_column_text][vc_single_image image=”9296″ img_size=”1200X350″ alignment=”center”][/vc_column_inner][/vc_row_inner][vc_row_inner][vc_column_inner width=”1/3″][vc_single_image image=”9264″ img_size=”large” alignment=”center”][vc_column_text]

    THR-22

    [/vc_column_text][/vc_column_inner][vc_column_inner width=”1/3″][vc_single_image image=”9263″ img_size=”large” alignment=”center”][vc_column_text]

    THR-5-22

    [/vc_column_text][/vc_column_inner][vc_column_inner width=”1/3″][vc_single_image image=”9262″ img_size=”large” alignment=”center”][vc_column_text]

    SMD-22

    [/vc_column_text][/vc_column_inner][/vc_row_inner][/vc_column][/vc_row][vc_row][vc_column width=”1/4″][/vc_column][vc_column width=”3/4″][vc_zigzag]

    Get Custom Quote
    We’ll get back to you within 12 hours.
    Drag & Drop Files, Choose Files to Upload You can upload up to 3 files.
    [vc_zigzag][/vc_column][/vc_row]

  • Piezo vs Capacitive Switches: What’s the Difference?

    Piezo vs Capacitive Switches: What’s the Difference?

    [vc_row][vc_column][vc_column_text]

    Piezo vs Capacitive Switches: What’s the Difference?

    [/vc_column_text][vc_single_image image=”8669″ img_size=”1200×350″ alignment=”center”][vc_column_text]Switches are found in nearly all electronic devices. While some of them are mechanical, though, others are touch-based. Two of the most common types of touch-based switches include piezo and capacitive. They don’t feature moving parts like their mechanical counterparts. Like all touch-based switches, piezo and capacitive switches will open or close a circuit in response to physical contact with a finger or object.[/vc_column_text][vc_column_text]

    What Is a Piezo Switch?

    [/vc_column_text][vc_column_text]A Piezo switch is a type of switch that leverages the properties of a piezoelectric material to change the orientation of a circuit. Piezoelectric materials are those that store an electrical charge when exposed to pressure. When certain materials are exposed to pressure, such as the pressure of a finger, they will store an electrical charge. These materials are known as piezoelectric materials, and they are used in the construction of piezo switches as well as piezo touchscreens.[/vc_column_text][vc_column_text]

    What Is a Capacitive Switch?

    [/vc_column_text][vc_column_text]A Capacitive switch, on the other hand, is a type of switch that leverages capacitive technology to change the orientation of a circuit. Capacitive technology refers to the use of a uniform electrostatic field to detect touches. Capacitive switches will create a uniform electrostatic field while simultaneously measuring it for changes. If you touch a key on a capacitive switch with a bare finger or any conductive object, the electrostatic field will change. The capacitive switch will then respond by opening or closing the circuit.[/vc_column_text][vc_column_text]

    Differences Between Piezo and Capacitive Switches

    [/vc_column_text][vc_column_text]Piezo and capacitive are both touch-based switches. They are designed to open or close a circuit. The way in which they operate, though, varies. Piezo switches are made of a piezoelectric material. When you press a key on a piezoelectric switch, it will store an electric charge while opening or closing the circuit.

    Capacitive switches aren’t made of a piezoelectric material. You can find them in different materials. Some of them are made of glass, whereas others are made of a transparent polymer. Regardless, capacitive switches don’t contain any piezoelectric materials in their construction. They are made of traditional materials, such as glass or plastic, that feature conductive traces.

    When turned on, capacitive switches will emit a uniform electrostatic field. They’ll constantly measure this electrostatic field to determine when to open or close the circuit. Pressing a key with a bare finger will absorb some of the electrostatic field’s charge. As a result, the capacitive switch will respond by opening or closing the circuit.[/vc_column_text][vc_zigzag]

    Get Custom Quote
    We’ll get back to you within 12 hours.
    Drag & Drop Files, Choose Files to Upload You can upload up to 3 files.
    [/vc_column][/vc_row][vc_row][vc_column][vc_zigzag][/vc_column][/vc_row]

  • Pros and Cons of Resistive Touch Switches

    Pros and Cons of Resistive Touch Switches

    [vc_row][vc_column][vc_column_text]

    Pros and Cons of Resistive Touch Switches

    [/vc_column_text][vc_row_inner][vc_column_inner][vc_single_image image=”8739″ img_size=”full” alignment=”center”][vc_column_text]Have you heard of resistive touch switches? While not as popular as capacitive or piezo touch switches, they are still used in many devices. Resistive touch switches use a similar method of operation as resistive touchscreens. They contain two layers, each of which features electrodes, that are separated by air. When you press a button, the top layer will push into the button so that the electrodes may contact. This contact will complete the circuit so that the resistive touch switch registers your command.[/vc_column_text][/vc_column_inner][/vc_row_inner][vc_column_text]

    Pro: Inexpensive

    [/vc_column_text][vc_column_text]Resistive touch switches are inexpensive. They feature a simpler design that other types of touch switches. Capacitive touch switches, for instance, have a complex design that projects an electrical charge across the button. Touching the button will draw some of this electrical charge to your finger, which the capacitive switch will detect as a command. There is no electrical charge with resistive touch switches. Rather, they feature a simple design consisting of two layers of electrodes.

    [/vc_column_text][vc_column_text]

    Pro: Supports All Touches

    [/vc_column_text][vc_column_text]Resistive touch switches also support all types of touches. The same can’t be said for capacitive touch switches. Capacitive touch switches only support touches performed with a conductive object. You can use a bare finger to operate them. The human body has conductive properties. As long as you aren’t wearing gloves, you can control a capacitive touch switch with a finger. Resistive touch switches, though, support all types of touches. You can control them with a bare finger, a gloved finger, a stylus or any other object, regardless of whether the object is electrically conductive or resistive.

    [/vc_column_text][vc_column_text]

    Con: Requires More Force

    [/vc_column_text][vc_column_text]On the other hand, resistive touch switches require more force than other types of touch switches. Without adequate force, they won’t register your commands. Resistive touch switches require force because of their use of layers. They feature two layers that are separated by air. The layers, of course, features electrodes on them. If you don’t press the button with enough force, the resistive touch switch’s layers won’t make contact with each other. In turn, the resistive touch switch won’t register your command.

    [/vc_column_text][vc_column_text]

    Con: Shorter Lifespan

    [/vc_column_text][vc_column_text]It’s also worth noting that resistive touch switches tend to have a shorter lifespan. This is due to the fact that they contain moving parts. Resistive is still a type of touch switch technology, but unlike other touch switch technologies, it contains moving parts. The two electrode-patterned layers, for instance, will move in response to your commands. As these layers constantly move, they may wear down.[/vc_column_text][vc_zigzag]

    Get Custom Quote
    We’ll get back to you within 12 hours.
    Drag & Drop Files, Choose Files to Upload You can upload up to 3 files.
    [/vc_column][/vc_row][vc_row][vc_column][vc_zigzag][/vc_column][/vc_row]

  • Capacitance vs Resistive vs Piezo Touch Switches

    Capacitance vs Resistive vs Piezo Touch Switches

    [vc_row][vc_column][vc_column_text]

    Capacitance vs Resistive vs Piezo Touch Switches

    [/vc_column_text][vc_row_inner][vc_column_inner][vc_single_image image=”8739″ img_size=”full” alignment=”center”][/vc_column_inner][/vc_row_inner][vc_column_text]Touch switches are found in everything from smartphones and tablets to lamps and machines. The term “touch switch” refers to any type of electrical switch that requires touch to operate. Most touchscreen interfaces feature multiple touches switched embedded within the display. While all touch switches serve the same basic function, there are some subtle nuances between the different types. The three primary types of touch switches include resistive, capacitance and piezo.[/vc_column_text][vc_column_text]

    Capacitance

    [/vc_column_text][vc_column_text]A capacitance touch switch is unique in the sense that it requires just a single electrode to function. This electrode can be installed behind a non-conductive panel, including materials like wood, glass or plastic. It works by using body capacitance, meaning it detects the electrical charge produced by the human operator. Upon touching the interface, this electrical charge increases the capacitance and engages the touch switch.[/vc_column_text][vc_column_text]

    Resistive

    [/vc_column_text][vc_column_text]A resistance touch switch requires not one but two separate electrodes to function — and these electrodes must be in contact with something conductive, such as a finger. Resistive touch switches work by lowering the resistance between two pieces of metal. When you place your finger across the plane, it turns on the switch. Consequently, removing your finger from the plate disengages the switch by turning it off.

    A key benefit associated with resistive touch switches is the ability to operate it with a bare finger or gloves finger. This is in stark contrast to capacitance touch switches, which require the use of a bare finger. Some people prefer resistive touch switches over their capacitance counterpart for this very reason.[/vc_column_text][vc_column_text]

    Piezo

    [/vc_column_text][vc_column_text]A third type of touch switch is the piezo. Piezo touch switches receive their namesake from the piezo ceramic properties, which allow for bending. They are constructed behind a surface, allowing the switch to be integrated with nearly any kind of material. It’s also worth noting that piezo switches can work as an actuator.[/vc_column_text][vc_column_text]So, which type of touch switch should you choose? There’s really no easy answer to this question, as it varies depending on your unique needs and how the switch will be used. Many people prefer capacitive touch switches because of their high accuracy and quality. However, resistive touch switches are a viable option to consider as well.[/vc_column_text][vc_zigzag]

    Get Custom Quote
    We’ll get back to you within 12 hours.
    Drag & Drop Files, Choose Files to Upload You can upload up to 3 files.
    [/vc_column][/vc_row][vc_row][vc_column][vc_zigzag][/vc_column][/vc_row]

  • What’s the Best Backlighting for a Capacitive Switch?

    What’s the Best Backlighting for a Capacitive Switch?

    [vc_row][vc_column][vc_column_text]

    What’s the Best Backlighting for a Capacitive Switch?

    [/vc_column_text][vc_row_inner][vc_column_inner][vc_single_image image=”8707″ img_size=”1200×300″ alignment=”center”][/vc_column_inner][/vc_row_inner][vc_column_text]Backlighting is commonly found in capacitive switches. It consists of lighting system that’s able to illuminate the keys or button legends from underneath. If you’re planning to use a capacitive switch in a dark environment — or any environment with poor lighting — you should consider choosing a capacitive switch with backlighting. There are different types of backlighting, however, some of which work better for capacitive switches than others. What’s the best backlighting for a capacitive switch exactly?[/vc_column_text][vc_column_text]

    How Capacitive Switches Work

    [/vc_column_text][vc_column_text]To determine the best type of backlighting for capacitive switches, you should familiarize yourself with the mechanics of capacitive switches. Capacitive switches are designed to control a circuit. All switches, in fact, serve this same purpose. Capacitive switches are different in the sense that they only require contact with a conductive object to change the orientation of the circuit. Exposure to a conductive object, such as your bare finger, will engage the capacitive switch’s circuit. It will either open or close the circuit.

    Since they only require contact with a conductive object to open or close the circuit, capacitive switches are often designed with backlighting. They can be designed with backlighting underneath the overlay layer, which doesn’t interfere with their operations.

    [/vc_column_text][vc_column_text]

    LED Backlighting

    [/vc_column_text][vc_column_text]While capacitive switches support many types of backlighting, light-emitting diode (LED) has become the most common. More capacitive switches feature LED backlighting than any other type of backlighting. LED backlighting uses similar bulbs as LED fixtures. They are just smaller and more compact LED bulbs. With LED backlighting, capacitive switches will feature an illuminated overlay layer that makes them easier to see and use.

    Some of the benefits of LED backlighting for capacitive switches include the following:

    • Allows capacitive switches to be used in dark environments with little or no light
    • Energy-efficient lighting technology
    • Produces less heat than other types of backlighting

    [/vc_column_text][vc_column_text]

    Light Guides

    [/vc_column_text][vc_column_text]You can choose LED backlighting for capacitive switches either with or without light guides. What are light guides, and how do they work in backlighting systems? Light guides are components that propagate and distribute light. They essentially “guide” the light to the areas where it’s needed.

    With light guides, the light produced by a capacitive switch’s backlighting system will be evenly distributed. The capacitive switch won’t suffer from dark or bright spots. Rather, its overlay layer will receive an equal amount of light throughout. If you’re looking to buy a capacitive switch, you may want to choose LED backlighting with light guides for this reason.[/vc_column_text][vc_zigzag]

    Get Custom Quote
    We’ll get back to you within 12 hours.
    Drag & Drop Files, Choose Files to Upload You can upload up to 3 files.
    [/vc_column][/vc_row][vc_row][vc_column][vc_zigzag][/vc_column][/vc_row]

  • 5 Facts About Touch Switches

    5 Facts About Touch Switches

    [vc_row][vc_column][vc_single_image image=”7771″ img_size=”1200×350″ alignment=”center”][vc_column_text]

    5 Facts About Touch Switches

    [/vc_column_text][vc_column_text]Electrical switches play an integral role in the function of countless electronic devices. From computers and smartphones to lamps, appliance, remote controls and more, many electronic devices feature one or more electrical switches. They are designed to open and close the circuit, thereby controlling the respective device.

    Touch switches, however, are distinguished from traditional mechanical switches by their method of operation. Rather than using a mechanical operation to open and close the circuit, they use a touch-based method of operation.[/vc_column_text][vc_column_text]

    1) Long-Lasting Functionality

    [/vc_column_text][vc_column_text]Touch switches are capable of lasting a very long time. Since they don’t use a mechanical method of operation, they are naturally exposed to less stress than mechanical switches. As a result, touch switches can withstand the hands of time for many years. If you’re tired of constantly replacing your mechanical switches, you may want to choose a touch switch for this reason.[/vc_column_text][vc_column_text]

    2) One Electrode

    [/vc_column_text][vc_column_text]Capacitive touch switches — the most common type — only require a single electrode to function. The electrode is typically embedded behind a layer of glass or plastic. When you press a capacitive touch switch, your finger will increase the switch’s capacitance through the electrode. The capacitive touch switch will then recognize this change in capacitance as a command to open or close the circuit.[/vc_column_text][vc_row_inner][vc_column_inner width=”1/3″][vc_single_image image=”10027″ img_size=”large” alignment=”center”][vc_column_text css=””]

    16mm Capacitive switch

    [/vc_column_text][/vc_column_inner][vc_column_inner width=”1/3″][vc_single_image image=”10030″ img_size=”large” alignment=”center”][vc_column_text css=””]

    22mm Capacitive switch

    [/vc_column_text][/vc_column_inner][vc_column_inner width=”1/3″][vc_single_image image=”10029″ img_size=”large” alignment=”center”][vc_column_text css=””]

    25mm Capacitive switch

    [/vc_column_text][/vc_column_inner][/vc_row_inner][vc_column_text]

    3) Some Touch Switches Work With Gloves

    [/vc_column_text][vc_column_text css=””]While you can’t control a capacitive touch switch while wearing gloves, you can control a resistive touch switches with a gloved finger. Like resistive touchscreens, resistive switches contain multiple layers with conductive traces that are separated by a spacer layer of air. When you press a resistive touch switch, the two conductive traces will meet, thereby opening the circuit. Releasing your finger from a resistive touch switch, on the other hand, breaks the circuit.[/vc_column_text][vc_column_text]

    4) Some Touch Switches Use Piezo Technology

    [/vc_column_text][vc_column_text css=””]A lesser-known type of touch switch technology is piezo. Piezo touch switches work by relying on piezo mechanics to determine when the circuit should be open and when it should be closed. Piezo touch switches aren’t as common as capacitive or resistive touch switches, but they are gaining momentum thanks in part to their high level of durability.[/vc_column_text][vc_row_inner][vc_column_inner width=”1/3″][vc_single_image image=”9949″ img_size=”large” alignment=”center”][vc_column_text css=””]

    16mm Piezo switch

    [/vc_column_text][/vc_column_inner][vc_column_inner width=”1/3″][vc_single_image image=”9972″ img_size=”large” alignment=”center”][vc_column_text css=””]

    22mm Piezo switch

    [/vc_column_text][/vc_column_inner][vc_column_inner width=”1/3″][vc_single_image image=”9976″ img_size=”large” alignment=”center”][vc_column_text css=””]

    25mm Piezo switch

    [/vc_column_text][/vc_column_inner][/vc_row_inner][vc_column_text]

    5) They Act as a Tactile Sensor

    [/vc_column_text][vc_column_text css=””]Whether it’s capacitive, resistive or piezo, all touch switches act as a tactile sensor. In other words, they respond specifically to your touch commands. They don’t necessarily produce tactile feedback, but touch sensors still require physical contact to function as intended. Therefore, they are considered a type of tactile sensor.[/vc_column_text][vc_zigzag]

    Get Custom Quote
    We’ll get back to you within 12 hours.
    Drag & Drop Files, Choose Files to Upload You can upload up to 3 files.
    [/vc_column][/vc_row][vc_row][vc_column][vc_zigzag][/vc_column][/vc_row]

  • Capacitive Switches: 5 Things You Need to Know

    Capacitive Switches: 5 Things You Need to Know

    [vc_row][vc_column][vc_column_text]

    Capacitive Switches: 5 Things You Need to Know

    [/vc_column_text][vc_single_image image=”7771″ img_size=”1200X350″ alignment=”center”][vc_column_text]Not all switches use a mechanical method of operation. Some of them use electricity to determine when to open or close a circuit. Known as capacitive switches, they are commonly used in touchpads, proximity sensors and other switch-related applications. Below are five important things you need to know about capacitive switches.[/vc_column_text][vc_column_text]

    1) Features 3 Sections

    [/vc_column_text][vc_column_text]While available in different designs, most capacitive switches feature three sections. They have a graphic overlay on top, followed by a circuit layer and then a back layer. The graphic overlay, of course, is the layer featuring the icons or graphics for the switch’s buttons. The circuit layer, on the other hand, is the layer featuring the switch’s electrical circuit or circuits. Underneath the graphic overlay and circuit layers is the back layer, which is the final section.[/vc_column_text][vc_row_inner][vc_column_inner width=”1/3″][vc_single_image image=”10030″ img_size=”large” alignment=”center”][vc_column_text]

    22mm Capacitive switch

    [/vc_column_text][/vc_column_inner][vc_column_inner width=”1/3″][vc_single_image image=”10027″ img_size=”large” alignment=”center”][vc_column_text]

    16mm Capacitive switch

    [/vc_column_text][/vc_column_inner][vc_column_inner width=”1/3″][vc_single_image image=”10029″ img_size=”large” alignment=”center”][vc_column_text]

    25mm Capacitive switch

    [/vc_column_text][/vc_column_inner][/vc_row_inner][vc_column_text]

    2) Glass or Plastic

    [/vc_column_text][vc_column_text]The overlay layer used in capacitive switches is typically made of either glass or plastic (or sometimes acrylic). They are both durable and transparent materials, making them ideal for capacitive switches. Glass, however, offers a higher level of clarity than plastic. Plastic, on the other hand, is better suited for heavy use. You can find capacitive switches with either a glass or plastic overlay layer.[/vc_column_text][vc_column_text]

    3) Long-Lasting

    [/vc_column_text][vc_column_text]Capacitive switches are long-lasting. Most capacitive switches, in fact, last longer than their mechanical counterparts. This is because they don’t have moving parts. Mechanical switches are defined by their use of separate, moving parts. When you use a mechanical switch, the parts from which it’s made will move. There is no movement with capacitive switches. Capacitive switches use a similar method of operation as capacitive touchscreens, thereby eliminating the need for moving parts.[/vc_column_text][vc_column_text]

    4) Requires Conductive Contact

    [/vc_column_text][vc_column_text]If you’re planning to use a capacitive switch, you should know that they require contact with a conductive object to work. You can’t control a capacitive switch with a nonconductive object. All capacitive switches require the use of a conductive object. Your body is conductive. Therefore, you can control a capacitive switch with your bare finger. If you’re wearing gloves, though, the capacitive switch may not respond to your command.[/vc_column_text][vc_column_text]

    5) Supports Backlighting

    [/vc_column_text][vc_column_text]Capacitive switches support backlighting. Backlighting is a component that, as the name suggests, is used to light up a switch’s overlay layer. It’s embedded behind the overlay layer where it illuminates the legends. The most popular backlighting solutions for capacitive switches include electroluminescent (EL) and light-emitting diode (LED).[/vc_column_text][/vc_column][vc_column][vc_zigzag]

    Get Custom Quote
    We’ll get back to you within 12 hours.
    Drag & Drop Files, Choose Files to Upload You can upload up to 3 files.
    [/vc_column][/vc_row][vc_row][vc_column][vc_zigzag][/vc_column][/vc_row]

  • An Introduction to Capacitive Switch: What You Should Know

    An Introduction to Capacitive Switch: What You Should Know

    [vc_row][vc_column][vc_single_image image=”7771″ img_size=”1200×350″ alignment=”center”][vc_column_text]

    An Introduction to Capacitive Switch: What You Should Know

    [/vc_column_text][vc_column_text]When researching some of the different types of electrical switches, you may come across capacitive switches. They’ve become an increasingly popular alternative to mechanical switches. You can find capacitive switches for consumer electronics as well as commercial electronics. Like all switches, they are designed to control a circuit. capacitive switches, however, feature a unique design that sets them apart from the rest.[/vc_column_text][vc_column_text]

    Overview of Capacitive Switches

    [/vc_column_text][vc_column_text]Capacitive switches are circuit-controlling devices that are characterized by their touch-based method of operation. They are similar to capacitive touchscreens. Capacitive touchscreens and capacitive switches both require direct contact with a conductive object, such as a bare finger. Contact with a conductive object will create a disruption in an otherwise uniform electrostatic field.

    There are different types of Capacitive switches. Nonetheless, they all require direct contact with a conductive object. You can’t control a capacitive switch with a non-conductive object. All Capacitive switches operate by measuring capacitance. They’ll emit an electrostatic field while simultaneously measuring it for changes of capacitance.[/vc_column_text][vc_row_inner][vc_column_inner width=”1/3″][vc_single_image image=”10028″ img_size=”large” alignment=”center”][vc_column_text]

    19mm Capacitive switch

    [/vc_column_text][/vc_column_inner][vc_column_inner width=”1/3″][vc_single_image image=”10030″ img_size=”large” alignment=”center”][vc_column_text]

    22mm Capacitive switch

    [/vc_column_text][/vc_column_inner][vc_column_inner width=”1/3″][vc_single_image image=”10029″ img_size=”large” alignment=”center”][vc_column_text]

    25mm Capacitive switch

    [/vc_column_text][/vc_column_inner][/vc_row_inner][vc_column_text]

    Benefits of Capacitive Switches

    [/vc_column_text][vc_column_text]Being that there are other switches on the market, you might be wondering what benefits capacitive switches offer. Well, there are several reasons to consider choosing capacitive switches. For starters, they are better protected against mechanical failure. Mechanical failure, in fact, is almost nonexistent in capacitive switches. This is because capacitive switches don’t use moving parts to control a circuit; they use capacitance.

    Capacitive switches are also more ergonomic than traditional switches. You can control them naturally and effortlessly by pressing your finger against the capacitive panel. This makes them more ergonomic than traditional switches, which often require a more forceful touch.[/vc_column_text][vc_column_text]

    Choosing the Right Capacitive Switches

    [/vc_column_text][vc_column_text]If you’re thinking about capacitive switches for your business, you should choose the right type. You can find capacitive switches in different materials. The overlays, for instance, are often made of either plastic, glass or acrylic. All three of these materials are transparent. Plastic and acrylic, though, are typically stronger than glass. Glass, on the other hand, offers a higher level of clarity and brightness.

    In addition to the overlay material, you should consider the backlighting when choosing capacitive switches. While not a requirement for capacitive switches, many of them feature backlighting. Some of the most common types of backlighting for capacitive switches include light-emitting diode (LED), electroluminescent (EL) and light guides. Backlighting will illuminate a capacitive switch so that it’s easier to see and use in low-light conditions.[/vc_column_text][vc_zigzag]

    Get Custom Quote
    We’ll get back to you within 12 hours.
    Drag & Drop Files, Choose Files to Upload You can upload up to 3 files.
    [/vc_column][/vc_row][vc_row][vc_column][vc_zigzag][/vc_column][/vc_row]

  • Piezo Switches: An Introduction to These Touch Switches

    Piezo Switches: An Introduction to These Touch Switches

    [vc_row][vc_column][vc_single_image image=”8669″ img_size=”1200×350″ alignment=”center”][vc_column_text]

    Piezo Switches: An Introduction to These Touch Switches

    [/vc_column_text][vc_column_text]Have you heard of piezo switches? They’ve become one of the most popular types of touch switches on the market. Like all touch switches, piezo switches don’t rely on moving parts to open and close their circuits. Rather, you can control them via touch. What are piezo switches exactly, and how do they work?[/vc_column_text][vc_row_inner][vc_column_inner width=”1/3″][vc_single_image image=”9973″ img_size=”large” alignment=”center”][vc_column_text css=””]

    22mm Piezo switch

    [/vc_column_text][/vc_column_inner][vc_column_inner width=”1/3″][vc_single_image image=”9957″ img_size=”large” alignment=”center”][vc_column_text css=””]

    16mm Piezo switch

    [/vc_column_text][/vc_column_inner][vc_column_inner width=”1/3″][vc_single_image image=”9960″ img_size=”large” alignment=”center”][vc_column_text css=””]

    19mm Piezo switch

    [/vc_column_text][/vc_column_inner][/vc_row_inner][vc_column_text]

    The Basics of Piezo Switch

    [/vc_column_text][vc_column_text]A piezo switch is a type of touch switch that relies on the piezoelectric effect to open and close its circuits. You can operate them by pressing your finger against a given key. When exposed to your finger, the piezo switch will generate a pulse of electricity that opens or closes the underlying circuit.[/vc_column_text][vc_column_text]

    How Piezo Switches Work

    [/vc_column_text][vc_column_text]Piezo switches work by using a piezoelectric element to generate electricity. Piezoelectric elements are materials that convert and store mechanical energy as electric energy. Touching a piezo switch will exposed it to mechanical stress. As you press your finger against a button, the piezoelectric element will take this mechanical energy and store it as electric energy. This electricity is then used to change the circuit’s orientation.[/vc_column_text][vc_column_text]

    Advantages of Piezo Switches

    [/vc_column_text][vc_column_text css=””]With their touch-based method of operation, piezo switches are durable. It’s not uncommon for piezo switches to last for millions or even tens of millions of key presses. Other types of switches tend to have a shorter lifespan. Mechanical switches, for instance, are exposed to wear and tear during each key press. Therefore, they are more likely to experience premature failure than their piezo switch counterparts.

    Another advantage of piezo switches is moisture protection. They can be used in wet and humid environments without succumbing to moisture damage. With piezo switches, the circuits are protected from moisture. Piezo switches feature a sealed design that prevents moisture from reaching their circuits. This makes them an attractive choice for wet and humid environments.

    You can easily clean piezo switches. All switches will inevitably gather dust and dirt. Thanks to their sealed design, however, you can clean a piezo switch with traditional cleaning products. Spraying a cleaning product onto a piezo switch won’t damage it. All piezo switches are sealed, so you can clean them without damaging them.

    There are different the faceplate materials available for piezo switches. Stainless steel is a popular choice. It’s sleek, strong and resistant to rust. Other faceplate materials for piezo switches include aluminum, glass and plastic, each of which offers its own benefits.[/vc_column_text][vc_zigzag]

    Get Custom Quote
    We’ll get back to you within 12 hours.
    Drag & Drop Files, Choose Files to Upload You can upload up to 3 files.
    [/vc_column][/vc_row][vc_row][vc_column][vc_zigzag][/vc_column][/vc_row]

  • How to Choose a Capacitive Switch?

    How to Choose a Capacitive Switch?

    [vc_row][vc_column][vc_single_image image=”7771″ img_size=”1200X350″ alignment=”center”][vc_column_text]

    How to Choose a Capacitive Switch?

    [/vc_column_text][vc_column_text]Are you looking to buy a Capacitive switches? If so, you’ll need to choose the right type. Capacitive switches have become increasingly popular. Like all touch switches, they operate via touch. Capacitive switches use a similar method of operation as capacitive touchscreens, with both devices leveraging the human body’s conductivity properties to open and close their respective switches.

    There are many different types of Capacitive switches, however. You can find them in different materials, button configurations, styles and more. Regardless of the application for which you plan on using it, it’s important to choose the right Capacitive switch.[/vc_column_text][vc_column_text]

    Panel Material

    [/vc_column_text][vc_column_text]Most capacitive switches have an overlay panel. Behind this overlay panel is the electrode, which is responsible for identifying touch commands. Touching a capacitive switch’s panel will result in a change of capacitance. The electrode behind the panel will transfer some of its electricity to your finger, thereby allowing the capacitive switch to identify your command. You can find capacitive switches, though, available in different panel materials.[/vc_column_text][vc_column_text]Some of the most common panel materials used for capacitive switches include the following:[/vc_column_text][vc_column_text]

    • Glass
    • Plastic
    • Acrylic

    [/vc_column_text][vc_column_text]

    FPC vs PCB

    [/vc_column_text][vc_column_text]When choosing a capacitive switch, one of the decisions you’ll have to make is whether to go with a Flexible Printed Circuit (FPC) or a Printed Circuit Board (PCB). All capacitive switches have a circuit board. The circuit board is the electrical component that contains the conductive pathways for a switch’s buttons. There are two types of circuit boards used in capacitive switches: FPCs and PCBs.

    FPCs are defined by their flexible composition. They are able to bend and flex without breaking. This flexible construction allows them to fit into small spaces. PCBs serve the same purpose as FPCs, but they have a stiff and rigid composition rather than a flexible composition.[/vc_column_text][vc_row_inner][vc_column_inner width=”1/3″][vc_single_image image=”10028″ img_size=”large” alignment=”center”][vc_column_text]

    19mm Capacitive switch

    [/vc_column_text][/vc_column_inner][vc_column_inner width=”1/3″][vc_single_image image=”10030″ img_size=”large” alignment=”center”][vc_column_text]

    22mm Capacitive switch

    [/vc_column_text][/vc_column_inner][vc_column_inner width=”1/3″][vc_single_image image=”10027″ img_size=”large” alignment=”center”][vc_column_text]

    16mm Capacitive switch

    [/vc_column_text][/vc_column_inner][/vc_row_inner][vc_column_text]

    Backlighting

    [/vc_column_text][vc_column_text]You may want to choose a capacitive switch with backlighting. Like many other types of touch switches, capacitive switches support backlighting. They can be laser-etched, for instance, so that light beams through select areas of the panel. Backlighting isn’t a requirement for capacitive switches. Nonetheless, many businesses prefer capacitive switches with backlighting because it makes them easier to use in low-light conditions.

    Light-emitting diode (LED) is the most common type of backlighting for capacitive switches. It’s energy efficient, produces little or no heat, long-lasting and effective. With that said, LED backlighting can be used with light guides to achieve a more even level of illumination that’s protected from bright and dark spots.[/vc_column_text][vc_zigzag]

    Get Custom Quote
    We’ll get back to you within 12 hours.
    Drag & Drop Files, Choose Files to Upload You can upload up to 3 files.
    [vc_zigzag][/vc_column][/vc_row]

  • How to Choose a Piezo Switch?

    How to Choose a Piezo Switch?

    [vc_row][vc_column][vc_single_image image=”8669″ img_size=”1200×400″ alignment=”center”][vc_column_text]

    How to Choose a Piezo Switch

    [/vc_column_text][vc_column_text]Are you looking to buy a piezo switch? If so, you’ll need to choose the right type. While all piezo switches use a piezoelectric element to control an underlying circuit, not all of them are the same. They are available in different materials, technologies, features, design specifications and more. By following these tips, however, you can choose the right piezo switch for your business’s needs.[/vc_column_text][vc_column_text]

    Material

    [/vc_column_text][vc_column_text]You should consider the faceplate material when choosing a piezo switch. Most piezo switches are designed with a faceplate. The material used for the faceplate, though, may vary. There are stainless steel faceplates as well as aluminum and plastic faceplates. Alternatively, you can choose a piezo switch with a glass faceplate. Each faceplate material has its own pros and cons. Therefore, you should evaluate your applications to determine which faceplate material is best.[/vc_column_text][vc_separator][vc_column_text css=””]Don’t forget to consider the back panel material when choosing a Piezo switch. All Piezo switches have a back panel. Like with the faceplate, though, the material from which the back panel is made can vary. Piezo switches are available in metal or plastic back panels. Metal is obviously the strongest material of the two. With a metal back panel, piezo switches can withstand extreme environments without succumbing to damage. Plastic, on the other hand, is lighter and better protected against corrosion.[/vc_column_text][vc_column_text]

    Display Technology

    [/vc_column_text][vc_column_text]In addition to the faceplate material, you should consider the display technology when choosing a piezo switch. Piezo switches are available in many of the same display technologies as touchscreens. You can find them with a liquid-crystal display (LCD), for instance. LCDs are energy efficient, bright, long-lasting and capable of producing high-resolution images. You can also find piezo switches with an organic light-emitting display (OLED). OLEDs offer many of the same benefits as LCDs, but they don’t require a backlighting system.[/vc_column_text][vc_row_inner][vc_column_inner width=”1/3″][vc_single_image image=”9954″ img_size=”large” alignment=”center”][vc_column_text css=””]

    12mm Piezo switch

    [/vc_column_text][/vc_column_inner][vc_column_inner width=”1/3″][vc_single_image image=”9959″ img_size=”large” alignment=”center”][vc_column_text css=””]

    19mm Piezo switch

    [/vc_column_text][/vc_column_inner][vc_column_inner width=”1/3″][vc_single_image image=”9973″ img_size=”large” alignment=”center”][vc_column_text css=””]

    22mm Piezo swtich

    [/vc_column_text][/vc_column_inner][/vc_row_inner][vc_column_text]

    In Conclusion

    [/vc_column_text][vc_column_text css=””]Piezo switches have become an increasingly popular alternative to traditional mechanical switches. They are known as “piezo switches” because they use a piezoelectric element to open and close a circuit. By considering the faceplate material, display technology, sensitivity settings and back panel material, you can choose the right piezo switch for your business’s needs.[/vc_column_text][vc_zigzag]

    Get Custom Quote
    We’ll get back to you within 12 hours.
    Drag & Drop Files, Choose Files to Upload You can upload up to 3 files.
    [vc_zigzag][/vc_column][/vc_row]