Are old push button light switches safe in modern homes? This post looks at basic safety, clear signs that a switch needs replacing, and simple steps to make a safe update. Readers get a no-nonsense guide to fixing electrical issues, keeping homes risk-free, and enjoying modern upgrades that work better. It’s all about making smart choices without any hassle.
Old Push Button Light Switches and Their Safety
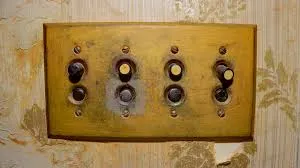
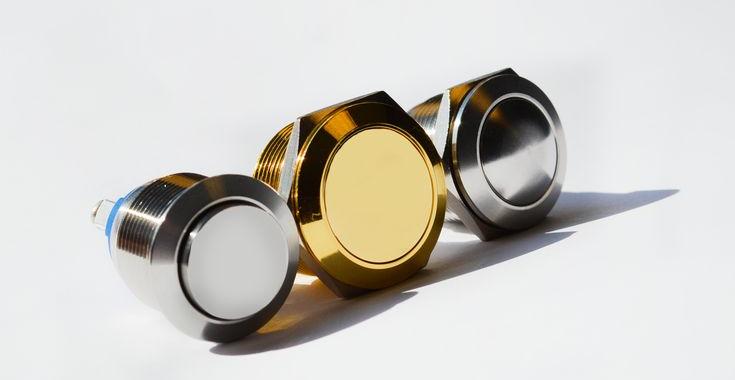
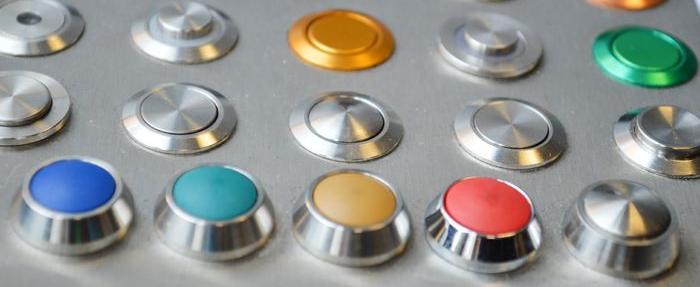
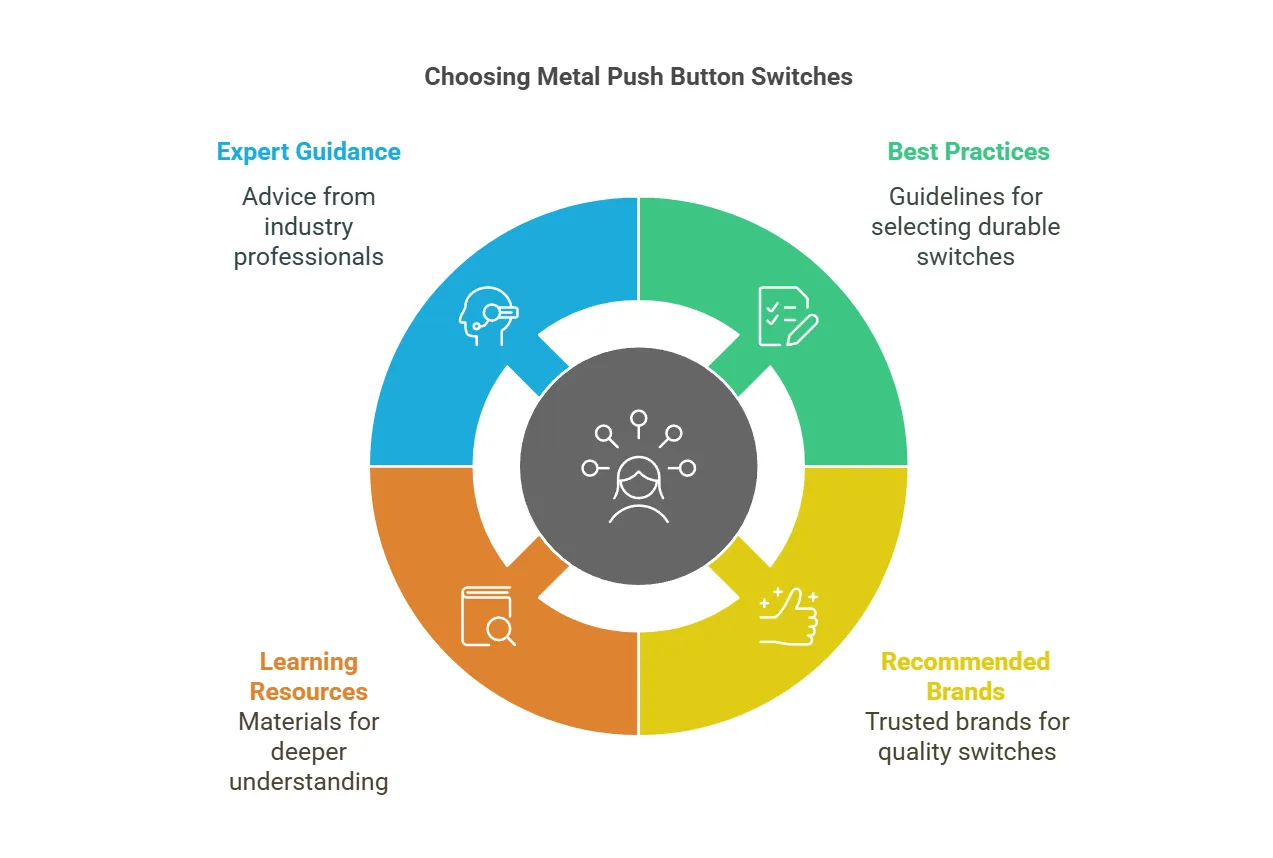
Old push button switches show off a unique design with sturdy metal parts only handling electricity. They sometimes struggle with electrical load issues and don’t always match the national electrical code. Plus, these switches can differ from newer light fixture setups, hinting at common issues that spark extra questions about their safety today.
The Design and Functionality of Old Push Button Light Switches
Old push button light switches show off a simple yet sturdy design built with metal parts that get the job done, even if they don’t always line up with modern manufacturing methods; an experienced electrician might grab their pliers to check a worn fuse or watch out for a hint of smoke when these switches face heavy loads:
Component
Observation
Insight
Metal Parts
Solid, but aging
May not hold up in today’s setups
Fuse
Exposed to wear
Needs routine checks
Safety Factor
Potential for smoke
Demands skilled electrician review
Common Issues Associated With Old Push Button Light Switches
Old push button switches sometimes mess with the flow of electrons in a home electrical system, causing stress on outdated electrical wiring. Regular maintenance and careful checks by a seasoned pro can keep the setup safe and running, even when the old switch design shows its age.
How Old Switches Compare to Modern Electrical Standards
Old push button switches often struggle with energy flow and alternating current regulation compared to modern systems, resulting in uneven brightness and potential safety concerns; the wire gauge these models use frequently falls short, urging a clear look at the differences:
Worn electrical cables, frail home wiring, or even leakage near a clothes dryer and plumbing are clear signs of wear. Old switches may hide safety hazards and raise compliance questions. Checking these details gives experts practical insights on when replacement becomes necessary.
Recognizing Wear and Tear on Old Switches
Old switches may start showing clear signs of aging, such as worn fuses and a loose screw terminal that fails to hold up under extra heat, something professionals point out when advising on home automation setups. Experts offer simple tips, advising folks to check these components regularly to avoid costly surprises down the road.
Identifying Safety Hazards Linked to Outdated Switches
Old push button switches can cause issues with cables and pose a risk to fire safety by creating conditions that may lead to a short circuit, forcing an electrical service panel to work overtime. Experts note that aging switches signal that the electrical network might not be ready for modern demands, prompting a check-up to keep everything running smoothly.
Evaluating Your Home’s Electrical System for Compliance
When professionals inspect a home’s electrical system, they check every detail—from the wiring and light switch mechanics to every tiny screw—to ensure there’s no hidden risk of an arc fault. A simple advertisement for an upgrade might seem trivial, but it signals that modern compliance standards deserve attention to keep the household safely powered.
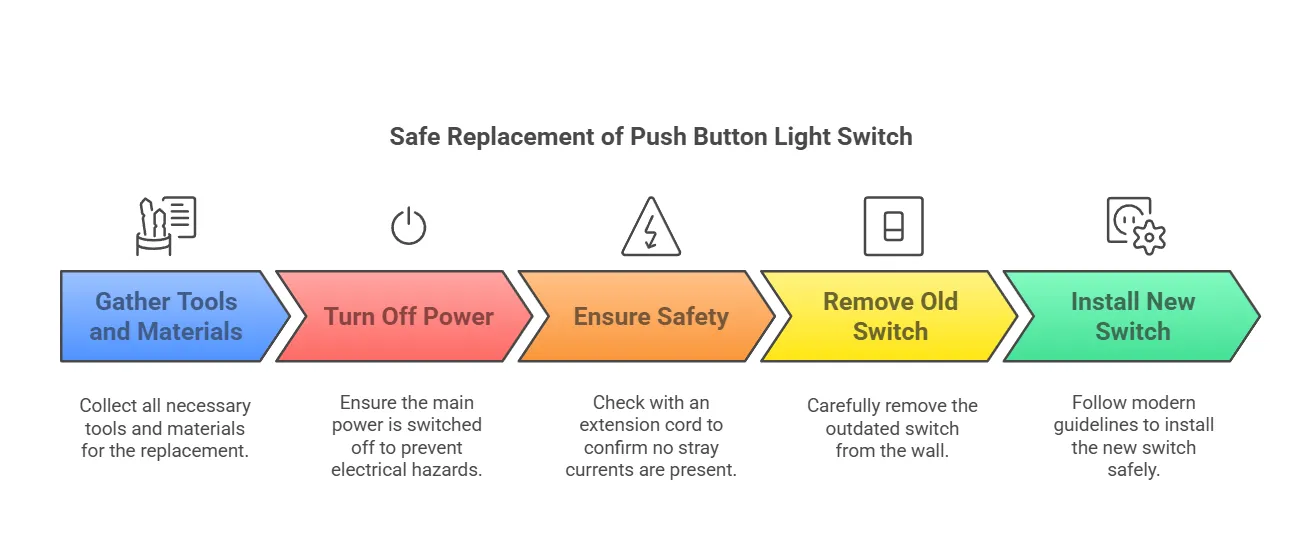
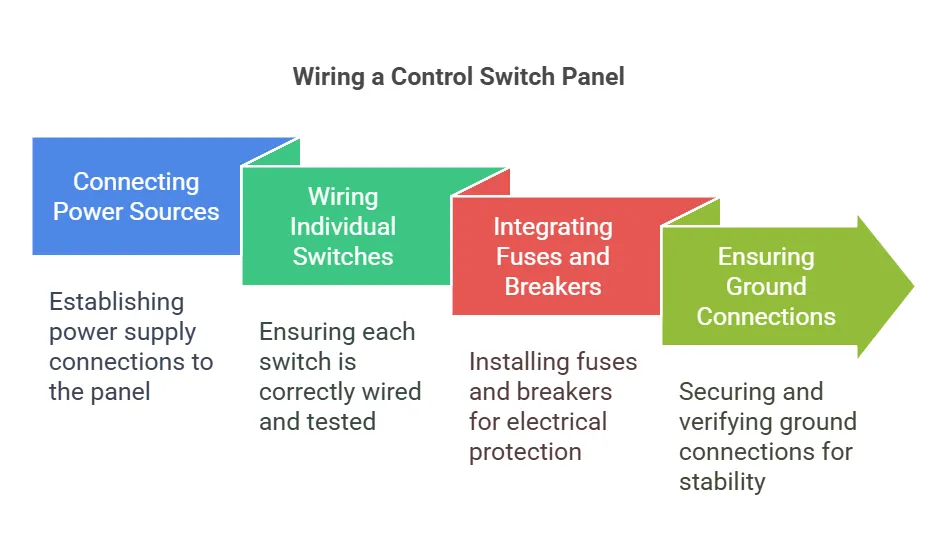
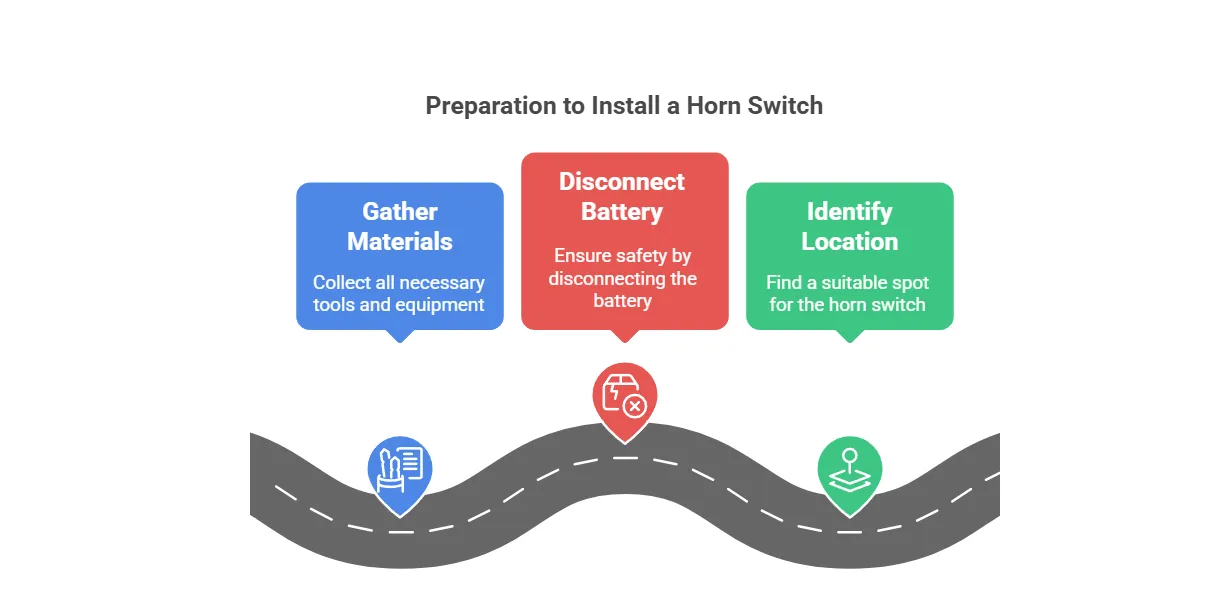
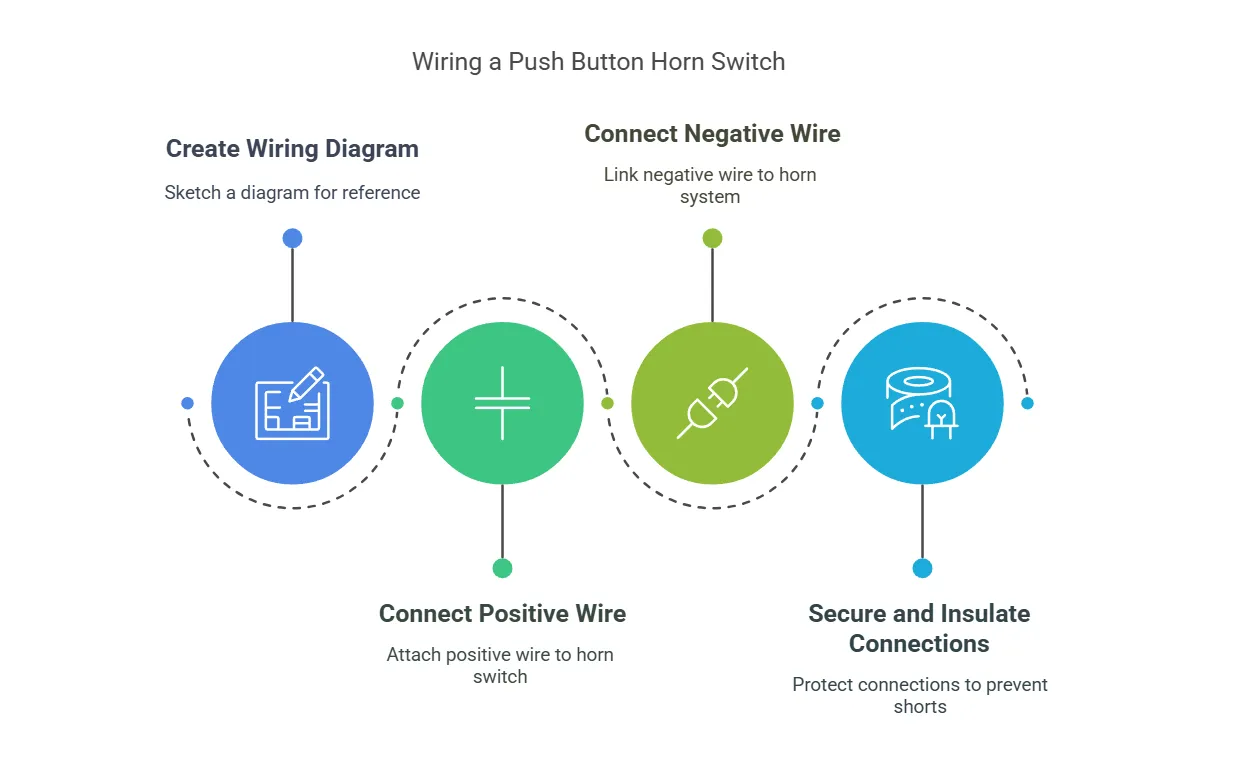
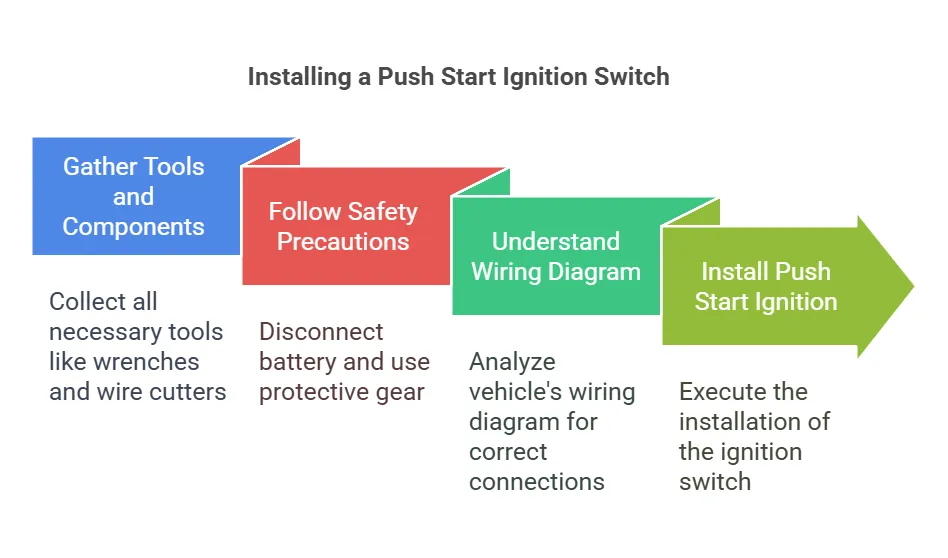
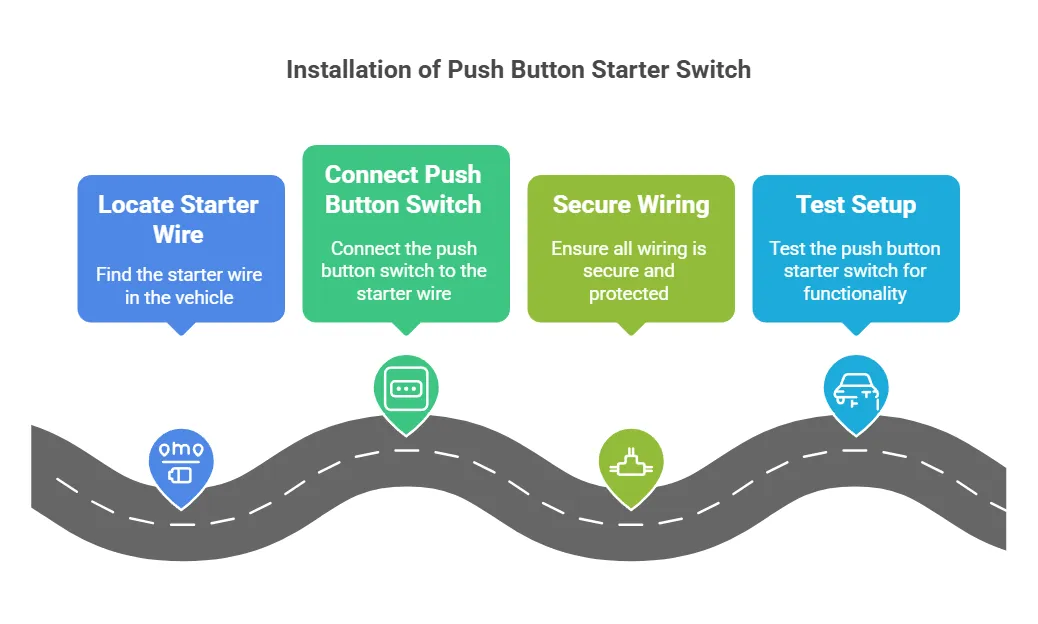
Steps for Replacing a Push Button Light Switch Safely
They start by gathering tools like copper and brass bits, checking switch wiring, and setting aside key safety gear. Power gets turned off, and even furniture gets tidied up before work begins. The quick guide shows each step, letting experts skip to content that details a safe, clear way to swap out an old push button switch.
Gathering Necessary Tools and Materials for Replacement
The expert advises collecting all the needed gear before any work begins, which helps steer clear of sudden power outage issues. They stress that every tool, including what’s used for maintaining proper ceiling connections and checking wires that meet american wire gauge standards, plays a role in electrical safety. Each button and part set the stage for a smooth, straightforward switch upgrade that keeps everything in check.
Turning Off Power and Ensuring Safety Before Replacement
The expert stresses that before any renovation effort, the main power must be switched off to stop even a single watt from powering an electrical device during work. A careful check with an extension cord ensures no stray currents lurk, keeping everything safe—even during moments of severe weather that might otherwise stir up trouble.
Step-by-Step Instructions for Replacing an Old Switch
The pro starts by switching off the power and double-checking with a tester before removing the outdated switch from the wall. When working in a bathroom or any other spot, they carefully note that even a slight electrical fault can be risky, so they use modern technology to guide each step, ensuring a smooth swap that meets today’s demands. Simple moves and solid know-how keep the replacement clear and safe for everyone.
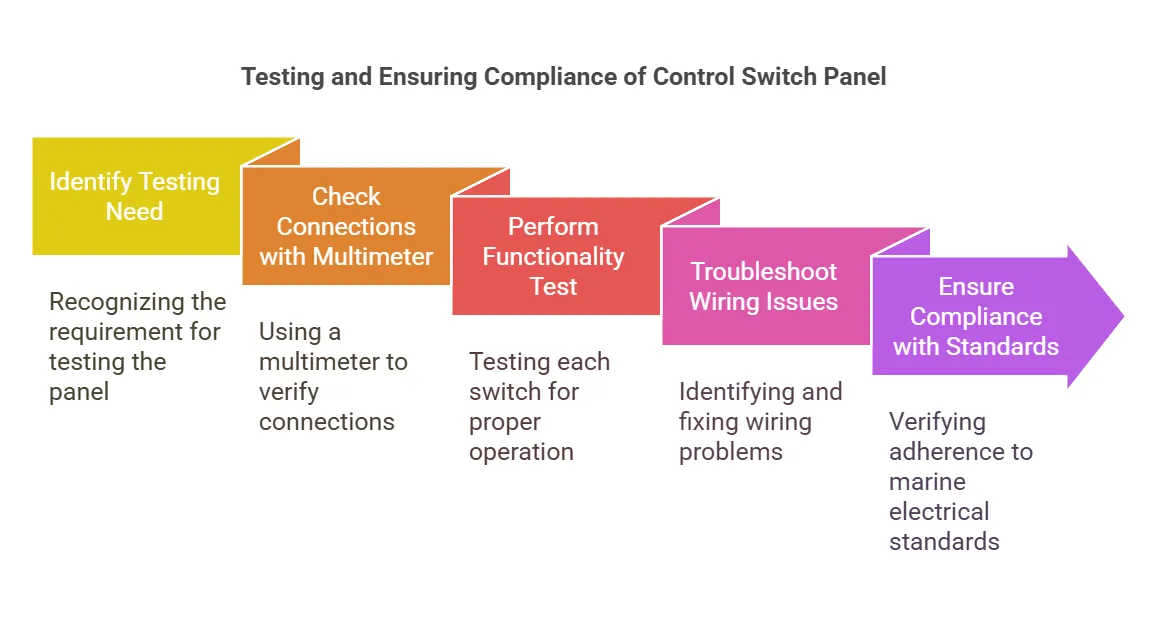
Assessing Home Electrical Safety With Old Switches
Electrical safety matters big time. Experts check old switches with modern lighting rules, inspecting surge protector setups, verifying a solid ground, and testing sensor responses with a trusty screwdriver. They focus on inspections, standards, and hiring pros to nail every detail, keeping your home safe and up to code.
Importance of Electrical Safety Inspections
Regular electrical safety inspections by pros are key when a home still rocks an old push button light switch; each check covers everything from the breaker to even a bit of paint chipping that signals wear, helping catch hazards before they lead to bigger issues. This hands-on review gives homeowners peace of mind knowing that every connection is properly safeguarded.
Key Safety Standards for Residential Electrical Systems
Modern homes depend on clear safety standards that cover every nook—from a window’s soft light to a ceiling fan’s steady spin—ensuring that even older switches don’t compromise security. Experts use a reliable tool to check wiring and share simple electrical safety tips, keeping the entire system robust and safe for everyday living.
Hiring a Professional for Thorough Electrical Assessments
A certified technician reviews every switch in the system, from areas near building insulation to spots by circuit breakers, to ensure the setup supports even heavy-duty devices like the refrigerator. This hands-on check offers real insights that help keep modern homes safe while addressing common concerns with aging electrical gear.
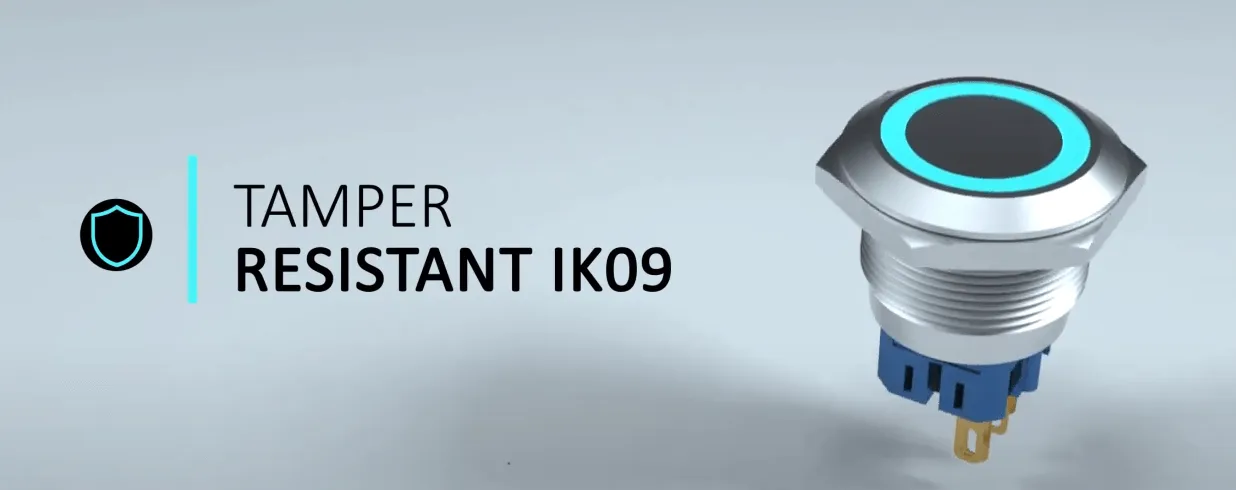
Modern light switches offer smart safety upgrades that lower risk during an emergency, in the kitchen, or near a floor light. New tech makes them energy-smart and a breeze to use. The next sections cover safety tweaks, energy wins, and user-friendly options that fit today’s needs.
Enhancing Safety Features With Modern Designs
Modern designs boost home electrical safety by reworking wiring solutions and integrating water-resistant features that handle everyday challenges. Experts share handy ideas, like using a reliable stripper for tidy wire ends, to ensure the upgrade offers clear benefits over old push button systems.
Improved Energy Efficiency With New Switch Technology
Modern switches ramp up energy use performance by fine-tuning the volt to deliver exactly what your electrical setup needs, ensuring your toaster and home electrical wiring both run cool. Experts say better insulation around the wiring helps control energy loss, making the boost in efficiency feel like a smart, low-hassle upgrade that tackles old switch issues head-on.
User-Friendly Options Available in Modern Switch Designs
Modern switch designs bring that ease of use everyone needs. They feature easy-to-adjust dimmers and smart layouts, passing tests at a nationally recognized testing laboratory to ensure reliable electrical work. Plus, with user-friendly cords and even a built-in wire stripper option, updating from old push button switches becomes a quicker fix than expected.
Resources for Further Information on Electrical Safety
Looking for expert electricians to inspect and replace outdated switches? This section covers where pros set guidelines using national fire protection association and UL standards, shares online DIY safety tips for solar power setups, and explains how to contact them for secure, modern solutions.
Where to Find Professional Electricians for Inspections and Replacements
Professional electricians hold the key to a sturdy electrical safety foundation—experts who check everything from erratic power cord fittings to aging switches that might affect a home appliance. Their practical advice, often circulated via a newsletter, proves crucial for home improvement projects and ensures safe replacements for outdated systems:
Service
Benefit
Example
Inspection
Identifies potential hazards
Checking power cord integrity
Replacement
Boosts overall safety
Upgrading old push button switches
Newsletter
Keeps homeowners informed
Home improvement tips and tricks
Recommended Guidelines for Home Electrical Safety
Experts suggest regular checks on the circuit breaker and every electrical circuits, especially in the basement where old wires often hide surprises. A trusted network of electricians can spot any issues early so homeowners feel secure knowing their setup meets modern safety needs.
Online Resources for DIY Electrical Projects and Safety Tips
Online sources offer plenty of clear, no-nonsense advice for anyone looking to get hands-on with DIY electrical projects and safety tips. Experts point out that these guides cover everything from basic automation to handling appliances like air conditioning units and using the right power tool, making projects for a room both safe and achievable:
Resource
Focus
Benefit
Tutorial Videos
DIY Projects
Step-by-step instructions
Forums
Safety Tips
Real user advice
Guides
Electrical Automation
Clear solutions for appliances
Push Button Light Switches | FAQs
Are old push button light switches safe in modern homes?
Old push button light switches can be safe if thoroughly checked. Experts stress a proper evaluation for updated wiring and parts to meet current use. A good inspection keeps everything running securely in modern homes.
Which signs suggest a switch must be replaced?
Push button switches can become sticky or unresponsive. A burning smell, odd sounds, or visible wear like cracks in the casing may signal that replacement is needed.
How can one replace a push button switch safely?
Always cut power first and confirm it’s off. Remove the old push button switch, note wire positions, and install the new switch carefully, matching wires correctly. Check wiring with a voltage tester before restoring power.
Can old switches risk home electrical safety?
Old switches can risk home electrical safety if their components are outdated or damaged, which may lead to shorts or sparks. Upgrading to modern models can help keep your setup reliable and secure.
What benefits come with modern light switch upgrades?
Modern light switch upgrades offer energy savings, improved durability, and faster response times. They simplify installation and boost control, turning ordinary rooms into smart, user-friendly spaces that suit bulk customization for push button switch manufacturing.
Are Old Push Button Light Switches Still Compliant With Current Codes?
Old push button light switches might look cool and sturdy, but many don’t cut it against today’s voltage demands and can put pipe connections at risk. Experts say these units often fall short of current safety codes, urging a quick check-up if they still power your place. A smart move is to upgrade to modern designs that reliably fit modern standards and keep things running smooth.
What Are the Risks of Leaving Old Switches in Use?
Keeping old push button switches in a modern home isn’t a good idea; the outdated parts might misbehave under today’s power demands. They could overheat or even trip a short circuit, leaving the electrical system as frazzled as a stressed-out performer. An experienced electrician would point out that swapping these out for modern models is a straightforward move toward a safer, more reliable home setup.
How Can I Tell if My Push Button Switch Is Defective?
The expert points out that a push button switch might be defective if it doesn’t click properly, feels loose, or causes the light to flicker oddly; these issues signal that the old setup may not handle modern loads. Indicators like a faulty switch mechanism, unpredictable light output, and warming contact points serve as a wake-up call:
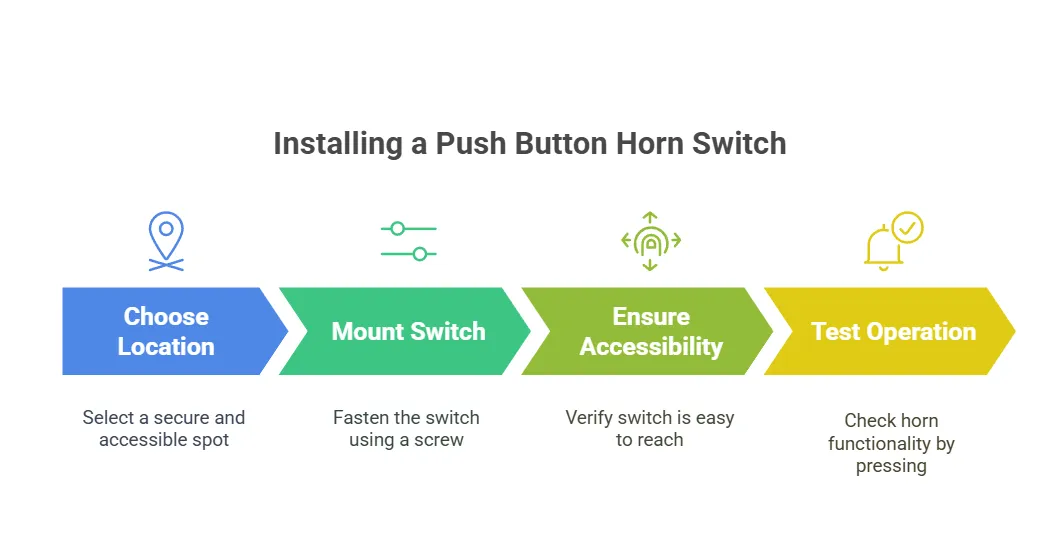
Ever struggle with mounting a panel switch the right way? This guide breaks down panel switch mounting techniques, workspace setup, and proper wiring. It shows each step to secure and test your installation so that nothing goes wrong later. Readers save time and avoid errors with these clear, hands-on tips.
Panel switch mounting starts here. It breaks down different panel switches—from simple buttons to setups using resistors on a printed circuit board. The guide lists key tools each machine needs and points out safety tips for working with a power supply. Every step is straightforward and practical.
Different Types of Panel Switches for Installation
When it comes to mounting panel switches, a variety of types suits every project need. Experts note that some devices rely on a panel mount toggle switch with ratings in volt and parts made from alloy and copper to keep work looking sharp, while others even integrate with a raspberry pi for added functionality.
Essential Tools Required for Mounting Panel Switches
The right gear is what makes mounting panel switches smooth. Experts gather a capacitor, brass fittings, a reliable power cord, a clear lens, and silver contacts to keep things tight and efficient:
Tool
Usage
Capacitor
Stabilizes the switch’s power flow
Brass fittings
Offers strong, durable connections
Power cord
Provides a steady energy source
Lens
Helps inspect fine details
Silver contacts
Ensures excellent conductivity
Electrical Safety Precautions for Switch Mounting
During switch mounting panel work, experts check each wire for damage and tighten every nut like they’re setting down a hot plate. They measure the diameter of every plastic piece to make sure nothing is wobbly. This method keeps everything safe, sidestepping any surprises when current flows.
Prepare Your Workspace for Efficient Panel Switch Installation
Clear your space. Keep a cart, arduino kit, and rotary switch close by. Ensure proper lighting and set up a sturdy table. Each tool—from a basic symbol to stainless steel fittings—plays its part in a smart setup. This approach makes the rest of the steps feel straightforward and friendly.
Clear the Area and Organize Tools for Easy Access
The workspace gets cleared, and every tool finds its own little nook—a circuit breaker, a dimmer, all safely arranged where the light cuts through any confusion. Experts compare each part against a solid operating temperature to ensure that nothing stumbles during the setup, making installation as smooth as a well-practiced routine.
Ensure Proper Lighting for Safe Workspace Conditions
Good lighting makes every detail count in an electronics workspace, letting technicians see sensors, actuators, and screw terminals clearly in a neat square setup. This simple upgrade helps prevent errors and guides every step with ease.
Set Up a Solid Work Surface to Handle Mounting Tasks
A sturdy work surface makes all the difference in mounting panel switches, letting pros solder with ease and keep voltage in check like a calm mushroom standing its ground. Using a solid table means contact components stay secure, which helps everyone get the job done without the usual fuss.
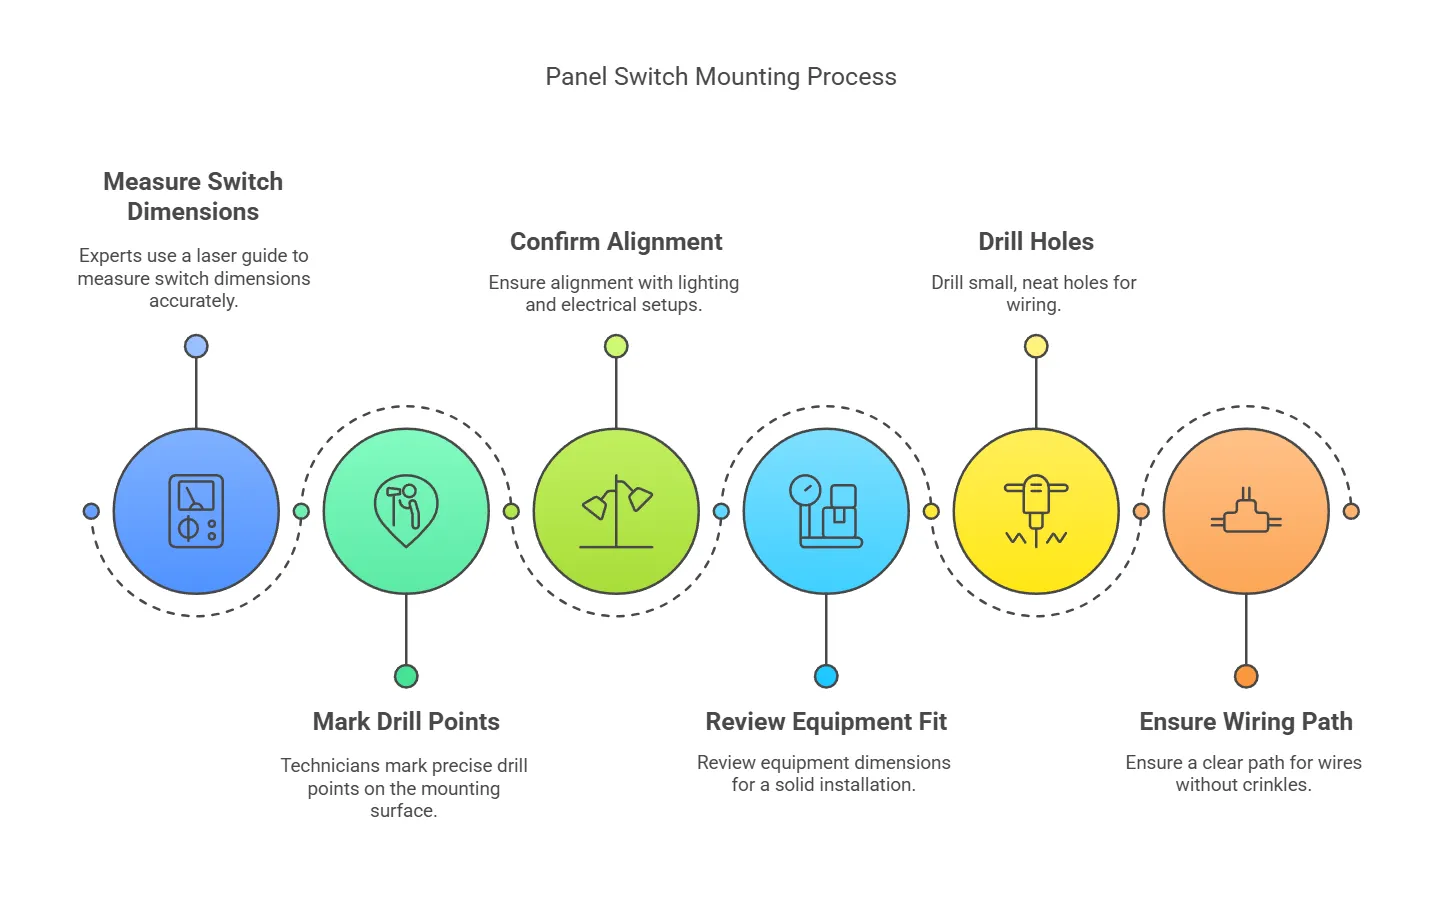
Step-by-Step Instructions for Panel Switch Mounting
Begin with accurate measurements for switch placement, marking drill points precisely. Then, drill holes to allow wires to pass through. This method checks the fuse for proper electric current, uses a lever for smooth operation, and aims for a fair price—almost like a good shopping cart deal. Each step feeds into the next practical move.
Outline the Initial Measurements for Switch Placement
Experts kick things off by using a laser guide to pinpoint spots while marking the panel for the 12v switch surface mount, keeping all electrical parts and lighting fixtures in their right places. They jot down equipment dimensions to avoid any future hassles and follow these steps:
Measure the switch dimensions
Mark precise drill points
Confirm alignment with lighting and electrical setups
Review equipment fit for a solid installation
Mark Drilling Points Accurately on the Mounting Surface
The technician marks each drilling point on the metal surface with precision, ensuring that every switch—especially the panel mount push button switch—and relay aligns perfectly with the flow of electricity. This careful setup not only eases the installation but also guarantees reliability when the current kicks in.
Drill Holes and Make Room for Wires to Pass Through
The technician drills small, neat holes while keeping the wiring path in mind. Carefully, they work to leave enough room for wires to pass without any crinkling or pinch. The process creates a smooth setup that clearly benefits the overall panel switch mounting effort.
Experts emphasize the need to identify your panel switch’s wire configuration, strip each wire end carefully, and secure every connection with the right tools. This method builds a reliable electrical setup and paves the way for clear, practical step-by-step instructions that follow in the guide.
Identify Wire Configurations for Your Specific Panel Switch
The expert checks the wiring layout carefully before hooking up any switches, ensuring that every conductor finds its proper spot on the panel. With a practical eye for detail, the technician uses the switch specifications as a guide to match each wire with its right connection, keeping the setup straightforward and reliable.
Strip Ends of Wires Before Making Connections
Skilled experts strip the wire ends neatly, exposing just enough metal for a secure bond without any fuss. This careful prep makes connecting wires to the panel switch smooth and reliable, cutting down on rework and giving peace of mind during installation.
Secure Connections With Appropriate Tools for Durability
Experts rely on tools like insulated crimpers and torque screwdrivers to secure wires firmly, ensuring the panel switch operates reliably. They work carefully to lock every connection in place and keep voltage steady, which means less chance for future rework. Using the right gear makes the setup long-lasting and hassle-free, meeting industry standards for durability and performance.
Check functions before closing the panel and hiding wires. Review every electrical connection to ensure safe operation while troubleshooting common issues that surface after mounting. This step sets the stage for a reliable panel switch installation with clear insights and practical tips.
Check Functions Before Closing the Panel and Hiding Wires
They test each switch press and verify every connection before sealing up the panel, ensuring the switch works as it should. This hands-on check saves a lot of hassle later, keeping the installation process straightforward and reliable.
Ensure Safe Operation by Reviewing Electrical Connections
Experts double-check every connection to confirm that the panel switch is working safely. They review wiring, test terminals, and ensure no loose parts remain during installation:
Inspect wiring pathways
Secure all terminal connections
Test for proper signal flow
Troubleshoot Common Issues That May Arise Post-Mounting
The technician spots that post-mounting issues often come from a few loose wires or skewed contacts, so he checks every connection and reaffirms wiring paths. He tweaks the setup with a careful test run, ensuring the panel switch works perfectly while sidestepping future mishaps.
Maintain Your Panel Switch for Long-Term Performance
Experts say keeping a panel switch in good shape is a must. They recommend scheduled inspections to catch faults, regular cleaning to keep dust at bay, and quick replacement of damaged switches for safety. These steps set the stage for a reliable, long-lasting setup.
Schedule Regular Inspections to Catch Potential Faults
Regular inspections keep the panel switch working right. Experts recommend checking each part for signs of wear and ensuring firm connections to catch faults early before they become a problem:
Inspection Step
Focus Area
Benefit
Visual Check
Component wear and tear
Prevents unexpected downtime
Connection Test
Wiring and contact integrity
Keeps power steady
Component Review
Early fault detection
Extends system life
Skilled technicians stick to a strict schedule, checking and tightening every connection to avoid any hiccups and ensure long-term performance.
Clean Panel Surfaces to Avoid Dust and Debris Buildup
Experts keep panel surfaces neat with regular wipe-downs to cut down on dust and debris buildup. A tidy area means a safer, more reliable switch setup that stands up to daily use without unexpected issues.
Replace Damaged Switches Promptly to Ensure Safety
When a panel switch shows signs of wear, swapping it out right away can save a lot of trouble later on. The technician points out that a quick replacement avoids messy repairs and keeps the whole system running without a hitch. Smart upkeep like this gives everyone a bit more peace of mind and keeps things safe and steady.
How to Mount a Panel Switch | FAQs
What are the key mounting techniques for panel switches?
Push button panel switches use three main techniques: flush, surface, and recessed. Flush places the switch in line with the panel, surface mounts it on top, and recessed fits it into a carved spot for a neat, secure setup.
How do you set up your workspace for switch installation?
Clear your workspace and arrange essential tools with care. Make sure lighting counts and map out wiring paths before installing push button switches. A neat, well-organized area makes switch installation a breeze.
What steps do you follow for mounting a panel switch?
Disconnect power. Mark the switch spot, drill holes, mount the bracket, connect wiring correctly, then test the panel switch.
How can wires be secured to the panel switch?
Wires may be secured to the panel switch by using dedicated mounting clips or screw-connected terminals. The clamp holds wires firmly and prevents movement, ensuring steady and safe performance.
How do you test and maintain the panel switch?
Testing panel switches can be done with a multimeter to check voltage and ensure proper contact. A visual inspection for wear, combined with routine cleaning and adjustment, keeps the system running smoothly and safely.
Ever wonder why push button switches work so smoothly? This guide explains how a push button switch works, breaking down its types and functions in clear terms. Readers will learn about momentary and latching switches while getting practical tips for push button light and on/off switches. It tackles common challenges and clears up any confusion about switch functions, making the process easier for industrial buyers and manufacturers.
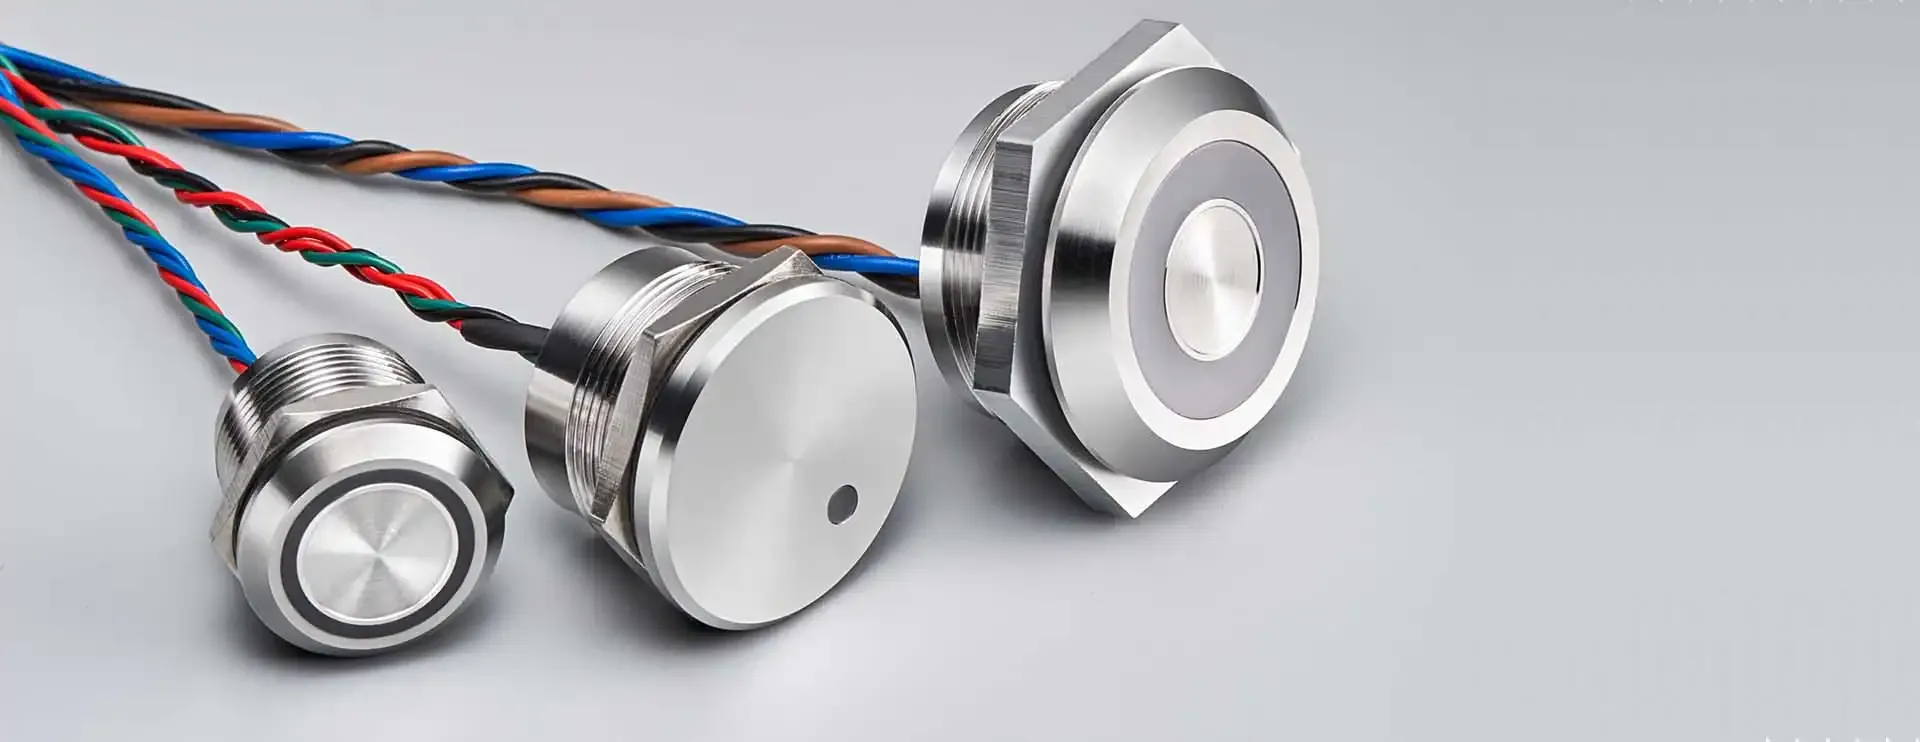
A push button switch is a compact device that activates a circuit with a simple press. It uses a screw terminal setup that keeps wiring neat and secure, perfect for tight spaces. It shows up in lots of instrumentation projects where reliability matters.
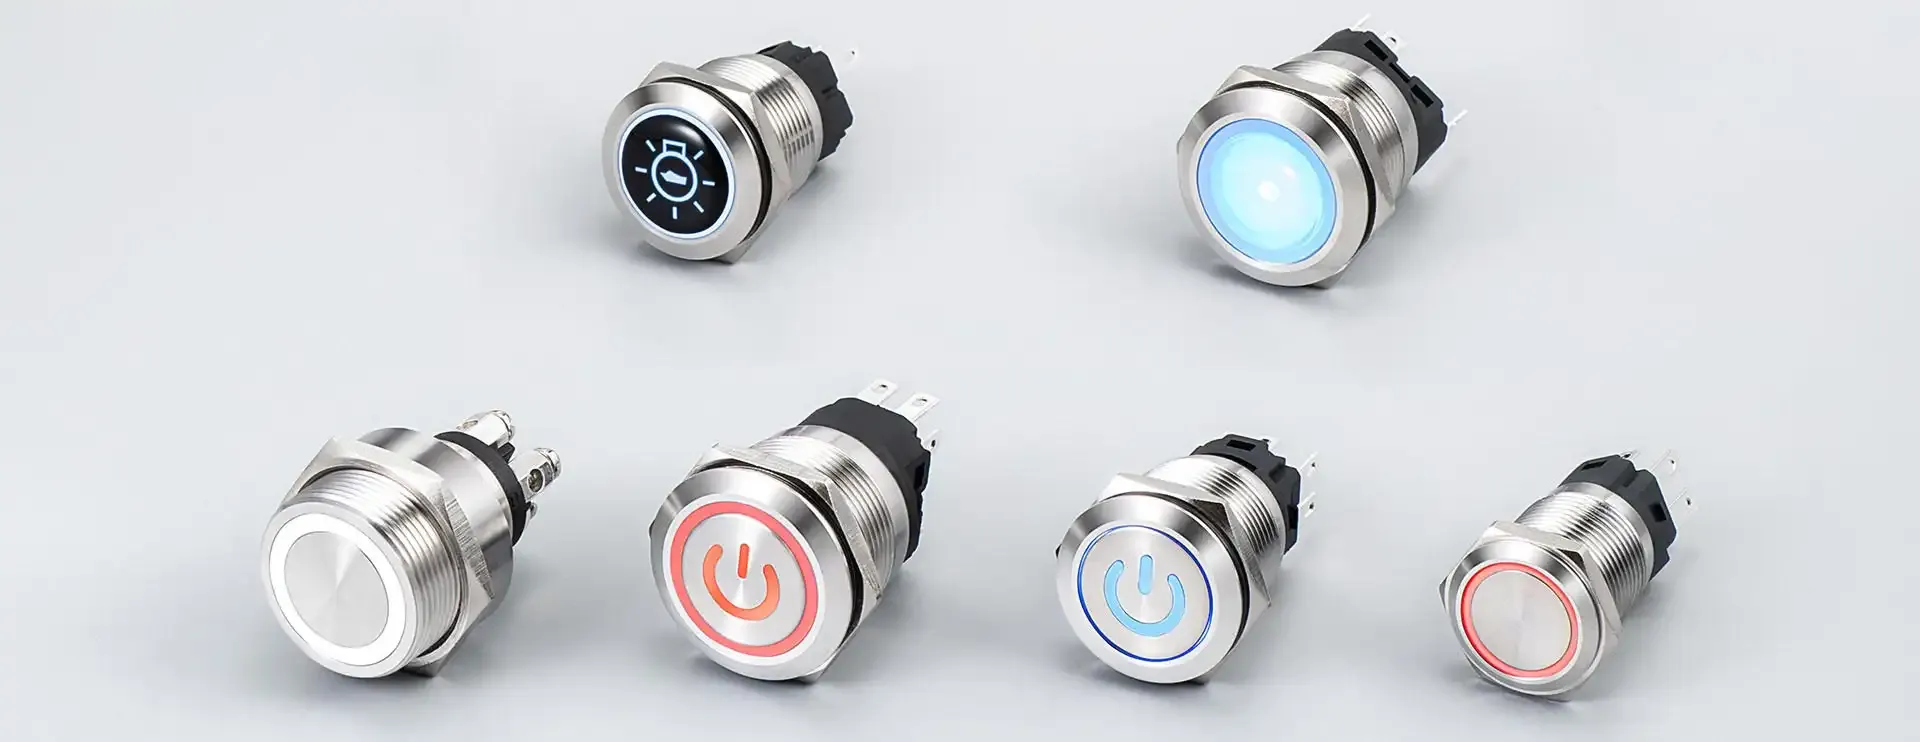
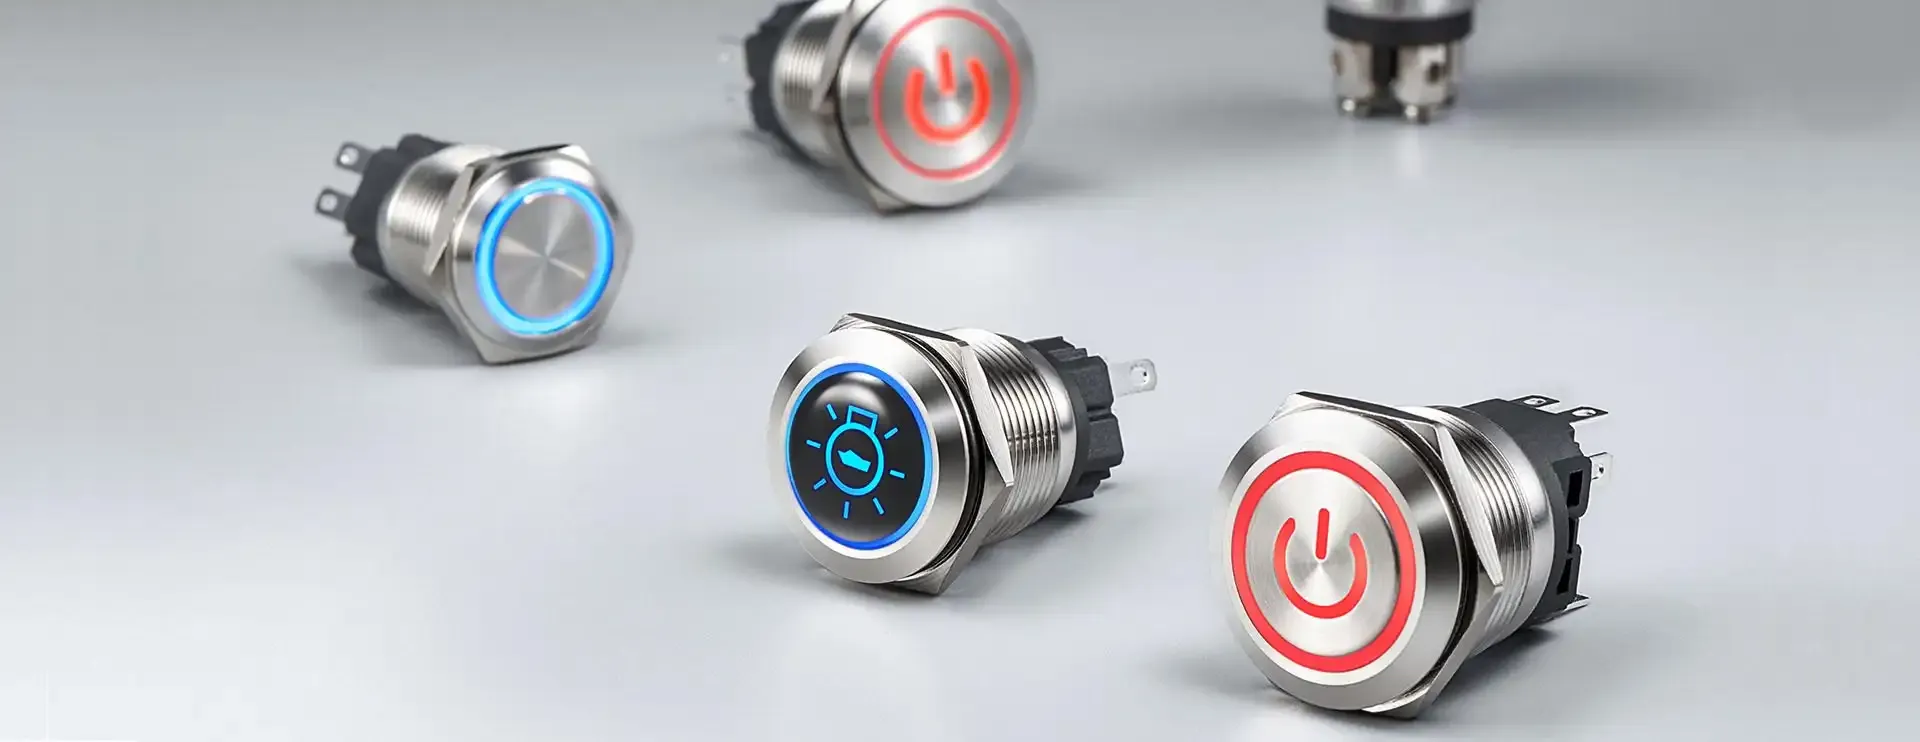
This switch makes things happen when it gets a nudge, kicking circuits into gear instantly. Its design can include vivid color highlights and noticeable brightness to signal its status clearly. It proves its worth in jobs that demand clear signals and rugged performance.
Manufacturers rely on these switches for dependable operation in harsh settings. Many models come with waterproofing to handle splashes and messes without a fuss. Their no-nonsense design fits right into industrial panels, keeping things simple and effective.
A push button switch works like a mini messenger in a circuit. When pressed, it sends a crisp signal, kind of like a key on a computer keyboard, telling everything around to gear up. Its design fits right on a printed circuit board, keeping the trail of information neat.
The switch relies on metal parts made from sturdy alloy to keep things smooth. When the button engages, it clacks securely and quickly closes the circuit. This reliable action ensures that the flow of information never misses a beat.
In tough setups, the switch stays cool and efficient, executing its role without fuss. It sends a clear signal with each press, much like how a computer keyboard does its job. The printed circuit board holds it all together, letting information travel without hiccups.
Momentary push button switches connect circuits only when pressed. They use sturdy parts like bronze components and a resistor system to manage electricity. These switches work in consumer setups and industrial controls that demand speed and a light design. Future sections detail their operation, main uses, and key advantages.
How Does a Momentary Push Button Switch Work?
The momentary push button switch works by having a sensor detect a quick press, letting a burst of electron energy close the circuit, much like ac power plugs and sockets manage to seal connections with a snap. Its simple ergonomics offer a clue on how does a latching push button switch work:
Action
Response
Component
Quick Press
Signal Sent
Sensor
Electron surge
Circuit Closed
Switch Contacts
Key Applications for Momentary Push Button Switches
Momentary push button switches work wonders in settings like computer interfaces and industrial controls, where an actuator’s quick move sparks immediate results. Their design uses a secure screw system to keep every electrical contact in place and helps prevent a short circuit, ensuring reliable performance even under constant use.
Advantages of Using Momentary Push Button Switches
Momentary push button switches bring a lot to the table, from a quick reset to a wiring diagram-friendly setup and even a built-in buzzer for clear signals—all wrapped in robust stainless steel that stands strong against corrosion:
Feature
Benefit
Reset Function
Quick recovery for smooth operation
Wiring Diagram
Simpler installation and maintenance
Buzzer Alert
Instant audio feedback while troubleshooting
Stainless Steel
Strong resistance to corrosion in harsh environments
Latching push button switches hold circuits steady after a press. They use plastic and steel in electrical engineering setups, like a dependable light fixture. With solid contact, these switches deliver reliability and clear benefits. Next, the talk dives into their mechanics, common uses, and standout advantages.
How Does a Latching Push Button Switch Work?
A latching push button switch works by locking into place after a press, much like a boat that steadies itself in rough water, and its design makes sure the mechanism holds firm through every use. It sends reliable feedback and data on its behavior, ensuring that every touch results in clear, efficient action on the circuit.
Common Uses for Latching Push Button Switches
Latching push button switches play a solid role in setups like microwave ovens that need a quick on-off, contactor systems managing big machines, and even bells that give an audible nod for safety. Industry experts appreciate this technology for keeping maintenance simple and operations smooth without any extra fuss.
Benefits of Latching Push Button Switches
Latching push button switches offer steady performance from home improvement setups to large-scale manufacturing, providing reliable remote control actions and enhanced visibility when paired with an electromagnetic coil for precise signal handling:
Push Button Light Switches mix electrical wiring, home automation, and power supply with smart software that delivers speedy responses. They work great in everyday settings like offices and workshops. Up next, the details reveal how these switches perform, their typical uses, and the clear perks they offer.
How Does a Push Button Light Switch Work?
A push button light switch works by closing a circuit with a quick press, sending direct current through its setup to light things up. It often displays a yellow accent that signals its status, and when paired with a javascript system for access control, it keeps running smoothly even when dust gets in the way.
Typical Scenarios for Push Button Light Switches
The push button light switch shows up in spots where quick fixes matter, like in industrial layouts and the automotive industry, where a firm press can interrupt circuits and deliver energy bursts on demand. Its design as an electronic switch, often featuring a sleek silver finish, proves useful for real-world problems that demand reliable performance without fuss.
Advantages of Push Button Light Switches
Push button light switches deliver a no-nonsense approach that fits right into the rhythm of busy industrial setups and consumer electronics projects. This electronic component offers crisp communication with each press, bringing a fresh dose of reliability that brightens up a bathroom or any space needing a smart, clean look—all without the usual fuss.
Push button on/off switches use solid metal to fight wear and tear and handle pressure. They work like a rotary switch with a lever-style action. The text covers how the switch operates, common industry uses, and clear benefits in everyday applications. Practical insights show the strength and simplicity of these reliable components.
How Does a Push Button on/Off Switch Work?
A push button on/off switch toggles circuits by making or breaking contact with each press, a mechanism that works smoothly on a home appliance and shows up clearly on a datasheet. It keeps troubleshooting simple and reliable, whether it’s signaling an LED lamp or activating an elevator, ensuring a clear and effective performance every time.
Applications of Push Button on/Off Switches
Push button on/off switches shine in setups that handle steady voltage and substantial electrical load, proving their durability in industrial lines and everyday products. Engineers often raise the question, “how does a push button light switch work?” as they rely on these devices to deliver a solid, no-fuss performance every time.
Benefits of Push Button on/Off Switches
The push button on/off switch stands out when it comes to practical use, making it almost as reliable as a kill switch in high-stakes setups. With careful solder work and a clear diagram to guide installation, this machine-ready component gives extra knowledge to anyone looking to fix issues fast and get the job done without any fuss.
Push button switches split into momentary and latching types, each with its own specification quirks. Light switches often stand apart, too—think touch switch tech, capacitor details, and safety standards that even factor into ceiling setups. The next bits break these down so the right choice fits any need.
Key Differences Between Momentary and Latching Switches
Push button switches come in two flavors that matter a lot to a customer: momentary switches only complete the circuit while the button is pressed, whereas latching switches keep the circuit closed until it gets another nudge. They help build a user interface that fits a tight space and works smoothly with alternating current systems:
Momentary: activates the circuit briefly, perfect for rapid actions
Latching: holds the connection steady until reset, ideal for control panels
Interface: ensures a clean, friendly experience for every user
How Light Switches Compare to Other Types
Light switches stand apart with a robust design that uses copper wiring to keep electric current in check, ensuring every press serves as a clear signal even in an emergency situation. Their mechanism acts like an intercom with a secure pin connection, offering a no-nonsense performance that even the toughest industrial setups rely on.
Choosing the Right Push Button Switch for Your Needs
Engineers know a push button switch isn’t just a button—it’s a tool that brings clear function to systems, whether used in an arduino project, a light switch setup, or even playing a role in a circuit breaker scheme. Choosing the right switch means balancing durability with ease of integration, so the decision fits the project’s needs without any fuss.
Additional Resources on Push Button Switch Technology
This guide offers extra insights with a brass symbol marking quality and reliability in every push button switch. It helps readers understand how a tool can manage a wire setup while toggling a dimmer with a simple press.
Additional online articles serve as a tool for those who need clear instructions on wiring and installation. They point to a brass element that acts as a symbol of strength, proving that even a small switch can pack a punch.
Technical briefs and hands-on guides show how a solid switch holds up against routine use with seamless wire connections and smooth dimmer action. They use a brass detail as a symbol to mark each step in making these systems work efficiently.
How Does a Push Button Switch Work | FAQs
What is a push button switch and its primary uses?
A push button switch is a compact device that makes or breaks a power circuit when pressed. It shows up in control panels, machinery, and everyday gear—perfect for quick, dependable power control.
How does a momentary switch differ from a latching type?
A momentary switch only stays on while pressed, while a latching type remains activated until manually reset—making push button switches handy for quick, temporary control versus steady, continuous operation in manufacturing setups.
What makes push button light switches popular in design?
Push button light switches charm designers with a modern look and great control. They fit neatly in various spaces and can be tailored for any project, making them a hot pick for design and ease of use.
How do push button on/off switches operate for safety?
Push button on/off switches work by completing or breaking the circuit with a quick press. This stops or starts power immediately, meeting safety standards by halting current flow to reduce shock, fire, and equipment damage.
Can manufacturers customize push button switches for bulk orders?
Yes, manufacturers usually offer custom push button switches for bulk orders. They work with customers to modify design, materials, and features to match specific needs and applications.
Struggling with a faulty industrial push button? This post breaks down key push button components and tackles common issues head-on. Readers get clear troubleshooting techniques and effective solutions to fix these problems fast, saving time and money. The tips shared here help prevent downtime and improve overall performance.
Industrial push buttons come in varied types, built tough with common materials and smart specs like ip code ratings and ergonomics. This gear impacts how equipment and machines perform. A quick web browser search shows experts that the right push button is key—setting the stage for clear insights into each component.
Overview of Push Button Types
Industrial push button types come in all shapes and sizes, from rugged steel models to sleek designs built for smooth management and integration with an operating system. These buttons often support transport layer security measures and prove useful in goodman furnace troubleshooting, making them a reliable choice when equipment demands practicality and ease.
Common Materials Used in Push Buttons
Industrial push buttons use tough metals, resilient plastics, and composite materials that keep a button push steady and reliable, even under harsh conditions. Experts in electrical buttons and switches know that quality materials help with equipment accounting and system software checks, avoiding confusing jargon by keeping it simple and smart:
Stainless steel for durability
Polycarbonate plastics for impact resistance
Composite blends for optimized performance
Key Specifications and Features to Consider
Industrial push button specs boil down to a few real must-haves: solid design that can handle signals from a server, reliable wire connection to keep data flowing, and tough builds that work even when the situation feels as uncertain as a faulty doorbell or a skipped credit card swipe:
Durable materials that stand up to heavy use
Reliable design ensuring tight server integration
Secure and proper wire connections for smooth function
User-friendly performance that acts like a well-timed doorbell
Cost-effective solutions with reliability like a credit card purchase
Importance of Selecting the Right Push Button
Choosing the right push button is vital for keeping an efficient system in place—one that integrates fault-free actuator controls supported by robust technology and helps build strong customer relationship management using a clear checklist:
Unresponsive push buttons have several culprits. Mechanical faults, environmental wear, and wiring mistakes mess up an http cache and impact the client experience. Next, the text looks at issues like lack of response, moving parts going off-track, harsh surroundings, and wiring errors—even those pesky malware hiccups. This sets the stage for smart fixes.
Unresponsive Push Buttons and Their Causes
Pushbuttons sometimes act up because the physical switch is worn out or loose wiring starts to misbehave. A smart process of elimination helps pinpoint if a transmission control protocol hiccup or even antivirus software is playing mind games, letting experts sort the issue and get things back on track.
Mechanical Issues Affecting Functionality
Engineers often face issues where mechanical parts just don’t work as planned. Wear on a pilot light or a loose wiring connection can disrupt frequency checks and wireless signals, forcing quick troubleshooting to get things back in line:
Issue
Cause
Solution
Worn Components
Pilot light damage
Expert inspection and repair
Loose Wiring
Connection faults affecting wireless operations
Secure wiring to stabilize frequency outputs
Environmental Factors and Durability Concerns
Industrial push button switches can struggle with wear from harsh weather and dusty factory floors, a hassle kind of like trying to fix ac in car issues on a scorching day. Research by comptia-trained pros shows that steady problem solving goes a long way in stopping packet loss and keeping these buttons tough and ready for action.
Wiring Errors Leading to Malfunction
Wiring errors in a push switch assembly can lead to misread signals and erratic pressure readings, even when the operating temperature is stable and the ip address is correctly set; a single loose connection may result in false alerts to the help desk:
This section lays out a step-by-step process for troubleshooting industrial push buttons. It covers using multimeters to diagnose issues, checking loose wiring, and assessing control system fit—even for a momentary button on microsoft windows setups. A quick screenshot or resource guide adds practical insights to tackle common problems.
Step-by-Step Process for Effective Troubleshooting
The expert lays out a clear process for troubleshooting push button switches much like fixing goodman air conditioner problems—starting with a quick computer check alongside a robust firewall setup to catch any artificial intelligence glitches that might hint at a failure:
Inspect each wiring connection for any looseness
Use a computer diagnostic tool to check signal consistency
Review settings on the firewall to ensure proper protection
Check the physical button for signs of wear or damage
Using Multimeters to Diagnose Issues
Industrial push button experts use a multimeter as a no-nonsense tool to check every detail—from getting the definition of voltage levels on a latching switch right to keeping an eye on radio signals, all while verifying proper authentication and spotting any vulnerability in the setup:
Measure voltage on latching switches
Confirm stable authentication signals
Inspect radio frequency output
Identify any potential vulnerability
Identifying Loose Connections and Wiring Problems
Engineers see loose connections as a major hiccup in a button switch system that can throw off automation and ramp up downtime. The hypothesis here is simple—a tiny wiring slip or a misaligned default gateway can stop things cold, causing unexpected errors:
Issue
Impact
Solution
Loose wires
Increased downtime
Tighten connections
Misaligned default gateway
Automation interruptions
Recheck wiring
Button switch errors
System glitches
Test each link
Assessing Compatibility With Control Systems
Assessing control system compatibility means checking if an electrical button plays nice with the rest of the system, all while keeping the complexity low. Experts often refer to a clear document and a table of contents in javascript guidelines to spot any misfits early on, saving time and effort.
This section explains fixes for common industrial push button problems. It outlines routine care, component upgrades, protective measures against rough environments, and alternative designs to avoid failures. The tips compare a laptop’s adjustment of plastic parts to refining a gateway for smoother communication in any complex system.
Recommended Maintenance Practices
Industry experts note that routine maintenance in manufacturing is key, especially when a dpdt momentary switch starts acting up or a circuit breaker trips, dimming the light on efficiency; they recommend keeping an eye on every component via api checks and hands-on tests. Here are some essential steps to keep things running smoothly:
Inspect the dpdt momentary switch regularly
Test circuit breaker responsiveness during light checks
Use api tools to monitor manufacturing performance
Upgrading Components for Enhanced Reliability
The manufacturer upgrades critical components to handle unpredictable behavior in systems, whether it’s a momentary contact switch or an e stop button acting up. They recommend a quick menu check on control panels and a fresh emergency stop button when the system shows signs of wear:
Component
Keyword
Solution
Push Button
Behavior
Upgrade for stable performance
Momentary Contact Switch
Momentary contact switch
Replace with enhanced response units
E Stop Button
Emergency stop button
Install new models for reliable safety
Control Interface
Menu
Verify settings and recalibrate regularly
Implementing Protective Measures Against Environmental Damage
Industrial push button experts stress that protective measures against harsh weather and grime need to be spot on; they back up every move with careful root cause analysis, clear datasheet steps, and practical ge dishwasher troubleshooting to keep the starter button working like a champ:
Element
Purpose
Starter Button
Boosts durability under stress
Datasheet
Provides clear installation steps
GE Dishwasher Troubleshooting
Demonstrates practical fixes for tough conditions
Root Cause Analysis
Identifies the true source of environmental damage issues
Selecting Alternative Designs to Mitigate Failures
Industry experts say alternative designs can help when the usual fixes fall short. They often recommend debugging the controls like checking a clunky light switch, tracing the root of the issue before deciding to contact or reset the router. This straightforward approach cuts out the hassle and keeps systems running smoothly.
Best Practices for Maintenance of Industrial Push Buttons
Regular checks, smart cleaning, precise records, and hands-on training keep these buttons in top shape. This approach cuts latency, patches issues fast, and boosts team skill while giving customers clear information. It sets a strong base for solving common push button problems and helps keep systems running smoothly.
Regular Inspection Schedules
Regular inspection schedules act like keeping a tidy desk, ensuring every push button’s usability stays high and productivity doesn’t falter. Simple checks, inspired by tips from Schneider Electric and ideas found on the world wide web, let experts catch problems early and set systems right without fuss.
Cleaning Techniques for Longevity
Industrial push buttons need a good cleaning routine to keep them working right—sort of like when customer support steps in for an hp printer not printing, cutting through the nonsense and keeping things on track without letting dirt grow like a mushroom on old tech; experts point to basic upkeep as a beacon for reliable customer service. Follow these steps:
Wipe away dust and grime with a damp cloth.
Use a gentle detergent to lift stubborn particles.
Dry off thoroughly to prevent moisture buildup.
Inspect regularly to ensure ongoing performance.
Documentation of Maintenance Records
Documentation of maintenance records gives experts a clear trail to follow, much like tracking changes on a printed circuit board or catching a printer error over the internet. Detailed records of every check and Chamberlain garage door opener troubleshooting feedback help teams nail down push button issues quickly and keep operations running without a hitch.
Training Staff for Proper Usage
Industry experts note that training staff properly is a must in push button maintenance. They get hands-on with computer hardware checks, ensuring every power cord and signal passes the test, and boost their knowledge with clear analytics to keep systems humming along smoothly:
This section offers hands-on tips. It covers contacting manufacturers for support, online forums for troubleshooting, and manuals plus compliance guidelines packed with knowledge management insights. Experts can use google chrome to search, rely on a trusty pin for minor fixes, and keep asset info front and center for easy troubleshooting.
Contacting Manufacturers for Support
When manufacturers offer support, they keep it simple for issues tied to electrical wiring and even challenges like samsung refrigerator problems. They assist customers facing hurdles with medical device controls or components like the eaton 10250t, ensuring a glove is always handy for on-site help:
Reach out via phone or email for quick advice
Review troubleshooting guides provided by support teams
Get hands-on help with wiring adjustments and component checks
Request personalized service for unique challenges
Follow up with expert recommendations for preventive care
Online Forums and Communities for Troubleshooting Help
Industry experts find that online forums and communities offer a straightforward introduction to troubleshooting, mixing hands-on sensor techniques with practical advice on how every network packet can reveal hidden issues in metal or stainless steel components. This approachable community spirit helps ease pain points while giving professionals a real-world pulse on keeping push button systems running smoothly.
Manuals and Technical Documentation
Manuals and technical documentation serve as a steady online resource for anyone working with industrial pushbutton switches, offering clear steps to fix issues with a momentary switch in real-world scenarios. This reliable material provides practical learning that cuts through the confusion and guides teams to quickly tackle emergency repairs.
Industry Standards and Compliance Guidelines
Industry standards and compliance guidelines set a solid blueprint for smooth industrial push button operations, acting as a clear interface between design and real-world application—much like avoiding a glitch on a smartphone or the headache of an ice maker not making ice. Data-backed practices help manufacturers fine-tune every detail, so issues are caught early and systems work as they should.
How to Troubleshoot Common Issues with Industrial Push Buttons | FAQs
What are the main parts of an industrial push button?
Industrial push buttons mainly consist of an actuator, a housing, a contact mechanism, and a terminal assembly. Each part works together to offer safe, reliable switching in tough industrial settings.
Which issues are common with push button switches?
Push button switches often face issues like worn contacts, misalignment, and debris buildup, which may cause erratic performance. Regular inspections and proper cleaning can keep them reliable for everyday industrial work.
How can faulty push buttons be troubleshot?
Start by checking wiring and cleaning contacts. Test the button with a multimeter and inspect solder joints for cracks. Replace any faulty parts to keep your push button switches running smoothly.
What solutions fix frequent push button problems?
Fixing frequent push button issues means checking loose contacts, re-calibrating the switch mechanism, and sometimes swapping in reliable, bulk-customized units. Regular maintenance cuts down on misfires and boosts performance.
Where can further resources on push button maintenance be found?
Check out trusted industry websites, our resource center, and top contractor forums for clear guides on push button maintenance. These platforms offer practical tips and expert advice to keep your push button switches running smoothly.
Ever get stuck trying to pick the right electrical button switch for your project? You need one that clicks—just like a sturdy kickstand—and works with your AC power plugs and sockets. This post lays out a few basics: the types of switches, key specs including a momentary off switch, and a look at brands like legrand switches. You’ll match the right option to your user profile and product needs, saving you time and hassle.
What is an Electrical Switch
The electrical switch is a small device that controls power—perfect for setups focusing on sustainability and accessibility. Whether upgrading a bathroom, tinkering with a new Nintendo 3ds project, or working with switch electric companies, you’ll soon see how these switches fit into your plan.
An electrical push button switch is that small power boss you rely on. It works as an up down momentary switch and even puts your system in sleep mode—saving energy without any fuss. Many come in plastic or metal so you can easily replace one when needed:
Simple push to control power
Up down momentary switch operation
Built-in sleep mode for energy saving
Constructed from durable plastic
Quality manufacturing in japan
Easy to replace if things go south
The Importance of Electrical Button Switches
Electrical button switches control electric current in many setups. They work as relays or actuators in gamepad controls or developer projects. The right push button switch saves energy and cuts out extra hassle. Stick around as we look at their roles, benefits, and where they commonly come into play.
The Role of Electrical Button Switches in Applications
These switches keep your projects tight and simple. Whether you’re using a momentary push switch that gives instant feedback, relying on a tough bronze build for your video game controls, or matching up with your headphones setup, these parts work hard for you:
Instant feedback with every press
Reliable momentary push switch performance
Rugged bronze components for lasting use
Seamless use in video game systems and headphone circuits
Benefits of Choosing the Right Electrical Push Button Switch
A quality electrical push button switch makes life easier, saving you time and frustration. When you pick a reliable switch built for universal flash storage, water hazards, and easy push on push off control that works right with your light switch, you score smoother operations and fewer breakdowns:
Smooth performance in every task
Robust support for universal flash storage
Strong resistance against water mishaps
Effortless push on push off action
Simple integration with your light switch systems
Common Applications for Electric Buttons and Switches
The electrical button switch keeps things ticking—handling your power supply load, syncing with Tegra units, and even smoothing out Wii setups—while matching the clear switch specifications every electrical contractor needs to see:
Solid power supply control
Slick performance with Tegra systems
Effortless compatibility with Wii projects
Meets the demands of electrical contractor work
Clear, dependable switch specifications
Types of Electrical Button Switches
Momentary types flip power with one quick press while maintained ones stick around until you act. Single-throw and double-throw options let you choose the setup you need. And push-button variants can power a machine interface, handle your Nintendo account signals, run on direct current, or even work for a ceiling fan.
Momentary vs. Maintained Switches
Devices like a keypad and HDMI, with wire running safely by a diode, so you need a choice that fits your style. Momentary switches quickly snap back, kind of like that fast dash in Mario Kart 8, while maintained switches hold their signal until you cut it off:
Momentary: Quick press gives fast action and resets automatically.
Maintained: Remains active until you manually switch it off.
Ideal for setups with a keypad, hdmi, robust wire, and diode protection.
Perfect if you want performance inspired by a mario kart 8 race.
Single-Throw and Double-Throw Switches
Decide between a single-throw and a double-throw switch based on how simple or versatile you need your electric design to be. Single-throw gives you that straightforward on/off action, while a double-throw option lets you toggle between two outputs to match strict switch specs in commercial projects and keep a steady network flow with bluetooth ease:
Aspect
Single-Throw
Double-Throw
Operation
Basic on/off control
Toggles between two circuits
Application
Standard electric setups
Robust commercial systems
Connectivity
Works with a basic network
Seamlessly links with bluetooth devices
This breakdown helps you pick the switch that fits your needs, cutting through the confusion and keeping your projects running smoothly.
Push-Button Switch Variants
You need a switch that fits your project like a glove—and push-button switch variants give you just that. You can pick models built as a solid tool for high voltage tasks, with a lever feel that locks in a smart design perfect for a kitchen setup, all while keeping things simple and reliable. Consider these options:
Model with a lever-activated push for quick control
High voltage-rated switch for tough jobs
Design-focused variant built to perform in a kitchen environment
Reliable tool-style option that makes operation easy
Check current and voltage ratings, durability marks, and contact builds before you choose your switch. These specs make sure your device works with a touchscreen, button light switch for home improvement, or even a mobile game or gamecube rig. They give you the lowdown on picking a switch that really fits your project.
Current and Voltage Ratings
You need to check your current and voltage ratings when picking an electrical button switch – think of it as tuning your setup for that crisp 720p quality you expect in America. Make sure you match these ratings with the right fuse to keep everything safe and running smoothly:
Specification
Example Value
Current Rating
10A
Voltage Rating
250V
Fuse Compatibility
Appropriate match for load
Durability and Environmental Ratings
When checking the durability and environmental ratings, see if your switch is built tough enough to handle everyday mishaps—whether it’s unexpected splashes or the constant wear of busy stairs. You need a switch with a spot-on diameter that fits seamlessly in your setup, works as clearly as a camera lens, and performs with the smooth consistency you’d expect from Nintendo switch online gear, with feedback you can trust as noted on ign reviews.
Contact Configuration
Contact configuration keeps your system running smoothly and fights off wear, like a trusty disconnect switch that never quits. When your project involves a PlayStation 4 setup or even a Nintendo ds lite tweak, you count on a solid contact design to deliver steady power every time.
How to Select the Right Electrical Push Button Switch
Check your application requirements, load types, and style. Look for sockets and switches that handle energy—like a waterproof momentary switch set to the right-inch size and a brass finish. This section shows you clear steps to pick the perfect fit.
Assessing Application Requirements
Size up what your project demands—maybe your design uses a printed circuit board paired with a Nintendo game card setup, a slim credit card layout, a precise dimmer control, or even an automatic transfer switch—to pick the switch that fits just right. This upfront check means you’re not left guessing later when you really need things to work, saving you time and hassle overall.
Understanding Load Types
Size up load types to make sure your switch won’t quit on you when it’s handling real work, whether that’s powering a light fixture or syncing up with a handheld game console. You can check pdf spec sheets and even run an accelerometer test on your setup to see if it holds steady, much like ensuring your plumbing stays leak-free in busy environments.
Evaluating Size and Aesthetic Considerations
Check that the switch’s size and look match up with your electrical wiring layout, so nothing seems out of place. You need a design that keeps an eye on electric arc risks, works well in setups like a video game console, and pairs nicely with the light and engine elements of your system.
Comparing Brands and Models
Check top switch brands from leading manufacturers. You read customer reviews and compare prices. Look at features like rotary switch action, secure screw fitting, wall mount design, solid electrical contact, and breadboard setup. This guide gives you a clear view of each brand’s strengths, ratings, and cost so you can pick what truly fits your needs.
Leading Manufacturers of Electrical Push Button Switches
When checking out top manufacturers of electrical push button switches, you see they design products to handle heavy electrical loads without any leak in performance—kind of like an SD card that just works. Their clear advertising gives you a solid lead on which models fit your product needs, making your choice a smart, stress-free move.
Evaluating Customer Reviews and Ratings
Scan customer reviews to see if someone has experienced a failure under heavy loads, like with a 400 amp disconnect setup, or during a nintendo labo tweak. You want a power switch that stands up to its job and keeps electric power quality high, so real user feedback goes a long way in guiding your choice.
Price Comparison Among Popular Brands
Check prices on the internet and notice the tags sometimes match the cost of a sturdy computer keyboard—especially when you need switches that handle mains electricity without a hitch. You can use your credit to lock in a model that delivers 1080p-clear performance, making your push button switch project both smart and simple.
Stick with simple steps: use a multimeter to set up your switch, ensure that your alloy fittings match your home automation needs, and monitor performance like a solid frame rate. Routine checks and a look at gigabyte-level data help spot common glitches, so you can keep everything running as it should.
Proper Installation Techniques for Electrical Button Switches
Get every wire secure when you mount your electrical button switch, making sure the silver finishes line up with your setup. Test the momentary pull switch as if you’re checking your wii u or xbox one, and confirm the 4 way dimmer switch responds right—follow these steps:
Double-check each wiring connection for a snug fit.
Align the silver components neatly with your control panel.
Press the momentary pull switch to confirm quick response.
Set up your 4 way dimmer switch properly.
Verify compatibility with devices like wii u and xbox one.
Routine Maintenance Practices
Check your switch on the regular to dodge any sudden hiccups. Routine maintenance means you watch for humidity buildup, mark any issues with a simple symbol, check the regional lockout settings, confirm the design backs a solid patent, and ensure the power stays steady:
Maintenance Aspect
Your Action Step
Humidity
Keep an eye out for moisture and clean as needed
Symbol
Use clear markings to flag any irregularities
Regional Lockout
Check that settings prevent unauthorized access
Patent
Review documentation to back up design rights
Power
Test connections regularly to keep energy flowing
Troubleshooting Common Issues
You might find your momentary contact switch acting up or notice a hiccup with your AC adapter after long hours of use. It can feel like a Mario Kart race where every second counts, especially when unexpected issues push up the price for repairs. When things go sideways, check your wiring, give the switch a close look, and pull out your backup storage for spare parts:
Inspect wiring connections for a secure hold
Test the ac adapter to ensure proper output
Examine the momentary contact switch for any wear or damage
Verify available spare parts in your storage for quick fixes
Check electrical compliance standards, use proper operating steps, and wear the right gear. Think of the central processing unit and software like the brain and muscles of a cart—strong metal parts, clear oled displays, and steady safety practices keep your project running right.
Electrical Compliance Standards
Stick with electrical compliance standards that prove every piece—like a sturdy screw terminal in your switchgear—can handle the job, even when tested for motion with a gyroscope. You want exclusives that pass these tests so you can keep your project safe and straightforward without any fuss.
Safe Operating Procedures for Button Switches
Be sharp when working with button switches—always check every wiring connection and make sure your push light switch is spot-on, whether you’re setting up on the Nintendo network, in the United Kingdom, or following safety tips like those in The Legend of Zelda to avoid any hazard:
Inspect all wiring for secure connections
Confirm your push light switch responds correctly
Verify compatibility with your system’s power needs
Wear proper safety gear during installation
Review operational guides regularly
Using Protective Equipment
When working with double pole double throw momentary switch, you need to suit up—especially if you’re tweaking setups or testing capacitive sensing in virtual reality projects—so you can keep every electron in check:
Wear insulated gloves
Use safety eyewear
Don non-slip, grounded shoes
This gear helps you stay safe while you tackle each task with confidence.
Innovations in Electrical Button Switch Technology
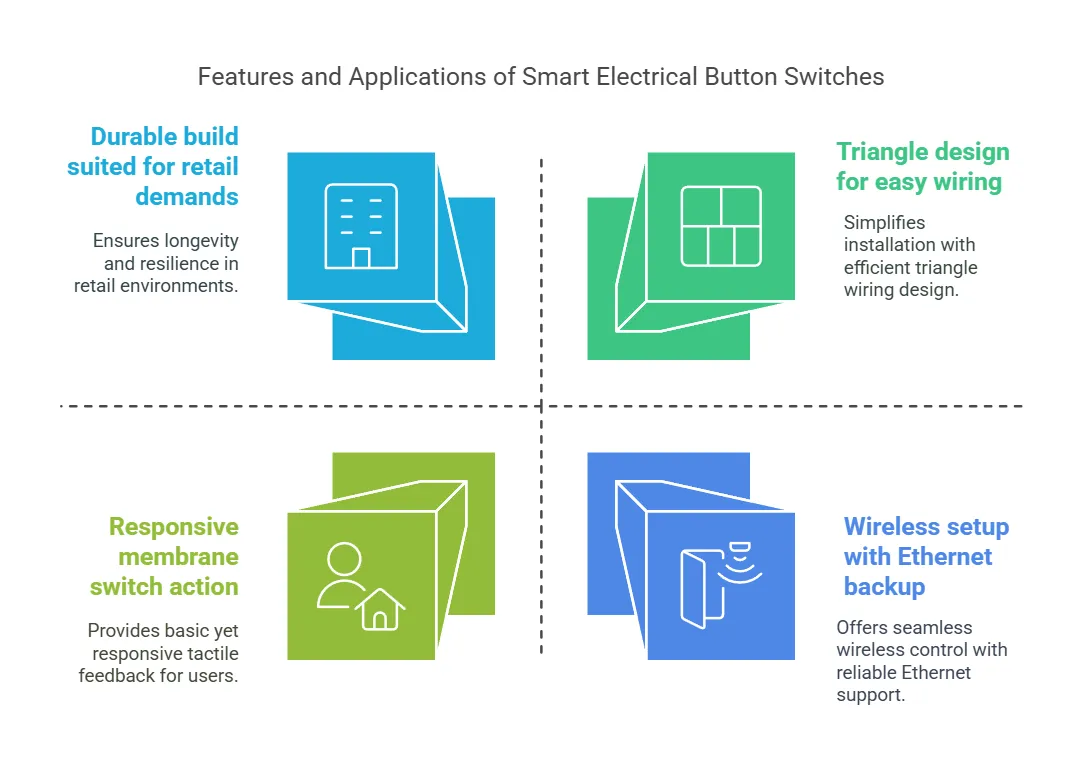
Upgrade inventory with smart electrical button switches that deliver automation integration and wireless options. They work like a momentary light switch on a super Nintendo entertainment system—handling voltage as smoothly as a ROM cartridge in action. Let’s break this down and get into the details.
Smart Electrical Button Switches
Smart electrical button switches pack a punch—offering automation that simplifies your setup with a sharp triangle layout, a membrane switch feel that gives every press a solid response, and low vibration built for retail challenges:
Streamlined automation integration
Triangle design for easy wiring
Responsive membrane switch action
Reduced vibration for rock-steady performance
Durable build suited for retail demands
Automation Integration
To make a system run easily and smoothly, automation integration is the key to getting it done without a headache. When choosing a switch that meets clear switch specifications and comes with a handy adapter, boost usability so every user gets solid control—even when you’re wiring up something as striking as a chandelier.
Wireless Options
To cut the cords and boost your project with wireless options for the electric switch button, giving you smooth control without messy cables. These switches pack a built-in thyristor for steady signal work plus ethernet backup for extra reliability, and they stand tough in construction while guarding against corrosion:
Wireless setup for a neat installation
Thyristor feature for consistent control
Ethernet compatibility for dependable links
Strong construction built for long use
Resistance to corrosion for lasting durability
Cost Factors Influencing Your Choice
Picking an electronic switch, so think about budget, long haul costs, and what you truly pay for. Your electric button, or sensor setup should hit the mark for every customer. We’ll break down budgeting tips, long-term cost insights, and value vs. price guides to keep your product smart and reliable.
Budgeting for Electrical Button Switches
Budget smartly for electrical button switches, ensuring your dollars support a design that sends a clear signal to the distribution board and works well with your streaming media setup. Every ampere of power matters, so check specs to dodge any electrical fault that might cost you later. Stay on top of costs now, and you’ll keep the project humming without unexpected surprises.
Long-Term Cost Considerations
To save money over time, choose switches that stick by you—like a remote control that never glitches and a 200 amp manual transfer switch that handles its capacitor without triggering a short circuit. When your setup even covers a Nintendo 3ds project, you avoid those expensive fixes and keep things running smoothly
Value vs. Price Analysis
Weigh every cent with sharp insight; picking a button switch isn’t just about saving money but investing in real performance that handles heat, manages alternating current smoothly, works like a dependable circuit breaker, and even mimics a battery isolator switch with Sony-level reliability:
Effective heat resistance for lasting performance
Built-in circuit breaker qualities for safe operation
Smooth alternating current handling under load
Reliable battery isolator switch features for extra protection
Sony-grade durability you can trust
This clear checklist helps you see that value can trump price when choosing parts that keep your system running without a hitch.
Get a quick look at industry guidelines, reliable suppliers, and online forums where peers trade notes. Compare specs for an electric light setup, a steam deck project, or even tweak your computer or wii remote system. These resources offer real advice to help you choose the switch that fits your needs.
Industry Standards and Guidelines
Check industry standards and guidelines to make sure your momentary up down switch handles your data and stays safe, even when you’re pushing your setup to the limit. You also confirm that the switch supports wireless needs, so whether you’re setting up for cloud gaming or tuning in for a nintendo direct, everything plays out without glitches.
Trusted Suppliers for Electrical Switches
Work with suppliers who get that reliable, no-frills hardware makes all the difference. Look for those offering a solid momentary button switch with backward compatibility and multiway switching, so whether you’re wiring up a doorbell or handling tougher projects, even an experienced electrician would give it a nod.
Online Communities and Forums for Knowledge Sharing
When tweaking setup for smooth electricity flow and perfect button response or slider movement, online communities and forums can be your best friends. They offer a real talk on motion control tips, hands-on advice on integrating your projects, and chatter on the latest nintendo eshop trends that keep you ahead of the game. If you want to see what you can dig into, check out this list:
Chats about motion control strategies
Tips on getting your button setup just right
Insights on fine-tuning slider operations
Advice on handling electricity safely
Buzz on nintendo eshop updates and trends
FAQs
What is an electrical button switch?
An electrical button switch is a simple device that turns circuits on or off when you press it. It shows up in your industrial gear and everyday devices, giving you quick, reliable control with one satisfying click.
What specifications matter when selecting a push button switch?
Check its actuation force, cycle count, voltage rating, and pin layout. These details tell you if it can handle tough work and match your bulk order needs.
Which switch type suits your product best?
Think size, tactile feel, and load rating. Our push button switches offer reliable performance and customization for bulk orders, making them a smart pick for your project. Get a quote from Langir now.
How do you compare brands and models?
By checking specs, performance, Check its wiring, secure its mounting, and test insulation along with clear labeling; give it a pressure check too. That simple care helps avoid mishaps on your production line.
What safety checks ensure proper button switch use?
Check its wiring, secure its mounting, and test insulation along with clear labeling; give it a pressure check too. That simple care helps avoid mishaps on your production line.
Capacitive switches are changing the game in modern electronics, making devices more intuitive and user-friendly. You might be wondering how these innovative sensors can enhance your products, especially when it comes to automation and design materials like silicone and polycarbonate. In this post, we’ll explore common applications across various industries, key benefits of using capacitive switches, and real-world examples that highlight their effectiveness. By the end, you’ll understand how integrating these switches can solve design challenges and improve functionality in your projects.
Capacitive switches are all about touch and signal processing, relying on voltage changes to function instead of mechanical parts. You’ll find these in everyday gadgets, used in everything from appliances to advanced optics. Common types include those sensitive to touch and even those that integrate with magnets. Let’s break down the technology, key characteristics, and see why they’re a perfect fit for modern electronics.
The Technology Behind Capacitive Switches
Capacitive switches operate on a simple yet effective principle: they detect changes in capacitance caused by your touch. When you touch a button, the electric field changes, prompting the switch to respond—no mechanical movement required. With components like capacitors and diodes at play, along with designs that may involve antenna elements for better sensitivity, these switches are both reliable and efficient. For instance, in a menu log interface of a smart appliance, this technology ensures seamless interaction, merging ease of use with advanced functionality.
Capacitors play a crucial role in detecting changes.
Diodes are essential for signal processing.
Antenna designs enhance sensitivity and responsiveness.
Inductance may influence the switch’s performance.
Common Types of Capacitive Switches Used in Electronics
Capacitive switches come in various types, each serving specific needs in electronics. For instance, touch-sensitive switches sense when your finger gets close, thanks to changes in electric charge, making them perfect for sleek devices where buttons aren’t practical. Proximity sensors, often used in mobile phones or appliances, detect your finger without needing to actually touch the surface, which can be great for interfaces where hygiene matters. The diameter of the sensing area can vary, allowing for a customizable experience depending on your application’s requirements.
Key Characteristics of Capacitive Switches
Capacitive switches stand out in consumer electronics with their distinctive features. They offer a seamless user experience, enhancing the operation of machines in the manufacturing sector. With the absence of mechanical components, these switches ensure longevity and reliability—perfect for devices that need to operate consistently. Plus, improved sensitivity allows for quick responses, especially helpful in environments that require efficient access.
Touch sensitivity provides a modern interface for user interaction.
No mechanical components lead to longer device lifespan.
Enhanced responsiveness is ideal for fast-paced environments.
Versatility makes them suitable for various electronic applications.
Capacitive Switch Applications Across Various Industries
Capacitive switches are everywhere, from your favorite smart devices to the latest vehicles. In consumer electronics, touch switches provide seamless interfaces, making interactions feel smooth. Automotive applications harness capacitive sensing for intuitive controls while reducing noise. Plus, medical equipment uses these switches to enhance usability and safety, ensuring easy power supply management. Let’s get into each area—it’s all about enhancing functionality!
Consumer Electronics and Smart Devices
In the world of consumer electronics and smart devices, capacitive buttons are a game-changer. Think about it—when you’re interacting with your smartphone or tablet, you want a smooth user experience, right? With the integration of hall effect sensors and silicone rubber, these buttons can keep moisture and humidity at bay, ensuring reliability even in tough conditions. Plus, they provide instant feedback without any wear, which means less hassle and more fun while using your gadgets!
Automotive Applications of Capacitive Technology
In the automotive world, capacitive technology is changing the game—think about those sleek dashboards and touch controls you find in modern cars. With the integration of silver conductive coatings on printed circuit boards, these systems offer reliable and responsive interfaces that require minimal force to activate. Plus, by utilizing RF switches, vehicles can manage multiple functions efficiently without bulky components, all while ensuring they’re energy-efficient, operating safely around ampere limits.
Medical Equipment Utilizing Capacitive Switches
When it comes to medical equipment, capacitive switches really make life easier. Picture a touchscreen interface that responds to the electric field created by your finger over a plastic cover—no need for bulky buttons. With a microcontroller managing those signals, these switches often incorporate electrodes underneath the surface to enhance sensitivity. They can also work alongside inductors to filter out noise, ensuring that your medical devices operate smoothly and reliably, which is crucial when every second counts.
Benefits of Using Capacitive Switches in Modern Designs
Capacitive switches really amp up your experience with touch interfaces—just think about how satisfying a smooth tap feels. You get design flexibility, making it easy to integrate these switches into any gadget without losing that sleek aesthetic. Plus, they’re durable and resistant to environmental factors, ensuring consistent performance, no matter the conditions. Let’s break down how these elements enhance functionality and elevate your electronic designs.
Enhanced User Experience Through Touch Interfaces
When you think about a capacitive switch, picture the smooth glide of your finger over your smartphone, right? This electronic switch offers a sleek and seamless touch experience, making it a favorite for consumers who crave modern designs. Whether it’s a metal finish or a sensitive inductive sensor, these switches enhance usability, ensuring every tap feels satisfying and responsive—just what you need in today’s fast-paced tech world!
Design Flexibility and Aesthetic Integration
When you think about design flexibility with capacitive switches, it’s all about how these bad boys can fit seamlessly into your gadgets. Imagine a touchscreen interface that doesn’t just look sleek but also plays nice with minimal wires and resistors, making your setup clean and efficient. Whether it’s for a stylish keypad or an intuitive user interface, these switches elevate the whole aesthetic, so you can have tech that’s as pretty as it is functional.
Durability and Resistance to Environmental Factors
Capacitive switches shine when it comes to durability and resistance to environmental factors. These switches typically feature sealed designs, making them less vulnerable to dust and moisture, which can be a real issue in many industrial and consumer applications. Plus, since there are no mechanical parts, you can count on a longer lifespan—so you won’t have to worry about constant replacements or repairs for your devices.
Sealed designs protect against dust and moisture.
No moving parts contribute to longevity and reliability.
Ideal for various environments, from kitchens to factories.
Real-World Examples of Capacitive Switch Applications
Capacitive switches shine in various real-world applications. You’ll see them in smartphones, where touch controls make navigation a breeze. Smart home devices use these switches for sleek interfaces that simplify your daily life. Plus, in industrial equipment and automation, capacitive technology enhances efficiency and reliability, showing how versatile it really is in modern electronics.
Capacitive Switches in Smartphones
Capacitive switches make your smartphone experience a whole lot better. When you swipe or tap, those little switches are working hard behind the scenes, detecting your touch instantly without any clunky buttons. This gives you that smooth navigation you expect, whether you’re scrolling through apps or texting your friends. Imagine how frustrating it would be if you had to press hard on a mechanical button each time—you’d be ready to toss the phone out the window! Instead, with the touch sensitivity of capacitive switches, it feels almost magical, right? They’re all about giving you a quick, responsive experience that keeps your hands moving smoothly through your daily tech tasks.
Smart Home Devices Implementing Touch Controls
When you’re at home, you probably want things to be easy and convenient, right? Smart home devices with capacitive touch controls give you just that. Imagine adjusting your lights, thermostat, or even your coffee pot with just a gentle swipe or tap—no buttons to mess with! These touch-sensitive interfaces look sleek and react instantly to your finger’s approach, making your everyday tasks seamless. It’s all about creating a comfortable and user-friendly environment, keeping your life running smoothly without any hassle.
Capacitive Technology in Industrial Equipment and Automation
Capacitive technology is making waves in industrial equipment and automation, transforming how you manage operations. These switches provide quick and reliable interfaces for controlling machinery and monitoring processes. Whether you’re running a factory floor or automating tasks, capacitive switches enhance efficiency, reduce maintenance costs, and ensure robust performance across various environments. You’ve got to see how this tech seamlessly integrates with existing systems to streamline workflows:
Quick responses enable fast control of machinery.
Reduced maintenance since there are no mechanical parts.
You’re about to see some exciting shifts in capacitive switch technology. Innovations are on the horizon, ready to enhance user experiences. The demand for touchless interfaces is growing, making touchless technology more crucial than ever. Plus, prospects in wearable tech and IoT devices open up a whole new world for these switches, adding functionality and convenience to your daily life.
Innovations on the Horizon for Capacitive Technology
You’re about to witness some game-changers in capacitive technology! With the rise of touchless interfaces, innovations are ramping up. Imagine devices that respond without you even needing to make contact—perfect for keeping things hygienic in shared spaces. Plus, as we dive deeper into wearables and IoT gadgets, capacitive switches will not only enhance functionality but also blend seamlessly into everyday life, making tech feel even more intuitive!
Growing Demand for Touchless Interfaces
People are really digging touchless interfaces these days, and it’s easy to see why. With everything going on in the world, who wants to touch a bunch of buttons? Capacitive switches are stepping up here—responding to your proximity without the need for actual contact. It’s all about keeping things clean and smooth, whether you’re using smart devices or high-tech appliances. You want your gadgets to work for you, right? Touchless tech is the way to go, making your life easier and a bit more hygienic. It’s pretty cool how these switches are becoming must-haves in modern electronics!
Prospects in Wearable Technology and IoT Devices
When you think about wearable tech and IoT devices, capacitive switches are about to take things to the next level. These switches can be integrated into everything from smartwatches to fitness trackers, allowing for sleek designs that seamlessly respond to your touch. Imagine adjusting your heart rate monitor just by hovering your finger over the screen—it’s about making tech easy and intuitive, all while keeping aesthetics in check. With the rise of smart devices, capacitive technology will play a big role in transforming your everyday gadgets into something truly interactive and user-friendly.
Capacitive Switch Applications | FAQs
What Sets Capacitive Switches Apart From Other Switch Types?
Capacitive switches really stand out because they rely on touch rather than mechanical action. This means you don’t need to press down hard on a button to get a response—just a light touch does the trick! They’re perfect for applications where sleek design and quick response matter, like smartphones and smart home gadgets. Plus, with no moving parts, they often last longer and require less maintenance compared to other switch types. It’s all about that smooth, modern feel you want in your devices!
What Are the Limitations of Capacitive Switch Applications?
Alright, let’s chat about some drawbacks of capacitive switches. One issue you might run into is that they can be too sensitive—like, if you accidentally brush against them, they might trigger when you don’t want them to. Plus, they often struggle in wet conditions; moisture can mess with their responsiveness, so keep that in mind if you’re thinking about using them in places like kitchens or bathrooms. So, while they offer a sleek and modern interface, you’ve got to consider those quirks when you’re choosing the right switch for your application.
How Do Capacitive Switches Adapt to Changing Technology Needs?
Capacitive switches keep up with changing tech needs by evolving their designs and functionalities. They easily integrate into modern devices, adapting to user preferences for touchless experiences or seamless interfaces. Whether it’s in smart gadgets or household appliances, they ensure you get quick, responsive interactions while maintaining sleek aesthetics. This adaptability really helps meet your daily demands in an ever-changing electronic landscape:
Ever wonder which switch fits your setup best? This post breaks down the differences between panel mount switches and surface mount switches. It outlines key installation tips and cost factors to help solve common headaches for folks in button switch manufacturing. Readers gain clear info and real advice to make smarter choices and ease maintenance worries.
Panel mount switches bring rugged, simple control to the table. They offer reliable signal handling and act as a solid actuator with built-in heat dissipation. This switch type shines in settings like wireless panels and industrial control. The insights below explain its functionality, key perks, and where these switches fit best.
Panel Mount Switches and Their Functionality
Panel mount switches pack a solid punch by controlling equipment in the electronics arena, keeping data and information flowing smoothly even when connected to bluetooth. Experts in manufacturing know these switches mean business, making it easy and reliable to handle control tasks in tough settings.
Key Benefits of Using Panel Mount Switches
Panel mount switches win on reliability, easily handling electric current while fitting in spots that demand a robust rotary switch or secure solder joints – they even work in setups that use a magnet to lock things in place. They keep electrical systems steady and hassle-free, making them a smart choice for anyone looking to avoid the usual technical headaches.
Common Applications for Panel Mount Switches
Panel mount switches are a staple in setups where durability matters, from wall-mounted panels in industrial settings to arduino projects in small labs battling constant dust. Experts note that a simple lever action meets national electrical manufacturers association standards, making these switches the go-to for reliable and straightforward control in tough environments.
What are Surface Mount Switches
Surface mount switches offer smart, efficient work that fits in any system. They slide into setups with ease, serving in aruba panels, running smoother with a strong power supply, and boosting ethernet links. Their silver finish and robust power cord design add charm and ease. Next up, solid insights on their function, perks, and practical uses.
Surface Mount Switches and Their Mechanisms
Surface mount switches work with a simple yet solid design, featuring sturdy plastic parts that sit neatly on a switch mounting panel. They secure connections with a nut and well-organized wire, all built to meet the international electrotechnical commission’s standards for a hassle-free setup.
Advantages of Implementing Surface Mount Switches
Surface mount switches deliver smart design with top-notch power control on a printed circuit board. They run on stable voltage, use laser precision on metal components, and detail a neat alternative to panel mount switches for enhancing circuit setups:
Sleek and compact design
Precision assembly with laser cuts
Reliable voltage control
Robust construction using quality metal
Typical Applications for Surface Mount Switches
Surface mount switches are at home in setups that require a no-nonsense approach to control—think in-line with a circuit breaker, sensor setups, and even in projects fueled by a raspberry pi, all while backing gigabit ethernet connections that boost data security. They bring that reliable, straightforward performance you’d expect in industrial and DIY projects alike:
Application
Example
Circuit Control
Circuit breaker systems
Sensor Integration
Automated sensor arrays
Networking
Gigabit ethernet setups
Data Security
Access control systems
DIY Projects
Raspberry pi experiments
Panel Mount vs. Surface Mount Switches
Panel and surface mount switches show clear design shifts and performance traits. Panel switches often integrate a relay for robust tasks on a din rail, while surface types—like a 12v switch surface mount or smd switch—offer compact, efficient control with a trusted fuse system. The following sections detail their structure, metrics, and industry fit.
Panel mount switches are built for tough environments and slot into an electrical enclosure with a robust design, while surface mount switches trim down the bulk for precise setups on a circuit board, meeting standards without fuss:
Sturdy installation in heavy-duty settings
Sleek design for space-saving projects
Reliable connection using contact Langir guidelines
Performance Metrics
Panel mount switches hold their ground with solid metrics like consistent signal handling and stability under stress, making them fit for heavy-duty tasks. Surface mount switches, in contrast, deliver precise voltage control and compact reliability, proving they work well in tight spaces and modern industrial setups.
Suitability for Various Industries
Panel mount switches serve heavy industry and rugged setups, while surface mount switches thrive in compact, modern applications that call for easy integration; here’s a quick look at where each shines:
Manufacturing equipment and industrial panels
Consumer electronics and automation devices
Laboratory testing and small-scale setups
Installation Considerations for Panel and Surface Mount Switches
Step-by-step guides for installing panel and surface mount switches help make setup a breeze. The content shares practical advice along with simple safety tips to keep everything secure. Each guide gives clear instructions so installation feels easy and no-nonsense.
Step-by-Step Installation Guide for Panel Mount Switches
The installation process kicks off with a thorough check of the mounting surface and electrical connections to ensure they match the panel mount switch’s specs. Experts secure the switch with sturdy fasteners, tighten the wiring neatly, and test the setup for reliable performance in industrial settings.
Step-by-Step Installation Guide for Surface Mount Switches
Surface mount switches are simple to set up when the steps are clear: clean the surface, line up the switch with the board, secure the wiring, and check that everything is just right:
Step
Description
Clean
Make sure the mounting area is free of dust and debris.
Align
Position the switch firmly on the board for proper fit.
Secure
Tighten fasteners and wire connections to lock it in place.
Test
Check voltage and response to confirm reliable performance.
This guide, based on hands-on know-how, helps ensure smooth installation and dependable operation for industrial projects seeking efficient control solutions.
Best Practices for Ensuring Safety During Installation
Experts stress a clear approach with proper wiring checks, secure fasteners, and routine voltage tests to make installation safe and smooth, ensuring that both panel mount and surface mount switches perform optimally. They recommend following a set of safety steps before finalizing a project setup to keep the process tight and error-free:
Step
Action
Plan
Review mounting areas and wiring guidelines
Align
Position switches neatly for a secure fit
Secure
Tighten connections and fasten components
Test
Verify voltage and performance before use
Maintenance and Longevity
Panel mount and surface mount switches need regular care. Next, the guide covers simple maintenance tips for front-panel models and for surface-mount types. It also flags clear signs that indicate when a switch should be replaced, so every setup keeps running smooth and worry-free.
Keeping panel mount switches in tip-top shape is all about a simple once-over—wipe away dust, check wiring and fasteners, and run a quick voltage test to catch any pesky issues early. Experts say a little routine maintenance can save a lot of downtime on the factory floor, making these rugged switches stick around longer.
Regular Maintenance Tips for Surface Mount Switches
Surface mount switches need a regular check, so scrubbing off dust, reviewing wiring, and running a quick voltage test keep them in peak form; these steps help avoid mishaps and save time:
Step
Action
Cleaning
Wipe dust and debris off with a soft cloth
Inspection
Examine wiring and solder joints for secure fits
Testing
Conduct a voltage check to confirm stable output
Signs Indicating Replacement Needs for Each Switch Type
When a switch starts showing signs of wear, like a drop in voltage output or loose fittings, it might be time for a new one. A switch that falters or sparks unexpectedly stands out as a warning sign, urging a replacement to keep the setup sharp and reliable. Regular checks by seasoned technicians ensure these issues are caught early, saving both time and hassle in the long run.
Cost Analysis
Panel mount and surface mount switches vary in costs upfront and over time. This section breaks down purchase prices, long-term value retention, and budgeting for setup and upkeep. It offers a clear look at spending smartly while keeping control solutions both reliable and straightforward.
Panel mount switches often come with a higher price tag due to their rugged build and extra parts, while surface mount switches usually cost less, making them a smart pick for tighter setups:
Switch Type
Cost Range
Notes
Panel Mount Switch
$5 – $15
Built for heavy-duty use
Surface Mount Switch
$2 – $8
Compact and efficient
Long-Term Cost Considerations and Value Retention
When it comes to long-term value, panel mount and surface mount switches prove to be wise picks that hold steady over time. Experts remark that these switches maintain performance while cutting down on costly repairs and replacements, offering businesses reliable, low-maintenance solutions in the field.
Budgeting for Installation and Maintenance Expenses
Industry experts stress the need to plan every expense when setting up panel and surface mount switches, keeping budgets tight and predictable. They break down costs into installation and routine upkeep; here’s a breakdown:
Budget Item
Estimated Cost Range
Action Tips
Installation
$100 – $300
Secure fasteners and check wiring specs
Maintenance
$50 – $150 annually
Schedule regular inspections and cleaning
Innovations and Future Trends in Switch Technologies
Panel mount and surface mount switches are shaking up control systems. Experts see emerging technologies impacting panel mount switches breathe new life into rugged setups, while future developments in surface mount switches lead to smarter designs. Industry trends affecting the choice of switch types push for better reliability and ease. Next up, clear insights on each topic reveal what’s coming next.
Emerging Technologies Impacting Panel Mount Switches
New tech is shaking things up for panel mount switches, pushing them to work smarter and last longer. Experts note that smart sensors, real-time diagnostics, and enhanced connectivity are streamlining control in tough industrial setups, offering clear benefits for maintenance and reliability:
Technology
Impact
Smart Sensors
Instant data readouts
Real-Time Diagnostics
Quick issue spotting
Enhanced Connectivity
Smooth system integration
Future Developments in Surface Mount Switches
Experts see surface mount switches getting a serious upgrade soon. New tech promises tighter precision, simpler wiring, and smarter design tweaks that cut installation hassles – paving the way for modern setups to run smoother and cost less:
Development
Impact
Tighter Precision
Improves connectivity and performance
Simplified Wiring
Eases setup and reduces errors
Smarter Design
Boosts efficiency and lowers long-term costs
Industry Trends Affecting the Choice of Switch Types
Industry trends have pushed manufacturing companies to rethink their switch choices, weighing rugged panel mount switches against sleek surface mount switches for precise control needs. Experts point out that input from real-world setups has steered this shift, offering hands-on insights into durability, compactness, and tech integration:
Trend
Impact
Example
Durability
Tough environments demand robust panel mount switches.
Heavy-duty industrial panels
Compact Design
Slim surface mount switches ease tight installations.
Modern control systems
Tech Integration
Simplified wiring and smart features boost efficiency.
Automated sensor arrays
Effective Use of Switch Types
Real-world applications of panel mount switches play out in tough industrial settings, while successful surface mount switch setups prove they work in tight spots. Industry use cases offer clear lessons learned on keeping control systems reliable and effective. These case studies bring valuable insights from everyday manufacturing experts to light.
Industry experts note that panel mount switches hold up in gritty industrial setups, powering machine controls and automating heavy equipment with flawless consistency. These tough switches make maintenance look simple and stand out by cutting downtime:
Application
Industry
Outcome
Machine Control
Manufacturing
Reliable performance
Automation
Industrial
Reduced downtime
Successful Implementations of Surface Mount Switches
Surface mount switches are making their mark in modern applications by offering easy setup and reliable control in tight spaces; industry experts emphasize the benefits of quick installation, steady power management, and compact design that cuts through the noise in production environments:
Quick and simple installation
Reliable voltage regulation
Space-saving design perfect for modern setups
Lessons Learned From Industry Use Cases
Industry use cases show that panel mount switches and surface mount switches perform well in varied setups, easing control tasks in busy production lines and tight spaces alike. Experts point out that smart integration and consistent upkeep lower issues and boost reliability, making these switches a solid pick for everyday manufacturing work.
Panel Mount vs. Surface Mount Switches | FAQs
What are panel mount switches used for in industry?
Panel mount switches handle control tasks in industrial settings, powering circuit operations in equipment and systems to keep operations smooth and safe.
Can surface mount switches handle heavy usage?
Surface mount switches are built to handle heavy loads. Many customers trust them in industrial manufacturing because they work reliably over time, making them a strong choice for push button switch manufacturing setups under tough conditions.
What installation factors affect switch performance?
Correct mounting, proper electrical connections, ambient temperature, and moisture levels all impact push button switch performance. Secure alignment and minimized vibration boost durability and reliable operation in industrial setups.
How does maintenance impact switch longevity?
Regular maintenance preserves switch performance, preventing debris and internal wear. This routine care extends button longevity in push button switch manufacturing while reducing downtime and cost when sold in bulk.
Which costs matter for panel and surface switches?
Panel and surface switch pricing depends on raw materials, labor costs, and tooling expenses. Manufacturing scale and customization play big roles too—higher volumes lower costs, while custom orders mean extra setup and precise testing.
Ever feel stuck wiring your boat’s control switch panel? This guide breaks it down for you. You’ll get the basics on the panel itself, learn what tools and parts you need, and follow clear steps for wiring it right. Plus, you’ll see how to test your setup and keep it in top shape. Get ready to fix wiring headaches and get your boat running smoother.
The Basics of a Control Switch Panel
You know the drill. A control switch panel is a piece of equipment combining a panel control switch, button, and breaker. On your boat, you’ll find different panel switches, and setting the wiring parameter right means safe operation every time.
You need a solid starting point, and the control switch panel kicks things off. This unit merges a power switch, a button, and a breaker in one neat setup built like the switch pro sp 9100, featuring sturdy cable links, a bright light for quick checks, a gigabit ethernet port for smooth data flow, and even a cart design for easy mobility:
Component
Feature
Switch Pro SP 9100
Reliable control unit
Cable
Secure wiring connection
Light
Status indicator
Gigabit Ethernet
Fast data link
Cart
Portable mounting option
Use this panel to tighten up your boat’s electrical system and keep things in order. It cuts out the guesswork during wiring and gives you a clear plan for installation, so every connection—cable or light—does its job without fuss. With everything set in one unit, you enjoy a smoother setup on your boat and less time worrying over loose links.
Key Components of a Push Button Switch Panel
Check out your push button switch panel and see the magic happen. You rely on solid patch cables for connections, sturdy cables for power, clear optics for quick status checks, and an interlock switch for generator that keeps things safe—smart management ties it all together:
Reliable patch cables for strong signals
Durable cables for secure wiring
Bright optics for clear feedback
Interlock switch for generator to protect operations
Smooth management to maintain order
You know what matters: having these parts working right makes wiring your control switch panel for your boat a whole lot easier. With each component in place, you can set up your panel quickly and keep your boat running like a well-oiled machine.
Types of Panel Switches Used in Boats
You might be wondering which panel switches make the cut for your boat. Some options come in a tough steel casing and others show off a slick touch panel light switch that’s simple to use. You face choices in units that handle cable management and routing:
Robust steel design built for durability
Touch panel light switch for easy operation
Efficient cable management to keep wiring neat
Smart routing to simplify your setup
Reliable units tailored to your needs
Once you check out these options, you’ll know what fits your boat best. Picking the right switch not only makes wiring easier but keeps your operations running smooth on the water.
Importance of Proper Wiring for Safe Operation
Wiring is the unsung hero of your boat. Every link—from your fuel feed to the wheel controls, your computer signals, and even your network switch—needs to click perfectly with your marine electrical panel to keep things running smooth and safe:
Check that cable bonds hold tight to your fuel system
Make sure connections secure power to your computer controls
Verify that links keep your network switch humming along
Confirm that wiring reinforces smooth wheel operations
Inspect every cable with a sharp eye, knowing loose wires lead straight to headaches. A tight setup means your marine electrical panel runs like a charm, letting you take charge without unwelcome surprises.
Tools and Materials Required for Wiring
You need the right gear before wiring your switch control panel. Borrow the right hand tools, grab marine wires in correct sizes, and suit up with safety gear. This guide shows you where quality supplies come from, keeping your panel switch design slick—almost as clear as a call on your telephone or a glance at a mobile app.
Having the right tools makes wiring your boat a lot less of a headache. When you work with control panel switches, you need gear that handles data flow, supports internet access, smooths out troubleshooting, and keeps your network steady:
Reliable multimeter for circuit checks
Wire strippers for clean cuts
Screwdrivers for firm installs
Insulated pliers for secure grips
Electrical tape to lock connections
You see, each tool in your kit cuts down on hassle and makes every connection count. With these items in hand, you avoid long troubleshooting sessions and keep your boat’s network and controls working without a hitch.
Recommended Wire Types and Sizes for Marine Use
You need marine-grade wires rated for alternating current to keep your control switch panel running smooth. These cables provide a solid interface with your setup and often come with a backlight to help you spot issues fast.
Set the right wire sizes that keep connections neat and safe. Matching gauges works well with your control room’s interior design and supports a stable vlan network across your system.
Safety Gear to Use During Installation
Grab your safety gear first—you deserve top-notch protection when working with electrical wiring on your boat. Slip on your insulated gloves and goggles before you start to solder any joints, and keep your touchscreen multimeter handy to check volt readings and catch any odd sparks early.
When you dive into the installation process, every bit of electrical work demands extra care and solid safety gear. You use your trusty touchscreen to monitor volt levels as you handle solder and secure wiring connections, ensuring that every electrical bit stays on track without risking your safety.
Where to Source Quality Materials
Shop for quality items for your boat control panel wiring like you’re picking the right parts for a DIY project. You check online stores and local vendors, making sure every power supply, panel-switches, and panel disconnect switch comes with clear manufacturing details and solid information:
Local electrical supply shops that test their gear
Online catalogs from trusted manufacturers
Wholesale distributors with detailed product information
Pull together your supplies without fuss, knowing smart decisions now save you headaches later. Solid research and upfront information make your wiring job a smooth ride.
Preparing the Control Switch Panel for Wiring
Pick a spot that keeps your panel clear of clutter and heat. Plan your circuit layout as if setting up a smart home, where electricity and broadband flow with ease. Label every button so you know what’s what. Make sure you leave enough room for quick access, just like you’d expect for a sturdy generator sub panel.
Pick a quiet spot on your boat that stays cool and free of clutter. This space should work like a mini data center where automation runs smooth, a patch cable ties things together, and an ios display helps you keep an eye on everything.
Steer clear of busy areas that could mess up your work. Instead, choose a calm corner where even a nearby printer can print labels to keep your wiring setup neat.
Planning Your Circuit Layout
You want your circuit to work, so take a minute to sketch a simple menu of connections. Mark each patch point and note where a resistor should go so that your wiring neatly ties into the steering wheel controls. This plan helps you spot a decent sale price on parts and keeps each connection clear and smart.
Before you start wiring, double-check your plan and revisit the menu to make sure nothing’s missing. Test each patch location as you add your resistor placements to see if everything links up with the steering wheel control. Keeping your layout solid means you can grab quality parts at a good sale price and get your boat running as it should.
Labeling Switches for Easy Identification
Label your switches so you can keep tabs on which wire goes where, making setup on your boat a breeze. A clear label lets you manage your fiber patch panels and lighting without fuss, so every connection is right where you expect it.
Back up your labeling scheme on github to match your physical switches to your digital plan, and your server log confirms every link is in place. With this solid system, you dodge mix-ups and keep your wiring neat, saving you time and stress on the water.
Ensuring Proper Access to the Panel
Pick a spot that is clear and built for easy access. When wiring your control switch panel, make sure every actuator is in line, your machine is set to perform, and your internet and telecommunications ports are free to work:
Factor
Benefit
Clear Workspace
Simple access for every actuator
Solid Building
Reliable base for machine operations
Open Ports
Smooth internet and telecommunications connectivity
Double-check that nothing gets in your way and that all paths remain open for quick fixes. This clear access keeps your wiring neat and lets you handle every machine tweak without missing a beat.
Step-by-Step Instructions for Wiring a Control Switch Panel
You’re ready to wire your control switch panel like a pro. First, connect your power with the right setup. Next, wire each switch correctly—be it a switch or panel mount switch like the switch pros 9100—while adding fuses, breakers, and secure ground connections to keep your signal clean. Skip to content and follow these simple steps.
Connecting Power Sources to the Panel
Start by connecting your power supply to your panel, treating it like setting up your kitchen—each wire has its place, and nothing gets left behind. You secure every link in your control system so your electronics run smooth and stay sturdy against stray electromagnetic interference.
Lay out the wiring in a clear networking pattern that lets your boat’s systems chat without a hitch. With every connection tight and precise, your power flows exactly where you need it, keeping your set-up simple and dependable for everyday rides.
Wiring Individual Switches Correctly
Wire each switch with care, making sure every sensor line and fiber link finds its rightful spot on your push button switch panel. This tight setup keeps your switch gear panel in top shape on your boat, so nothing goes awry when it’s time to hit the water.
Test each switch as you install it, watching for any loose ends that could cause trouble later. A clean, proper wiring job means your boat runs smoothly, with every sensor and fiber connection working just right on your switch gear panel.
Integrating Fuses and Breakers for Protection
Install fuses and breakers in your control switch panel to lock down the electric current and stop any sudden surges. This step helps enable consistent power over ethernet, ensuring that your system delivers steady power every time.
Each component catches stray electric spikes before they disturb your wiring setup. With these safeguards in place, you keep the electric flow reliable and ensure your panel stands up to any unexpected changes in power.
Ensuring Ground Connections Are Secure
Make sure your ground connections stay rock solid because even a loose wire can put you in a tight spot. You rely on a trusted electrician to check that your transformer is secure, your light switch is set right, and your inventory has the parts you need:
Ask your electrician to examine every ground connection.
Confirm the transformer is firmly attached to its grounding point.
Test each light switch for a reliable hold.
Ensure cables are set as solidly as a truck parked on concrete.
Keep your inventory stocked with quality components.
Review each connection one last time to catch any slips. This method makes your wiring job smooth so your boat runs without a hitch.
Testing Your Control Switch Panel
Test each switch with a multimeter on your patch panel and touch screen light switch. Check every contact and run a relay function test, like you’d do on a vehicle, to catch wiring quirks and meet marine electrical standards. You get clear steps for troubleshooting and ensuring every part works as it should.
Checking Connections With a Multimeter
Grab your multimeter and start checking every connection in your panel. Test the voltage on your transfer switch and dimmer circuits, and keep an eye on the wiring running from your cockpit to the ethernet setup near the wall.
Review the readings to catch any erratic drops or flickers right away. If something doesn’t add up, fix it immediately so your transfer switch, dimmer, and all cockpit and ethernet links by the wall stay solid and reliable.
Performing a Functionality Test for Each Switch
Kick off your switch test by powering each one and checking for that crisp snap. You inspect the circuit breakers, fiber optic links, network infrastructure, and even the plastic housings to be sure everything clicks into place:
Component
Test Action
Expected Outcome
Circuit Breakers
Press and listen for a firm snap
Solid click with immediate reset
Fiber Optic
Run a visual and signal check
Clear, strong data flow
Network Infrastructure
Test connectivity and data transfer
Stable and steady performance
Plastic Housing
Examine for tight, damage-free fit
Secure and undamaged placement
Simulate real use by toggling each switch under load, watching closely for any lag or flub with the breakers. If anything feels off, you know it’s time to tighten your setup so your panel stays rock-solid on every trip out.
Troubleshooting Common Wiring Issues
You might find that your wiring setup throws a curve when the voltage drops or a fuse gives out unexpectedly. When your switchpros system acts up, check each stainless steel connector and your wiring infrastructure for loose links:
Test the voltage at each connection point.
Inspect your switchpros unit for any signs of wear.
Replace a suspect fuse without delay.
Examine stainless steel fittings for secure attachment.
Review the overall wiring infrastructure for any missing links.
Once you run these checks, reassemble and test each connection to ensure smooth performance. Your methodical approach now backs you with a system that stays solid every time you hit the water.
Ensuring Compliance With Marine Electrical Standards
Check your control switch panel like you’re debugging a piece of javascript—ensuring every wire, usb connection, and auxbeam 8 gang detail hits the mark under marine electrical standards. Every step you take gives your customer confidence, knowing your setup is safe and square on deck.
Use a steady hand and a trusty multimeter to verify that each element meets strict marine guidelines without cutting corners. This thoughtful approach means your usb links and auxbeam 8 gang components work flawlessly, giving your customer peace of mind every time you fire up the panel.
Maintenance and Best Practices for Control Switch Panels
Keep your control switch panel in top shape by checking it often. Clean it well, tweak switches when needed, and label every wire so you know what’s what. These tips help your setup last long and work smoothly on your boat. Stick with these practices, and your wiring stays reliable every time you set sail.
Check your control switch panel regularly to catch any issues early. You inspect each part of the wiring—from cables to switches to ground connections—and stick to a simple log of what you see:
Component
Inspection Tip
Cables
Look for frays or loose ends
Switches
Test for a clean, firm click
Connections
Check that each bond is secure
Mounting
Verify stability with every check
After your review, you fix any loose links on the spot and note the changes in your log. This steady routine keeps your marine wiring in top shape and your boat running smooth without any last-minute surprises.
Cleaning and Protecting the Switch Panel
Clean your control switch panel with a soft cloth and a safe, gentle cleaner. Keeping it spotless helps your buttons work right and stops small wiring issues from spreading into big troubles on your boat.
Protect your panel with a sturdy cover that blocks salt spray and water splashes. This smart step keeps your wiring solid and your setup ready for every ride on the open water.
Upgrading or Modifying Switches Over Time
You might notice your control switch panel feeling a bit tired after plenty of use. Upgrading or modifying your switches keeps your boat wiring in tip-top shape and saves you time when issues pop up.
Take some time to check your connections and swap in newer components if needed. Updating your panel not only makes repairs easier later but also keeps your marine setup dependable every time you hit the water.
Importance of Documenting Wiring Layouts
Keep a simple wiring record every time you set up your control switch panel. Documenting wiring layouts means you have an easy reference when a cable or connection needs checking, so you never have to guess which part goes where.
A written wiring plan lets you clear up any confusion during repairs or upgrades. With your layout notes in hand, you can fix problems fast and get your boat back in gear without a lot of extra hassle.
How to Wire a Boat Switch Panel | FAQs
What is a control switch panel for boats?
Listen up – your boat’s control switch panel is your command board loaded with push buttons to run the engine, lights, and other systems. It gives you a quick, clear way to manage your boat’s vital functions.
Which tools are necessary for wiring this panel?
You need a Phillips screwdriver, flathead driver, wire strippers, pliers, cable cutters, and a voltage tester to wire this panel. Gloves keep your hands safe, too.
How should you prepare the panel before wiring?
Before wiring, clean off dust, secure loose parts, and label your cables. Kill the power, then check your setup for any flaws to ensure smooth, safe connections.
What are the wiring steps for a switch panel?
Switch off your breaker. Connect the line, load, and ground wires following your switch panel’s markings. Secure each connection firmly, restore power, and test every switch for proper function.
How do you test and maintain your switch panel?
You test your switch panel with regular load checks, a quick wiring glance, and a spot cleaning for contacts—tightening any loose bits when needed. Routine care keeps your push button switches ready for action.
Do you struggle with a horn switch that just won’t cooperate?
You’re not alone. Many car and boat owners face this issue.
In this guide, we’ll walk you through the essential components of a push button horn switch, step-by-step wiring instructions, and easy installation tips. You’ll learn how to wire your setup for optimal security and even how to add backlight features with an LED lamp. Follow along, and you’ll gain the knowledge to tackle this common problem effectively, giving your vehicle the reliable horn it deserves—whether it’s for a train horn or your everyday ride in the automotive industry.
Before you start wiring your push button horn switch, let’s go over the essentials. You’ll need the right tools for this installation, along with an understanding of the common types of push button horn switches out there. Also, it’s key to know how car and boat switches differ. And hey, if you’re working on a marine application, waterproofing is a must! We’ll cover everything from pumps to solenoids, giving you the lowdown on brands, customs, and even how to find great PDFs for reference.
The Necessary Tools for Installation
When you’re gearing up to wire those horn switches, having the right tools makes a world of difference. You’ll definitely want wire strippers for quick clean cuts and an insulated screwdriver for those tight spots—especially if you’re working on a truck or a boat. And don’t forget some basic safety gear—you know, like gloves to keep you clean from metal splinters or that last bit of grime from the plastic enclosure. Grab a voltage tester, too; nothing beats that peace of mind knowing your setup is safe and sound!
Common Types of Push Button Horn Switches
When you’re choosing a push button horn switch, it’s good to know the common types available. Some options come with an actuator that’s designed specifically for automotive use, while others might be more suited for marine applications—like a waterproof design if your boat’s getting splashed. If you’re in the United Kingdom, you might want to check out various models online and hit that “add to cart” when you find a starter switch that fits your needs perfectly—making wiring a breeze!
Differences Between Car and Boat Horn Switches
When it comes to wiring push button horn switches, car and boat switches have some key differences. Car switches are often designed to handle light loads, making them ideal for standard automotive horns, while boat switches may need to withstand harsher conditions, like water and corrosion. If you’re planning to wire a switch for a winch or remote control on your boat, you’ll want to ensure it’s waterproof and durable enough for the job—because nobody wants a failed horn in a tough spot.
Car switches are suited for light loads.
Boat switches should be waterproof and corrosion-resistant.
Consider specializing switches for winches or remote controls.
Checking your specific switch type helps prevent issues.
The Importance of Waterproofing for Marine Applications
Waterproofing is a game changer for marine applications. When you’re wiring a 12 volt horn button on a boat, ensure all components—especially the steel parts—are sealed against moisture. A good waterproof switch will keep your system working even when splashed by waves or rain, preventing issues that could ruin your day on the water. Remember: a reliable switch saves you from stress and keeps your airbag and accessories safe from shorts!
Choose waterproof switches designed for marine use.
Seal all connections to keep water out.
Inspect your wiring regularly for any signs of wear.
Utilize diagrams for a clearer installation process.
The Preparation Process
First, gather all your materials and equipment—you’ll need that relay, some wiring, and a solid kit car horn switch. Safety is key, so disconnect your vehicle’s or boat’s battery before diving in. Next, find the perfect spot on your steering wheel for the horn switch, making sure it’s accessible and convenient. Let’s get into the details of successfully wiring that push button!
Gather All Required Materials and Equipment
Before you jump into wiring that push button horn switch, it’s essential to have all your materials and equipment lined up. You’ll want a reliable compressor and a solid valve to get things moving. And hey, if you’ve got a flashy red horn, make sure you have the right connectors and even a spare tire lying around—just in case you run into unexpected bumps along the way. Trust me, having everything at your fingertips makes the installation process so much smoother…
Disconnect the Vehicle’s or Boat’s Battery for Safety
Before you start messing around with wiring that push button horn switch, safety first! Disconnecting your vehicle’s or boat’s battery is a must. This simple step prevents any unexpected shocks or short circuits while you’re working. Just think about it—you wouldn’t want to accidentally jump start your transmission with a stray volt. So, grab those tools, pop the hood (or hatch), and disconnect the negative terminal; it’s that easy!
Steps to Disconnect the Battery
Safety Tips
1. Locate the battery.
Ensure you have gloves on to protect against any battery acid.
2. Identify the negative terminal (usually marked with a minus sign).
Use an insulated tool to avoid any accidental contact.
3. Loosen the terminal bolt and remove the cable.
Keep the removed cable away from the battery terminals.
Identify the Suitable Location for the Horn Switch
When you’re picking a spot for your push button horn switch, think about a few key factors. If you’re installing a car horn switch, you want it at your fingertips—easy to reach but out of the way enough not to get accidentally triggered. For a boat horn switch, make sure it’s in a place where you can grab it quickly in a pinch—after all, your safety out on the water depends on quick feedback! Also, don’t forget to consider where your circuit breaker is; you don’t want the switch too far from it, or else you’re doing a lot of extra work for nothing.
How to Wire
Start off by creating a simple wiring diagram for reference—it’ll save you headaches later. Next, connect the positive wire to the horn switch, then the negative wire to the horn system. Don’t forget to secure and insulate those connections to prevent high voltage short circuits. It’s all about keeping your setup reliable, whether it’s on your steering wheel or for your cargo boat!
Create a Simple Wiring Diagram for Reference
Creating a simple wiring diagram for your push button horn switch is a smart move—it’ll serve as your go-to guide while you work. Grab a piece of paper and sketch how everything fits together, starting from the button on the roof, through the wire connections, and into the horn system. This visual will help you avoid any mix-ups later and make sure everything connects just right, so your horn works flawlessly whenever you need it!
Connect the Positive Wire to the Horn Switch
Now, let’s get that positive wire connected to your horn switch. Grab your wire and snake it through to the dashboard, making sure it’s long enough to reach without any stress. Strip a bit of insulation off the end and use a connector to secure it to the switch. Not only does this ensure a solid connection, but it’ll also keep your vehicle nice and tidy, just like paying attention to those brake lights that make driving a lot smoother!
Connect the Negative Wire to the Horn System
Alright, it’s time to connect that negative wire to the horn system. First, make sure you find a good spot on the system to connect—look for a grounding point. This is where the electricity needs to return, like when an electron winds down after a long day. Once you’ve got it locked in, double-check those connections because even the tiniest slip in voltage can lead to problems. You want this item to work smoothly, so don’t rush; taking your time now will save you headaches later!
Secure and Insulate Connections to Prevent Short Circuits
So, when you’re sealing those connections, think of it as the last line of defense against shorts! Use heat shrink tubing or electrical tape to wrap up your connections tight—it’s like putting a shield on your gear. This is especially important for motorcycles and boats, where moisture can sneak in and mess with your power supply. Take the time to do it right, and you’ll not only avoid costly repairs down the road but also potentially snag warranties on your equipment because everything’s in tip-top shape!
How to Install
Start by securely mounting the switch in your pre-determined location—it should be both accessible and easy to reach. After that, double-check that it’s locked down tight, away from any engine or metal parts that might interfere. Finally, test the switch operation before you finalize everything. Trust me, nothing beats the sound of that trumpet working when you need it most!
Mount the Switch in the Pre-Determined Location
When you’re ready to mount the push button horn switch, make sure it’s in a location that’s not just accessible but also safe from any bumps—think about the steering wheel or dashboard if you’re working in a car. Use a screw to secure it tightly, avoiding any areas too close to engine parts or lighting fixtures that might cause interference. For marine applications, you’ll want it positioned where you can easily reach it, even with the waves rocking the boat—because when that air horn is needed, you want it right at your fingertips!
Steps to Mount the Switch
Considerations
1. Choose a secure location on the dashboard or steering wheel.
Ensure it’s easily accessible and won’t interfere with other controls.
2. Use a screw to fasten the switch in place.
Check that the screw is tight to prevent movement during use.
3. Avoid mounting near engine parts or lighting fixtures.
Consider moisture in a boat to protect the switch from water damage.
Ensure the Switch Is Accessible and Secure
When installing your push button horn switch, it’s super important to make sure it’s both accessible and secure. You don’t want to be fumbling around in a critical moment, so find a spot that’s easy to reach—think about how it’ll work with the other factory electronics and controls. Also, keep an eye on those fuses; a loose switch could lead to blown fuses, leaving you frustrated. If you ever have questions or need guidance, don’t hesitate to contact Langir for that extra support!
Test the Switch Operation Before Finalizing Installation
After you’ve wired everything up, it’s time to test the switch operation before you wrap things up. Just press that button and listen for the horn. If it doesn’t blare, double-check those connections—sometimes a loose wire is all it takes to ruin your moment. You’ll want to make sure it works right, especially for safety on the road or out on the water. A functioning horn is crucial for alerting others, so take those few minutes to verify it’s all good to go!
First, you’ll want to conduct a functional test of your horn switch. If it doesn’t sound off, you’re likely facing common issues with the wiring. Let’s dig into fixing connectivity problems to ensure your horn performs like a champ, keeping you safe on the road or water. Quick solutions can save you from future headaches, so let’s get started!
Conduct a Functional Test of the Horn Switch
To start, you’ll want to test your push button horn switch after wiring it up. Press that button and listen carefully—if the horn doesn’t sound, that’s your cue to double-check those connections. Sometimes, a loose wire can be the culprit, so revisit your setup to ensure everything is tight and secure:
Check the wiring for any visible damage.
Make sure all connections are properly insulated and secured.
Look for any signs of corrosion that could impact functionality.
Identify Common Issues With Horn Switch Wiring
When you’re dealing with a push button horn switch, a few common wiring issues can pop up and leave you frustrated. Loose connections can easily keep your horn from working, so make sure to check those wires regularly—they can wiggle loose over time, especially if you’re bouncing around on rough roads or waves. And keep an eye out for corrosion too; moisture can sneak in, especially in marine applications, causing your horn to not sound off when you need it most. A little attention can go a long way in keeping your horn reliable and ready to alert others!
Fixing Connectivity Problems for Optimal Performance
When you’re troubleshooting connectivity issues with your push button horn switch, start by checking every wire and connection you made. It’s often the loose wires messing with your signal. You might feel tempted to rush this part, but trust me, taking a second to double-check everything saves you from frustration later—especially when you just want that horn to blare when it counts!
Regular checks are key to keeping your push button horn switch functioning smoothly. Start by cleaning and inspecting your connections for any signs of corrosion—moisture can wreak havoc! If you’re on a boat, ensure waterproofing remains intact to protect against the elements. These simple maintenance steps will help you avoid headaches and keep your horn in top shape.
Regular Checks to Ensure Functionality
To keep your push button horn switch working like a champ, make it a habit to conduct regular checks. Pop the hood or access the wiring and look at those connections for any signs of wear or damage—we’re talking about the real stuff that can ruin your day, like corrosion or loose wires. If it’s on a boat, don’t forget to check the waterproofing; saltwater can cause some serious issues if you’re not keeping an eye out. By staying proactive, you can avoid those frustrating moments when you just need that horn to work, whether you’re on the road or out on the water!
Clean and Inspect Connections for Corrosion
When you’re keeping an eye on your push button horn switch connections, checking for corrosion is a must. Grab some wire brushes or cleaning wipes to tackle any gunk that might build up over time. Especially in marine applications, moisture can sneak in and wreak havoc—so inspecting those connections regularly ensures your horn will sound off when you really need it. You don’t want to be out on the water, hitting that button and getting nothing but silence, right? Keeping it clean now saves you from headaches later!
Ensure Waterproofing Integrity for Marine Use
To keep your push button horn switch functioning on a boat, ensuring waterproofing is key. Regularly inspect your switch and connections for wear or damage from moisture—you really don’t want to find yourself without a horn when you need it. Using quality waterproof products and sealing connections will help you avoid issues, keeping everything reliable when waves get choppy:
Check for any cracks or loose seals around the switch.
Make sure all wires are properly insulated and protected from moisture.
Replace any components showing signs of corrosion before they fail.
Additional Considerations for Automotive and Marine Applications
Wiring a push button horn switch for cars and boats has its own set of rules. For starters, automotive and marine wiring differ in terms of durability and environmental stresses. Using marine-rated components is non-negotiable for boats—they’re built to handle water and corrosion. Plus, you’ve got to keep safety regulations and standards in mind, ensuring your setup is not just functional but also compliant. Let’s look at these important topics closely!
Differences in Wiring for Automotive Vs Marine Use
Wiring a push button horn switch for cars versus boats has some key differences you need to pay attention to. In automotive setups, you’ll mainly deal with lighter loads and standard components, which makes things a bit simpler. But when you’re working on boats, you’ve gotta think about waterproofing and corrosion resistance—those marine environments can be brutal! So, make sure to use marine-rated wiring and switches to keep everything running smoothly, even in rough seas.
Importance of Using Marine-Rated Components for Boats
Using marine-rated components for boats is essential to ensure longevity and reliability. These components are specifically designed to withstand harsh marine environments, protecting against corrosion and water damage. By investing in marine-grade switches, wires, and connectors, you reduce the risk of failures that could leave you without a horn when safety is on the line.
Marine-rated components resist corrosion and extend the lifespan of your system.
They are built to handle the tough conditions found on the water.
Using these components helps avoid failures, ensuring your horn works when you need it.
Complying With Safety Regulations and Standards
When you’re wiring a push button horn switch, following safety regulations and standards is a must. This means ensuring your wiring and components meet specific codes for both automotive and marine environments. For example, using marine-rated parts on your boat is vital to avoid corrosion and ensure reliability—nobody wants their horn failing just when they need it. Always check your local regulations and make sure everything’s up to par; you’ll not only keep yourself safe but also avoid potential hassles down the road.
If you’re looking for more resources, start with recommended guides for DIY installations to help you through the process step-by-step. And if issues pop up, online forums and communities are great for troubleshooting—you’re not alone in this! For those tricky setups, don’t hesitate to reach out to professional services that can handle complex installations. Let’s dive into each of these topics for more practical insights!
Recommended Guides for DIY Installations
If you’re looking to boost your DIY skills, there are some great guides out there to help you wire a push button horn switch for your car or boat. Try checking out videos on YouTube—they break things down really well and show you exactly what to do step-by-step. Plus, online forums can be a lifesaver when you hit a snag; you can connect with others who’ve been in your shoes. Just remember, thorough research and practical resources can turn a complicated task into a fun project!
Online Forums and Communities for Troubleshooting
Online forums and communities can be a game changer when you’re tackling the wiring of a push button horn switch for cars and boats. Places like Reddit or specialized automotive and marine websites are filled with folks who’ve faced similar challenges and have valuable tips to share. You might find someone who struggled with the same issue and found a simple fix—so don’t hesitate to ask questions or read through threads; your solution might just be a click away!
Professional Services for Complex Installations
Sometimes, wiring a push button horn switch can feel overwhelming, especially if you’re staring down a complicated setup. If you’re feeling a bit out of your depth, don’t hesitate to reach out to a professional service. They have the skills and tools to tackle any challenging installations, ensuring your horn works flawlessly when you need it most.
Consider hiring professionals for complex installations.
Professionals bring expertise and specialized tools to the table.
A successful installation can save you from future problems.
Push Button Horn Switch | FAQs
What are the main components of a push button horn switch?
A push button horn switch typically includes a button mechanism, housing, contacts, spring, and wires. These components work together to ensure reliable operation and safety for automotive applications.
How can I wire a push button horn switch correctly?
To wire a push button horn switch, connect one terminal to the horn and the other to the vehicle’s power source, ensuring a secure connection. Always check for any shorts or loose wires before testing the switch.
What steps do I need to install a push button horn switch?
To install a push button horn switch, first disconnect the battery, then remove the old switch. Connect the new switch’s wires to the horn and power source, secure it in place, and finally, reconnect the battery. Test the function.
How do I test my push button horn switch after installation?
To test your push button horn switch post-installation, simply connect the power, press the button, and listen for the horn sound. If it works, you’re good to go; if not, check connections or consider a replacement.
What maintenance is required for a push button horn switch?
To maintain a push button horn switch, regularly inspect for dirt or moisture, ensure connections are secure, and test functionality. Replace any corroded components and lubricate moving parts as needed for optimal performance.
Tired of fiddling with your old ignition system and just want a quick start?
You’re in the right spot!
Installing a push button starter switch in your car not only makes starting your engine easy, but it can also give your ride a modern touch.
In this guide, we’ll walk you through the basics: a push button starter switch, how to prepare for the installation, and the steps to get it done. Plus, we’ll tackle common issues and highlight some cool customizations to up your game.
A push button starter switch is a sleek and modern way to ignite your car’s engine. Key features include easy control and compatibility with ignition coils, making your starting process simple. Upgrading to this system not only enhances convenience but can also help you jump start your car quickly. Ready to learn more about those benefits and practical tips? Let’s dive in!
Key Features of an Engine Starter Button
So, what makes an engine starter button such a big deal? First off, it’s about simplicity—no more fumbling with keys. This nifty little device replaces traditional ignition systems, so you just smash that start button auto and vroom, you’re off! Plus, when you’re parked on the side of the road, waiting for roadside assistance, it’s a lot quicker to get going. And for those of you who enjoy driving after dark, the start button pairs easily with your headlamp, making it a total win for nighttime adventures. Trust me, once you try it, your steering gets a whole new vibe!
Benefits of Upgrading to a Push Button Start System
Upgrading to a push button start system can totally change your driving game. You get a smoother start, especially handy if you have a manual transmission. It’s also secure; when combined with power door locks, you get extra peace of mind. You won’t have to worry about fumbling for a key anymore—just push a button, and you’re ready to roll. Plus, this system often includes a resistor and solenoid that enhance the overall efficiency of your ignition system, making sure your engine turns over without a hitch. Say goodbye to frustrating starts!
Preparing for Installation
Before diving into the installation of your push start ignition switch, you’ll wanna gather your tools and components. Safety comes first—don those gloves and goggles! Next, take a good look at your vehicle’s wiring diagram to avoid any mix-ups. This prep is key to making sure everything works smoothly, from the relay to the crimp connections.
Collecting Necessary Tools and Components
Okay, let’s get right into it. When you’re collecting your tools and components for the push button starter switch, you want to make sure you have everything ready to go. Grab a wrench set, wire cutters, and some heat-shrink tubing—that stuff is great for preventing corrosion and keeping those connections tight. And don’t forget a remote starter button if you’re feeling fancy! Plus, make sure to have some light handy so you can see what you’re doing, especially when dealing with those tiny threads and wires under the dash. Trust me, being prepared makes all the difference!
Safety Precautions to Follow
Alright, listen up! Before you dive into installing that push button starter switch, you need to take some safety steps. First off, disconnect the battery to avoid any surprises while you’re working with the ignition system—nobody wants a zapping experience. And while you’re at it, keep your work area clear; avoiding clutter means avoiding accidental gear shifts or triggering any sensors that could complicate your installation. Trust me, being safe will make the whole process feel a lot smoother and less stressful!
Safety Precaution
Details
Disconnect the Battery
Avoid shocks and ensure no power goes to the ignition system while you work.
Clear Work Area
Keep tools and other items organized to prevent accidents or gear shifts.
Use Protective Gear
Wear gloves and goggles to protect yourself from any debris or accidental sparks.
Understanding Your Vehicle’s Wiring Diagram
Understanding your vehicle’s wiring diagram is a game changer when installing that starter button. This diagram shows where all the wires go and how they connect to your ignition system, replacing that old car key system. Take a moment to figure it out before you start—you’ll avoid a ton of headaches down the road. Plus, if you run into trouble, an app install can give you extra guidance and insights to keep things on track.
Identify the wiring diagram specific to your vehicle.
Locate the wires connected to the ignition system.
Make sure to match the starter button’s connections correctly.
Step-by-Step Guide to Installation
First up, you’ll want to locate the starter wire in your vehicle, especially if you’re working on a Ford Fusion. It’s crucial for connecting the ignition switch. Next, we’ll dive into actually connecting the push button starter switch, securing those wires tight for safety. Once that’s done, you’ll test the setup—making sure everything works like a charm and your radio doesn’t go haywire when you hit the foot button. Ready? Let’s roll!
Locating the Starter Wire in Your Vehicle
Alright, so you’re on the hunt for that starter wire in your vehicle—let’s nail this down. Usually, it’s hiding behind your steering column or near the ignition switch. If you’re unsure, check your car’s wiring diagram or contact Langir for details. You might also need a computer to pull up schematics if you’re all about that tech life. Once you pinpoint it, connecting the starter button cover becomes a whole lot easier. It’s like finding a needle in a haystack, but hey, no pressure, right? Just take your time, and you’ll have it sorted in no time!
Connecting the Push Button Starter Switch
Connecting the push button starter switch is a breeze if you follow a few key steps. First, make sure your parking brake is engaged—safety first, folks! You’ll identify the starter wire, and then match it with the push button’s connections; this is crucial, especially for models like the Ford Mustang. Don’t forget to check the ohm rating to prevent theft and other issues down the road. Once everything’s snug and tight, you might find yourself feeling like a true car enthusiast as you rev that engine with style!
Step
Description
1
Engage the parking brake for safety.
2
Identify the starter wire connection.
3
Connect the push button starter switch to the wire.
4
Verify the ohm rating to reduce theft chances.
5
Tighten connections to ensure secure operation.
Securing the Wiring and Ensuring Proper Functionality
When securing the wiring for your push button starter switch, it’s all about making sure everything is tight and secure. Use heat-shrink tubing to protect connections, especially for the startwire—keeping those volt levels just right. If you’re integrating a smart key system, make sure it plays nicely with your setup; this can save you a headache later when your engine starter button just won’t reply. Give everything a good check before you close up; a quick test of the connections can save you from unwanted surprises down the road.
Testing the Push Button Starter Switch After Installation
Once you’ve installed your push button starter switch, it’s time to test it out. Start by checking all your connections to ensure they’re tight and secure. Then, turn the ignition to the on position and press the button—your fuel pump should activate, and you should hear the engine roar to life. If you’re rocking keyless entry systems too, make sure they play nice with your new setup. If you run into issues, don’t forget to check the fuse; a blown fuse can stop your switch from working, especially in SUVs where electronic systems can be a bit finicky. Before closing everything up, give it a few good tries to ensure reliable functionality:
Confirm secure connections for your push button starter switch.
Turn the ignition to the on position and press the button.
Listen for the fuel pump and engine response.
Check compatibility with keyless entry systems.
Inspect the fuse if issues arise during testing.
Common Issues and Troubleshooting
If your push button starter switch isn’t firing up like it should, don’t panic. First, check if the button is even getting power—no hot wire means no go. Next, let’s talk wiring problems; misconnection can be sneaky. Finally, make sure your setup plays nice with your vehicle’s electrical system. These insights will help sort out any hiccups you’re facing!
If your push button starter switch isn’t working, don’t throw in the towel just yet. First, check to see if the tool you used for installation is still in good shape—loose connections can be sneaky, especially in a Honda Accord. Sometimes, the issue might relate to the vehicle’s amplifier or the wiring; ensure everything is connected right and that you’re not accidentally shorting something out. If things still feel off, reach out to the National Highway Traffic Safety Administration for guidance or any recalls—better safe than sorry while you’re navigating the road!
Identifying Wiring Problems and Fixes
Identifying wiring problems with your push button starter switch can be a hassle, but you’ve got this! Start by checking the connections to see if any wires are loose—especially the metal connectors, which can cause all kinds of issues. If you suspect your factory wiring isn’t cutting it, double-check if a rectifier is involved, as faulty rectifiers can mess with power flow, affecting your starting system and even your power windows. If something feels off, like your lights flickering when you hit the button, it might be time to trace back those wires and make sure everything’s snug and playing nice.
Check metal connectors for looseness.
Inspect factory wiring for any issues.
Look for faults related to the rectifier.
Ensure secure connections to prevent power disruption.
Trace wires if you experience flickering lights.
Checking Compatibility With Your Vehicle’s Electrical System
Before you dive into the install, you gotta check if your push start system is on the same page as your vehicle’s electrical setup. Think of it like dating—if you don’t vibe, things can get messy. Grab some electrical tape just in case you need to secure those connections while you’re troubleshooting; nobody wants to deal with an engine start button cover that’s all loosey-goosey. Ensure your button start stop is compatible with your vehicle’s wiring to avoid any surprises down the road—because if something’s off, you’ll be saying goodbye to that sweet engine roar and hello to frustration!
Let’s talk enhancements for your push button starter system. You can include security features that protect your ride, making use of volts and a reliable starter solenoid. If you’re thinking of integrating an auto starter button with keyless entry, this makes things even smoother. Plus, can you add push start to a car that doesn’t have it? You bet! We’ll cover all this and more!
Adding Security Features to Your Push Start System
Adding security features to your push button starter switch setup keeps your vehicle safe and sound. Many folks don’t realize that integrating a firewall between components can prevent unauthorized access. Plus, if you’re a John Deere user (or just appreciate solid tech), enhancing your system with a smart key option could be a real game changer. Want to ensure your tools will protect you? Read more about easy upgrades you can make:
Implement a firewall to safeguard your ignition system.
Add a smart key for an extra layer of security.
Consider a vehicle alarm that ties into your push button switch.
Use tamper-proof connectors to secure your wiring.
Integrating an Auto Starter Button With Keyless Entry
Integrating an auto starter button with keyless entry can really streamline your driving experience, especially if you’re driving a Chevrolet Silverado. By connecting a constant voltage cable to your ignition system, you’ll set things up so that one push on the button and you’re good to go! This cool feature not only adds convenience but also enhances security, making it harder for anyone to just hop in and start your vehicle.
Connect the constant voltage cable to the ignition system.
Install the keyless entry system alongside the push button starter.
Ensure the setup is compatible with your vehicle model.
Test the system to confirm both features operate seamlessly.
Can You Add Push Start to a Car That Doesn’t Have It?
Yes, you can absolutely add a push start system to a car that doesn’t already have one. It might sound tricky, but with some solid wiring skills and the right components, you’re golden. Imagine tackling this project in your garage, right down to the brass connections that keep everything tight and tidy; you’ll be cruising around like a pro in no time. Just be sure to check some articles and guides specific to your car model to avoid any tire-flipping surprises along the way, especially if you’re in a colder place like Alaska where reliable starts are a must!
Final Tips
To keep your push button starter switch in top shape, regular maintenance is key. Check the electrical wiring for wear and ensure your connections are secure. If you’re unsure about any step, especially with diagram readings or tougher transmission issues, don’t hesitate to seek professional help. It’s better to get it right, especially in places like Ontario, where carbon buildup can be a real nuisance.
These tips will help ensure your system runs smoothly, and if you hit any snags, remember: reaching out for support can save you a lot of headaches.
Maintenance Suggestions
You want to keep your push button starter switch in great shape, right? Regular checks on the wiring diagram can help you spot wear and tear before it turns into a headache. Make sure connections for your starter push buttons are tight, and inspect your momentary starter switch to prevent burnout. If there’s any play in the push start button cover or wiring, that’s a sign to tighten things up—don’t let loose connections leave you stranded!
Regularly check the wiring diagram for wear and tear.
Ensure connections for the starter buttons are tight.
Inspect the momentary starter switch to prevent burnout.
Tighten any loose connections in the push start button cover.
Importance of Professional Help When Needed
Sometimes, tackling the installation of a push button starter switch can feel a little overwhelming. If you’re not super comfy with wiring or if your vehicle’s satellite radio and steering wheel system could get fishy, it’s smart to call in a pro. Keep in mind that a faulty setup can mess with your warranty if anything goes south, plus you don’t want to deal with blown diodes or wiring nightmares. Remember, it’s better to get it done right the first time—your car (and your sanity) will thank you later!
Push Button Starter Switch | FAQs
What are the benefits of using a push button starter switch?
Using a push button starter switch offers reliable control, ease of use, and enhanced safety. These switches minimize wear on components and reduce the likelihood of accidental activation, making them ideal for various industrial applications.
Do I need any special tools for the installation?
For most push button switch installations, you typically need basic tools like a screwdriver and wire strippers. If you’re customizing, consider a voltage tester for safety. Always check the specific product instructions for any extra requirements.
How can I troubleshoot issues with my push button starter switch?
To troubleshoot your push button starter switch, start by checking the power supply and connections. Ensure the contacts are clean and tight. If issues persist, test the switch with a multimeter for continuity and replace if necessary.
Can I customize my push button starter switch design?
Yes, you can customize your push button starter switch design to meet specific needs, including size, color, and features. Contact us for details on options and bulk orders tailored to your requirements.
What safety precautions should I take during installation?
When installing push button switches, always disconnect power sources, wear protective gear, and follow manufacturer instructions closely. Double-check connections to ensure safety and functionality before restoring power.
Are you struggling to wire a push button switch with an LED?
You’re not alone!
Many face challenges when trying to connect these switches safely and effectively. This guide will walk you through the must-know features of illuminated push button switches and provide clear wiring diagrams. You’ll learn step-by-step how to wire a 12V push button switch, using tools like a soldering iron, while also addressing common issues that might pop up. By the end, you’ll have the skills to tackle your own design projects, saving both time and money. Let’s get started!
The Illuminated Push Button Switch Features and Benefits
When you install an illuminated push button switch, you’re adding a smart feature to your setup. This switch not only operates like a regular light switch but also gives you a visual cue when it’s on or off. It’s a quick way to check your circuit without needing to flip a circuit breaker.
These switches are super convenient, especially in dark spaces. Imagine fumbling around, trying to find a regular switch—you’d rather see that glow. Plus, with a 12v push pull switch, you can control devices safely and effectively, keeping your electrical connection clear and intuitive.
Wiring an illuminated push button switch is straightforward. Just remember to hook up the ground correctly, and use a proper electrical connector for a secure fit. It’s all about making your work easier and your devices more reliable—without adding stress to your setup.
Preparing for Installation
First things first, gather your tools and materials for wiring that led push switch. You’ll need things like a screwdriver, wire connectors, and of course, the switch itself. Safety is key—make sure to switch off the power before you start. Next, keep in mind the right setup for your consumer electronics. You’ll want things ready to roll so your dashboard lights up just right. Let’s dive into the details!
Gather Required Tools and Materials
Before you dive into wiring that push button switch with LED, let’s get the essentials sorted. You need a handful of tools like a screwdriver and some wire connectors to keep everything together. Working with electricity is no joke. With the right gear, it’ll all come together like a breeze, making your project hassle-free and efficient.
Review Safety Precautions Before Wiring
Before you start wiring your push pull switch 12v, take a moment to ensure safety is your top priority. You’ll want to switch off any power to the circuit to avoid any nasty surprises. If you’re working with technology like Arduino, remember that even small mistakes can lead to big headaches—so double-check your connections as you go. Having the right brand of wire connectors can make all the difference, keeping everything snug and secure while minimizing risks. You got this!
Wiring Diagrams for Different Types of Illuminated Push Button Switches
You’re about to dive into some practical wiring diagrams for different types of illuminated push button switches. First up, the 4 pin push button switch wiring diagram will break down the basics you need for connecting your electronics with clarity. Then, we’ll tackle the 5 pin push button switch wiring diagram, showing you how to manage heat and function effectively. Let’s make sure your setup runs smoothly and efficiently!
4 Pin Push Button Switch Wiring Diagram
When dealing with a 4 pin push button switch wiring diagram, you’ll notice it’s pretty straightforward. Typically, you connect one pin to the power source and another to your device. The last two pins often handle the LED function—think of it as the switch’s way of giving you a friendly visual cue. If you’re troubleshooting any issues, remember to double-check the pin connections and make sure the LED is wired correctly for optimal optics. Waterproofing also comes in handy if your switch will face the elements, ensuring everything stays in good shape.
Understand the basic pin functions in the diagram.
Check power connections to ensure proper operation.
Make sure the LED connections are secure for clear optics.
Inspect for waterproofing features if exposed to moisture.
Troubleshoot connection issues carefully to avoid mistakes.
5 Pin Push Button Switch Wiring Diagram
A 5 pin push button switch wiring diagram helps you tackle your illuminated push switch project with confidence. When connecting a 12v momentary switch, you’ll typically have one pin for the power input, another for the output to your device, and the remaining three to handle the LED and dimmer functions. Just think of it as a straightforward way to control your truck’s lighting or other accessories, making sure you light up your dashboard with ease while keeping everything safe and functional.
Step-by-Step Guide to Wiring a 12V Push Button Switch
Let’s get down to business! First, you’ll connect the power source to your push button switch—easy peasy, right? Next up is wiring the LED light feature, so that color pops when you hit the switch. Finally, you’ll attach the output load to complete the circuit diagram and ensure everything runs smoothly. Buckle up; you’re about to light things up!
Connect the Power Source to the Push Button
Alright, it’s time to get that power source connected to the push button switch. Grab your tool and the yellow wire—it’s not just for show. Strip the ends of the wire and connect one end to your power source. Use electrical tape to keep things secure because a loose connection can lead to problems down the line. Make sure you’re aware of your electrical load, so you don’t fry anything when you flip that switch on!
Wiring the LED Light Feature
Now that you’ve got the power source set, it’s time to wire that LED light feature to your push button. This step is crucial for enhancing the usability of your machine. You’ll want to connect a resistor in line with the LED to prevent it from drawing too much current—because nobody likes a burnt-out light! Once you’ve secured those connections, your button will signal when it’s active, lighting up your workspace like a beacon of productivity. Trust me, seeing that glow will make everything feel just right.
Attach the Output Load
Now it’s all about attaching the output load to your push button switch. This step is key because it brings everything together, allowing your circuit to function in your vehicle. Make sure you’re using the right alloy wires for a solid connection—this helps avoid corrosion over time and gives you reliable feedback every time you hit that switch. Just remember, proper wiring is a fundamental concept in electrical engineering, and securing this part of the circuit means you’re one step closer to lighting up that dashboard with confidence!
Troubleshooting Common Issues
Let’s get straight to the point. You might run into a few hiccups while wiring that push button switch with LED. First, you’ll need to identify any wiring problems. Then, figure out how to resolve any LED malfunctions. Finally, it’s crucial to check your power supply connections. Each of these steps is key to making sure your setup is efficient and ready to go!
Identifying Wiring Problems
When you’re tackling a wiring project with an illuminated button switch, identifying wiring problems is key. If the LED isn’t lighting up or the relay isn’t activating your device, double-check your wiring diagram for correct connections. Common issues often stem from loose wires or incorrectly paired connections; for example, ensure that connections to your computer or power sources are snug—any gap might leave you in the dark. That’s why a good inspection can save you a lot of headaches:
Check all wire connections for security.
Review the wiring diagram for correct configuration.
Test the LED to confirm it’s functioning.
Ensure the relay is properly connected.
Look for any damaged wires that need replacement.
Resolving LED Malfunction
If your LED isn’t lighting up after wiring your 12v button switch, don’t panic; it’s fixable! First, check to see if your power supply is working; sometimes it’s as simple as a loose connection or a dead battery. If you’ve customized your switch with specific components, ensure that everything is compatible—like the plastic housing not interfering with the LED’s connections. If you’re working with Bluetooth or other tech, verify that those settings are correct too. Getting that LED to glow is all about making the right connections and ensuring everything’s in sync!
Checking Power Supply Connections
When it comes to checking power supply connections, you want to know your system is getting the right force to drive your LED push button switch. Grab your multimeter and test for voltage at the switch wiring—this will tell you if the current is flowing correctly. If there’s no reading, it might be time to troubleshoot; check your electronic component connections to see if any wires are loose or damaged. Trust me, verifying these connections can save you a world of frustration, ensuring you get the payment you deserve from your project without any surprises!
You’ve got questions, and we’re here to help! First up, find out how an illuminated push button switch works—it’s pretty nifty. Next, we’ll dive into the advantages of using 12V push button switches, including their reliability for things like doorbells or customer service applications. Can you use an illuminated switch with different voltages? Absolutely, but let’s break down how you can manage that safely, even with a fuse in the mix. You’ll get practical insights that make wiring a breeze!
How Does an Illuminated Push Button Switch Work?
An illuminated push button switch works by passing electric current from the power supply through its circuit when activated. When you press the button, it completes the electrical wiring, allowing voltage to flow, which lights up the LED indicator. This gives you a clear visual cue, making it perfect for home appliances or any device needing easy control, especially in dimly lit spaces. If you’re wiring it yourself, just keep in mind the basics of electrical connections for a seamless setup.
What Are the Advantages of Using 12V Push Button Switches?
Using 12V push button switches comes with some solid perks. For starters, they’re super versatile—you can easily hook them up to various devices like pumps and lights without worrying about compatibility issues. Plus, they often include features like built-in capacitors to help manage current flow, making your setup smoother. Not to mention, with the right ohm ratings, you get reliable performance that keeps your engine or system running like a champ. It’s all about simplicity and efficiency, right?
Can I Use an Illuminated Switch With Different Voltages?
Absolutely, you can use an illuminated switch with different voltages, but you need to be careful. When you’re experimenting, make sure the actuator or sensor connected is rated for the voltage you’re using—this helps prevent any short circuits. And hey, if you’re unsure, grab your screwdriver and check how everything’s wired; it’s better to double-check than to deal with a blown setup!
What are the benefits of using an illuminated push button switch?
Illuminated push button switches enhance visibility in low-light settings, ensuring easy operation. They also provide clear status indicators for devices, improving user awareness and safety—making them ideal for industrial applications and user-friendly interfaces.
How do I prepare for push button switch installation?
To prepare for push button switch installation, gather your tools, read the manual, ensure the power is off, and check the wiring compatibility. This helps ensure a smooth and safe setup for your project.
Can you explain the different wiring diagrams for illuminated switches?
Illuminated switches come in various wiring diagrams. Key types include
Single Pole: Simple wiring for basic on/off control.
Double Pole: Controls multiple circuits with added safety.
Three-Way: Allows control from two locations.
each with unique configurations.
What is the process for wiring a 12V push button switch?
Wiring a 12V push button switch involves connecting the positive terminal to the switch, then linking the switch to the device’s positive side. Connect the device’s negative terminal to the power source’s negative. Simple as that!
How can I troubleshoot issues with my push button switch?
To troubleshoot your push button switch, check for visible damage, test the connections, and ensure proper voltage. If it’s unresponsive, consider replacing the switch or consulting a manufacturer for support and customization options.
How long can a metal pushbutton switch really last? This question often comes up for those looking to invest in reliable push-button switches for their products or projects. In this article, you’ll learn about the lifespan of metal pushbutton switches, the factors that influence their durability, and how common types vary in longevity. By understanding these key points, you’ll make more informed decisions and extend the life of your equipment. If you’ve been wondering about the reliability of steel or stainless steel switches, you’re in the right place. Contact Langir for expert insights!
Key Takeaways
Metal push button switches often last from 500,000 cycles to over a million cycles
Environmental conditions can greatly impact the longevity of push button switches in care settings
Regular maintenance is key for extending the lifespan of metal push button switches
Selecting high-quality materials increases the durability of switches in demanding environments
Implementing proper care strategies can prevent premature failure of push button switches
What is the Lifespan of Metal Push Button Switches
When considering the lifespan of a stainless steel push button switch, it often ranges from 500,000 to over a million cycles. This durability makes the metal pushbutton switch a reliable choice for various applications, ensuring you won’t be replacing it anytime soon.
For industries that require immediate and dependable performance, the metal emergency stop button is designed to withstand rigorous use. These buttons are built tough to handle extreme conditions, meaning they can last years in demanding environments.
If you opt for a stainless steel momentary push button switch, you’ll find they offer similar longevity. Their robust construction aims to deliver consistent performance, making them ideal for both commercial and industrial applications.
Factors Influencing the Lifespan of Metal Push Button Switches
Several important factors affect how long metal push button switches can be used, especially in settings like nursing and health care. Environmental conditions, user interaction, electrical load specifications, mechanical design, and maintenance practices all play key roles. Understanding these aspects will help you ensure optimal performance and longevity for your switches in various applications, including patient care and education.
Environmental Conditions
Environmental conditions play a significant role in the lifespan of your metal push button switch. If you’re working in a healthcare setting, for instance, factors like humidity, temperature, and exposure to cleaning chemicals can affect durability. Caregivers need a switch that can withstand these elements, particularly in environments governed by Medicaid regulations where reliability is crucial for patient safety and effective care.
User Interaction and Frequency of Use
User interaction and frequency of use play significant roles in determining the lifespan of metal push button switches. When you consistently push a button, the actuator experiences wear, which can lead to issues such as reduced hardness and increased susceptibility to corrosion over time. Balancing usage with quality, especially in high-demand environments, is key to maximizing productivity while ensuring your switches remain reliable and functional for the long haul.
Electrical Load and Specifications
The electrical load on your metal push button switch plays a huge role in determining how long it will last. If you’re constantly pushing a switch under heavy weight, that increased wear can wear down the contacts faster than expected, leading to a need for replacement sooner rather than later. Pay attention to the specifications of the switch to ensure it can handle the required voltage and current to avoid issues like solder failure, which could also shorten the lifespan of the buttons you rely on:
Understand the electrical load your switch will experience.
Choose models designed to handle heavier loads if necessary.
Keep specifications in mind to match your application effectively.
Mechanical Design and Components
The mechanical design and components of metal push button switches greatly affect their lifespan. For instance, switches built with high-quality aluminium casings and precision-engineered internals can resist wear and tear better, making them suitable for use in nursing homes or environments with protective services. Ensuring that your switch meets health insurance standards can also protect you from potential issues, much like how you would expect a credit card to offer secure transactions.
Durable materials like aluminium enhance longevity.
Precision engineering ensures smooth operation.
Switches designed for specific environments maintain reliability in places such as nursing homes.
Maintenance and Care Practices
Regular maintenance and proper care play a significant role in extending the lifespan of your metal push button switches. To reduce stress on the system, ensure that any printed circuit board connected to the switch is free from dust and debris, as this can interfere with its function over time. It’s also important to inspect the voltage levels frequently; if they exceed the relay’s specifications, it could lead to premature failure of not just the switch but the surrounding components, including plastic casings that protect your hardware.
Maintenance Tip
Description
Regular Cleaning
Keep the area around the switch clean to prevent dust accumulation.
Voltage Checks
Monitor voltage levels to ensure they stay within recommended limits.
Component Inspection
Regularly check for any signs of wear on components like the relay and plastic casing.
Connection Quality
Ensure that all connections to the printed circuit board are secure and free from corrosion.
Stainless steel push button switches offer durability and reliability. These switches come in various forms, including momentary types, each with distinct features. You’ll learn about the specifications of the popular 16mm metal push button switch, the characteristics of 19mm momentary switches, and essential insights on metal emergency stop buttons. Keep in mind factors like screw compatibility and resistor quality for optimal performance and storage solutions against unexpected failures.
Overview of Stainless Steel Push Button Switches
Stainless steel push button switches are a solid choice for your electronics needs, combining durability with functionality. With features like LED lamps for visibility and energy efficiency, these switches are designed to withstand rigorous use while maintaining a sleek look. Whether you’re connecting wires for industrial applications or enhancing user experience in various settings, investing in these durable goods ensures long-lasting performance and reliability.
Features of Stainless Steel Momentary Push Button Switches
Stainless steel momentary push button switches incorporate a robust alloy construction, ensuring longevity in various applications. Their design is not just about looks; it includes features like a screw terminal for easy wiring, making installation hassle-free. Plus, these switches often have a water-resistant rating, so they can handle challenging environments, whether you’re using them in a wood workshop or an industrial setting.
Specifications of 16mm Metal Push Button Switch
The 16mm metal push button switch stands out in manufacturing settings due to its compact size and effective performance. Designed to handle extensive cycles, this switch can significantly reduce the risk of failure in machines that rely on constant engagement, making it a cost-effective choice for your operations. Its built-in light feature enhances visibility, ensuring you can quickly spot the switch even in low-light conditions, which is critical for maintaining workflow efficiency and preventing costly errors.
Specification
Description
Size
16mm diameter for compact applications.
Cycle Life
Up to 1,000,000 cycles for durable operations.
Electrical Ratings
Compatible with various voltage and current specifications.
Light Feature
Integrated LED light for improved visibility.
Characteristics of 19mm Momentary Switches
The 19mm momentary switch, often referred to as a mushroom switch due to its distinct shape, brings a reliable option for home care and industrial settings alike. Known for its laser-cut precision and silver finish, this switch stands up to challenging environments and resists rust, making it a long-lasting choice. When you need a dependable solution that maintains performance without frequent replacements, the 19mm momentary switch fits the bill:
Robust construction for extended use.
Distinct mushroom design for easy actuation.
Silver finish that resists rust and wear.
Laser precision for accurate performance.
Insights on Metal Emergency Stop Buttons
Metal emergency stop buttons are crucial in systems like pumps and power supplies, providing a quick way to halt operations for safety. When you need reliable performance, these switches deliver essential information to users about system status and emergencies. Knowing how to maintain your emergency stop buttons can enhance their lifespan, ensuring they function properly when it counts the most—especially in environments where a sensor failure could lead to safety risks.
The durability of metal push button switches hinges on several key factors. You’ll discover the strength and resistance provided by materials, the impact of corrosion and oxidation, and how performance holds up in extreme temperatures. We’ll also touch on lifecycle testing standards and compare these switches with non-metallic options, all while emphasizing their benefits in lighting and signal applications, including terms like “dielectric strength” and “signal lamp.” This sets the stage for understanding long-term reliability.
Material Strength and Resistance
The material strength of metal push button switches plays a crucial role in their durability and reliability, especially in applications like data processing and payment systems. For example, a stainless steel switch can withstand high consumption levels without compromising performance, ensuring that your equipment operates seamlessly. When used in conjunction with components like capacitors or valves, these switches can handle harsh conditions, providing you with confidence that they won’t fail when you need them the most.
Impact of Corrosion and Oxidation
The impact of corrosion and oxidation on metal push button switches can significantly affect their longevity and reliability. When exposed to moisture or harsh environments, these switches may suffer from deterioration, leading to malfunction. To preserve their lifespan, consider using switches with protective coatings that electrocute corrosion or implement anode protection strategies, which can help maintain connections and reduce wear over time.
Performance in Extreme Temperatures
When you think about the performance of metal switches in extreme temperatures, their construction truly matters. Brass and other durable materials hold up well, ensuring that the electric connections remain stable even in tough conditions. Whether you’re in a hot factory or a chilly outdoor setup, knowing how your switches compare in these temperatures can save you from potential failures down the line, keeping your operations smooth and effective.
Lifecycle Testing Standards
Lifecycle testing standards for metal push button switches are vital for understanding how long these components can be effectively maintained in various applications. These tests simulate real-world conditions to ensure that switches can handle everything from heavy electrical loads to consistent use in demanding environments like those involving contactors or joysticks. By adhering to rigorous lifecycle standards, manufacturers can provide assurance that their switches will perform reliably, catering to your specific needs—so you won’t have to worry about unexpected failures while managing advertising efforts or operating equipment.
Understand lifecycle testing standards to ensure reliable performance.
Recognize the importance of maintenance for electronic components.
Consider the impact of heavy electrical loads on the longevity of your switches.
Apply knowledge of testing to improve operational efficiency.
Gauge the suitability of switches for different environments, including products for joystick use.
Comparisons With Non-Metallic Switches
When comparing metal push button switches to their non-metallic counterparts, you’ll notice significant differences in toughness and durability. Metal switches, like those produced in Zhejiang, are engineered to endure harsh conditions and automation settings, making them a reliable choice for critical applications. Non-metallic switches may falter under extreme stress or environmental challenges, which can affect their lifespan and reliability; thus, understanding these variations can help you make informed decisions that align with your operational policy:
Metal switches are designed for high toughness and durability.
Non-metallic switches tend to weaken in demanding environments.
Choosing metal switches enhances reliability in automation systems.
Consider the performance differences when selecting switches for specific applications.
The average lifespan of metal push button switches can vary based on several factors. Typical lifespan estimates provide a baseline, but factors like environmental conditions and usage frequency can shorten that time. Smart design can enhance longevity, while real-world case studies show practical applications. Finally, maintenance tips can help you extend the lifespan of your switches, ensuring they perform well in your home appliance or concrete setting.
Typical Lifespan Estimates
The typical lifespan of metal push button switches can reach impressive figures, often between 500,000 cycles to over one million cycles, depending on quality and usage. When you consider factors like the environment in a factory or workspace, the right color and chrome plating can enhance durability and performance, ensuring that your switches not only look good but also stand the test of time. For optimal employment in diverse settings, understanding these lifespan estimates will help you make informed decisions that keep your operations running smoothly:
Quality of materials used affects longevity.
Regular maintenance keeps switches functioning at their best.
Environmental conditions play a significant role in durability.
Factors That Shorten Lifespan
Several key factors can significantly shorten the lifespan of metal push button switches. If you have high contact resistance or an incorrect torque applied during installation, it can lead to premature wear and tear. Moreover, environmental elements such as moisture can compromise the unit’s dielectric strength, resulting in failures and requiring you to replace them sooner than you’d like.
Factor
Impact on Lifespan
Contact Resistance
High resistance can lead to overheating and failure.
Torque Issues
Incorrect torque can lead to misalignment, causing damage.
Moisture Exposure
Can compromise dielectric strength, leading to malfunction.
Poor Maintenance
Neglect increases the risk of component failure.
Enhancing Longevity Through Smart Design
Enhancing the longevity of metal push button switches is key for ensuring they withstand frequent use. By opting for smart design features like nickel plating, you can improve corrosion resistance so that the switches function well in various environments, whether they’re for industrial machinery or health care equipment. Utilizing components such as high-quality nuts in assembly will prevent misalignment and maintain a consistent performance over time; a focus on these specifics can save you from the hassle of frequent replacements and help keep your mailing list up to date with reliable products.
Design Feature
Benefit
Nickel Plating
Improves corrosion resistance.
High-Quality Nuts
Prevents misalignment.
Robust Materials
Enhances overall durability.
Precise Engineering
Ensures smooth operation.
Real-World Lifespan Case Studies
Real-world examples shed light on how metal push button switches withstand various industries, from welding to crane operations. For instance, a crane company tracked the performance of their metal switches, finding that those rated for heavy-duty use consistently reset without significant wear after years of service; the reliability of these switches plays a critical role in managing inventory and ensuring safety. By examining scenarios like this, you can appreciate how choosing the right metal push button switch directly impacts your operations and helps address concerns about longevity and maintenance.
Maintenance Tips to Extend Lifespan
To keep your metal push button switches in top shape and extend their lifespan, focus on regular maintenance practices that suit your environment, particularly in directed care settings. For caregivers working in home care or office wellness environments, ensuring that switches are free from dust and debris can prevent unnecessary wear and tear. Simple steps, like routinely checking for signs of wear and making sure voltage levels remain within specifications, go a long way in effective care management and can significantly enhance the reliability and lifespan of your switches.
Application Insights for Metal Push Button Switches
Industries rely heavily on metal push button switches for various applications, from office equipment to emergency systems. You’ll see usage examples of on and off push button switches, and discover the advantages of momentary push button switches. Safety features in stainless steel emergency stop buttons are paramount, and we’ll also highlight future trends in push button technology, ensuring their extended lifespan in the market.
Industries Relying on Pushbutton Switches
Metal push button switches play a vital role in various industries, including healthcare and food service, where reliability is paramount. In settings like hospitals, these switches ensure medications are dispensed accurately, while in kitchens, they control tools and equipment efficiently under varying operating temperatures. Investing in quality switches not only guarantees a longer operational lifespan but often comes with a warranty, providing you peace of mind as you navigate the demanding needs of your industry.
Usage Examples of on and Off Push Button Switches
On and off push button switches are versatile components found in many settings, from light switches used in households to pressure controls in industrial machinery. For example, when you’re operating a cart in a warehouse, these switches help ensure smooth functionality and safety by allowing quick and easy access to control systems. Using a gasket in conjunction with these switches can offer added protection against environmental factors, extending their lifespan and reliability.
Advantages of Momentary Push Button Switches in Applications
Momentary push button switches offer significant advantages in various applications, particularly because of their efficiency and ease of use. Whether you’re working with iron machinery or intricate electronic systems, these switches can handle high-frequency operations without wearing out quickly. For brands that rely on secure access, integrating a momentary switch for password entry systems can enhance safety while ensuring smooth functionality.
Safety Features in Stainless Steel Emergency Stop Buttons
When considering stainless steel emergency stop buttons, safety features are paramount. These buttons often include a backlight, making them easily visible in low-light environments, which is crucial during emergencies. As a customer, when shopping for these components, you’ll want to pay attention to the electrical wiring compatibility, ensuring installation is straightforward and effective, preventing costly issues down the line. The price of these safety-focused buttons reflects their robust design and reliability, giving you peace of mind in high-stakes situations.
Future Trends in Push Button Technology
When we look at the future of push button technology, you’ll notice an innovative shift toward enhanced recovery systems and increased durability. Manufacturers are focusing on creating more durable options that can withstand breaking or wear from heavy use, ensuring they last longer in various applications. This emphasis on building robust, reliable systems means you can count on metal push button switches not only to perform consistently but to meet the demanding needs of your operational environment.
To make informed choices about metal push button switches, you’ll want to consider best practices for selecting quality products that resist damage from physical and chemical factors. We’ll discuss recommended brands and products, provide resources for further learning, highlight common FAQs about lifespan, and share contact information for expert guidance. Each of these topics aims to empower you as you navigate the world of metal push button switches.
Best Practices for Choosing Quality Metal Push Button Switches
When selecting durable metal push button switches, it’s essential to consider their specific application and environmental factors. Look for options that offer waterproofing and meet your weight requirements to ensure they function effectively in challenging conditions. A good practice is to examine the gear mechanisms involved; durable designs will maintain reliability even under frequent use.
Consider the application – choose switches tailored for your specific needs.
Ensure waterproofing to protect against moisture in demanding environments.
Check the weight capacity to avoid operational failures.
Examine the durability of the gear mechanisms for reliable performance.
Recommended Brands and Products
When looking for reliable metal push button switches, it’s worth checking out brands that integrate quality materials like silicone for durability and ease of use. For example, a switch designed with a pilot light not only provides you with visibility but also enhances functionality, making it a smart choice for your workforce. Additionally, products featuring a kill switch ensure safety in critical situations, while those suitable for use with a soldering iron facilitate easy installation and maintenance, helping you get the most out of your investment.
Resources for Further Learning
If you’re looking to deepen your understanding of metal push button switches, several resources can guide you. Check out datasheets specific to each switch model, as they include vital information about performance, voltage ratings, and electrode specifications. Additionally, reaching out to customer service teams can provide insights into product longevity; they can help with questions about applications like hoists or recommend using a voltmeter for maintenance checks.
Datasheets offer detailed specifications and performance guidelines.
Customer service can assist with specific inquiries and troubleshooting.
Using a voltmeter helps monitor performance over time.
Consider applications such as hoists for practical insights into durability.
Contact Information for Expert Guidance
If you need expert guidance about metal push button switches, especially those from reputable manufacturers in China, reaching out for help is a smart move. Knowing the right diameter for your switch or conducting regular inspection of the circuit can significantly extend its lifespan. Keep an eye on volt levels during use—having experienced professionals available to answer your questions can ensure that you always get honest advice and practical solutions, allowing your operations to run smoothly.
FAQs
What factors affect the lifespan of metal push button switches?
The lifespan of metal push button switches is influenced by factors like operating environment, requency of use, mechanical stress, and electrical load. Proper selection and maintenance enhance durability and reliability.
How long do metal push button switches typically last?
Metal push button switches typically last between 1 million to 10 million cycles, depending on factors like quality, usage, and environment. Choosing a reliable manufacturer ensures you get durable and dependable switches for your applications.
What are the common types of metal push button switches?
Metal push button switches come in various types, including momentary, latching, illuminated, and sealed options, each designed for specific applications like industrial machinery, consumer electronics, and automotive use, ensuring reliability and durability in operation.
How durable are metal push button switches compared to others?
Metal push button switches are highly durable compared to plastic alternatives. They resist wear, impact, and environmental factors, making them ideal for demanding applications. With proper maintenance, they often outlast other types, providing reliable performance over time.
In what applications are metal push button switches commonly used?
Metal push button switches are widely used in industrial machinery, automotive controls, home appliances, and electronic devices, providing reliable operation and durability in various environments. Their robust design makes them ideal for high-performance applications.